Summary
This document will guide you through the steps to enable multi-factor authentication and Single-Sign On for on-prem Microsoft SharePoint.
For instructions on how to protect Microsoft SharePoint Online, please view the step-by-step guide for Office 365 MFA and SSO.
System Requirements
- PhenixID Authentication Server 2.0 or higher
- Microsoft SharePoint 2013 or above installed
- Microsoft Active Directory Federation Services 2.0 (ADFS) or above installed
Instruction
Overview
This document will guide you through the steps to enable multi-factor authentication and Single-Sign-On for Microsoft Sharepoint (on-premise).
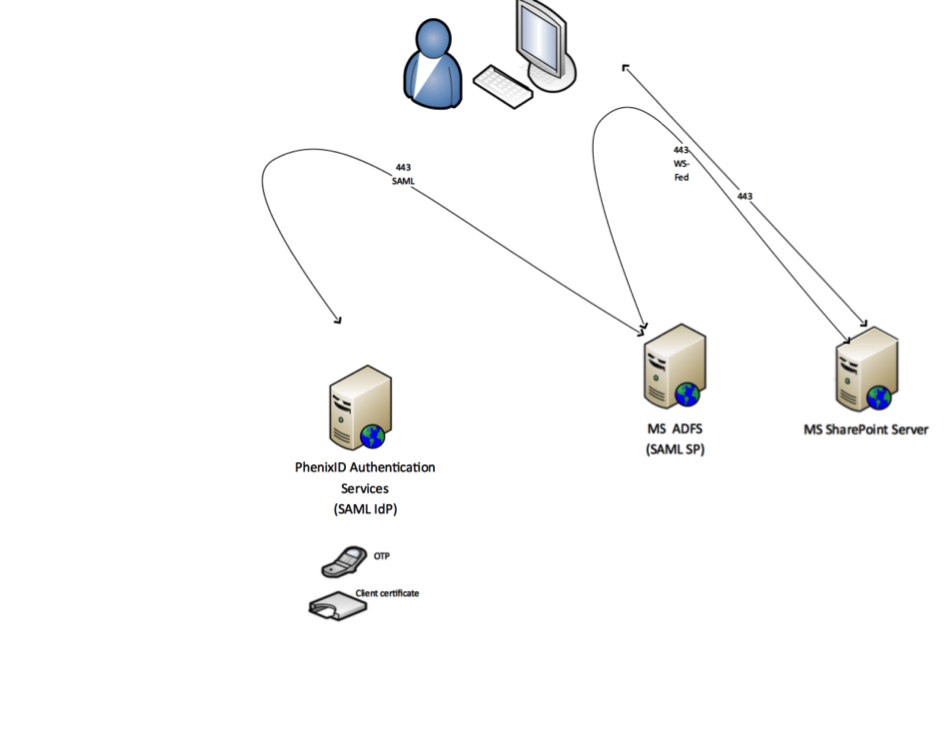
Flow
This picture describes the flow. An alternative to this setup is to skip the connection between ADFS and PhenixID SAML IdP and use PhenixID MFA Adapters for ADFS instead.
About this instruction
Domains used in this example:
ADFS domain: https://adfs.sharepointlab.se
Sharepoint domain: https://neo.sharepointlab.se
IdP domain: https://idp.phenixid.net
Please change these values in the configuration to suite your enviroment.
Configure PhenixID Authentication Services
- Setup PhenixID Authentication Services as a SAML IdP using one of the Federation scenarios described here. (If the desired authentication method is not provided by a scenario, use the documentation for the SAML authenticator here)
- Fetch the userPrincipalName attribute for the user.
- Use userPrincipalName as Name ID attribute.
- Go to Scenarios->Federation-> <newly_added_scenario> -> Identity Provider. Deselect “Require signed requests”. Save.
- Then export your SAML IdP metadata by going to the URL:
https://<YourServerDomainName>/saml/authenticate/<authenticator_alias>?getIDPMeta
and download the metadata to a xml file. - Export SAML metadata from ADFS server (browse to https://adfs.sharepointlab.se/FederationMetadata/2007-06/FederationMetadata.xml and save file)
- Use Scenarions->Federation guide to import ADFS SAML Metadata
Configure ADFS to trust PhenixID Authentication Services
- Open ADFS management console on ADFS server
- Click on Claim provider trusts
- Click Add new Claim provider Trust
- Select ”Import data about the claims provider from a file”
- Point to metadata file saved in previous step
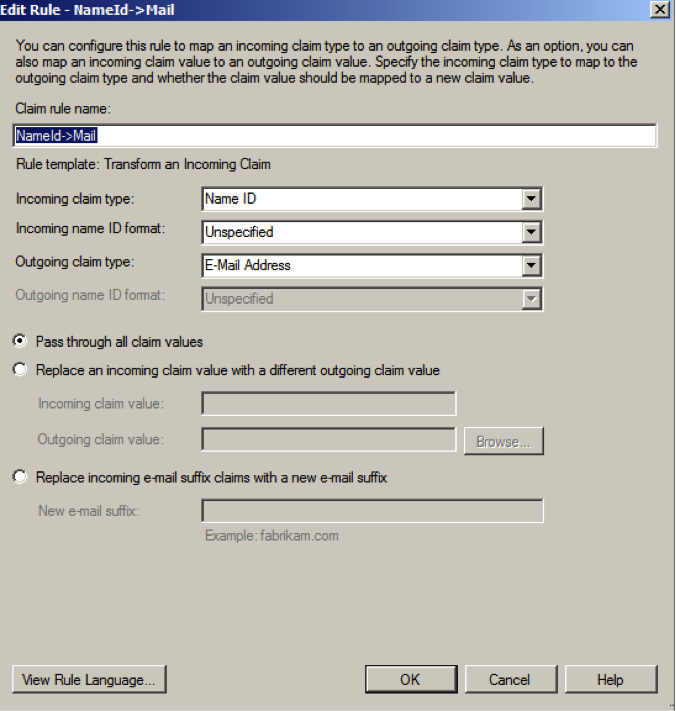
After the guide is finished, add one Acceptance transform rule:

- Click OK
- Select Properties on the Claim provider trust just added
- Click Advanced
- Change Hash algorithm to SHA-1
- Save
Configure ADFS to trust SharePoint
- Open ADFS management console on ADFS server
- Follow the instructions under ”Configure AD FS for a replying party” -> http://technet.microsoft.com/en-us/library/hh305235%28v=office.15%29.aspx#Phase2
- Point 11, endpoint URL value, set: https://neo.sharepointlab.se/_trust/
- Point 12, identifier value, set: urn:sharepoint:sitetest
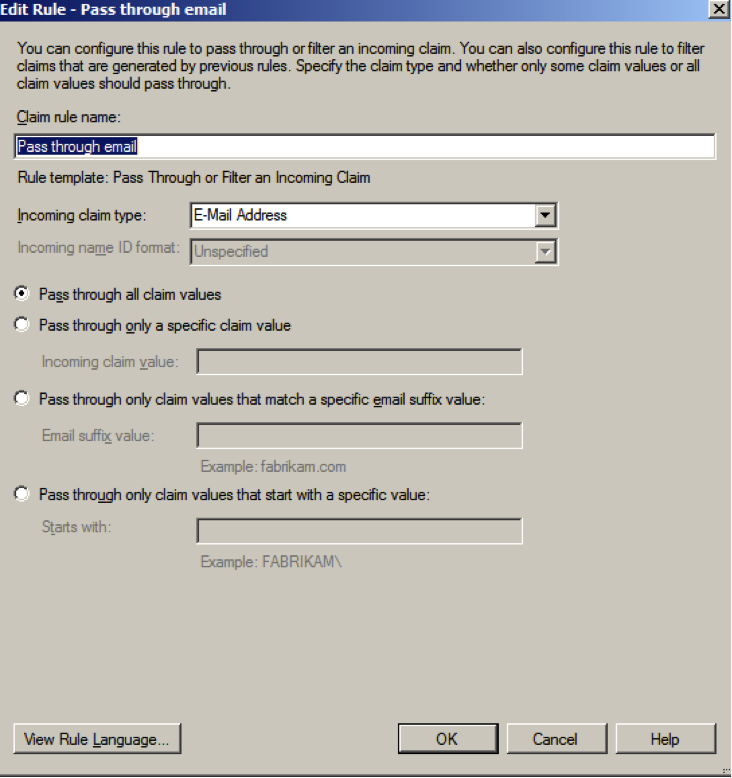
After finishing the guide, add two issuance transform claim rules:

- Follow the instructions below ”Export the token signing certificate” in http://technet.microsoft.com/en-us/library/hh305235%28v=office.15%29.aspx#Phase2
- Name the certificate file ”signingCertADFS.cer”.
- Copy the file to C:\ on the SharePoint server
Configure SharePoint to trust ADFS
- Open SharePoint management shell on the SharePoint server
- Execute the following powershell commands:
$cert = New-Object System.Security.Cryptography.X509Certificates.X509Certificate2(“c:\signingCertADFS.cer”)
New-SPTrustedRootAuthority -Name “Token Signing Cert” -Certificate $cert
$emailClaimMap = New-SPClaimTypeMapping -IncomingClaimType “http://schemas.xmlsoap.org/ws/2005/05/identity/claims/emailaddress” -IncomingClaimTypeDisplayName “EmailAddress” -SameAsIncoming
$realm = “urn:sharepoint:sitetest”
$signInURL = “https://adfs.sharepointlab.se/adfs/ls”
$ap = New-SPTrustedIdentityTokenIssuer -Name ADFSLAB -Description ADFSLAB -realm $realm -ImportTrustCertificate $cert -ClaimsMappings $emailClaimMap -SignInUrl $signInURL -IdentifierClaim $emailClaimmap.InputClaimType
- Logon to SharePoint central admin (https://neo.sharepointlab.se:21196) with an admin account
- Click Application Management- >Manage web applications
- Select application (in this example SharePoint – 80)
- Click Authentication providers
- Click Default zone
- Scroll down, select Trusted identity provider, select ADFSLAB
Test
- Browse to https://neo.sharepointlab.se/sites/sitetest
- Select ADFSLAB for authentication
- Redirect to ADFS
- Select organization, ” https://idp.phenixid.net”
- Redirect to IDP
- Authenticate
- If authentication is successful, redirect to ADFS
- Redirect to SharePoint
- User is logged in and permitted data is displayed
For troubleshooting and debugging, use Firefox add-in tool SAML Tracer.
[OPTIONAL] Role claim mapping
SharePoint offers the possibility to trust a role claim. By doing this, the SharePoint administrator can configure a rule which will give federated users access to SharePoint based on an attribute in the SAML assertion. No users need to be added to SharePoint/AD directly.
ADFS – Map SAML attribute to Role claims
This example will fetch the value in the SAML attribute AccessGroup and transform it to a role claim.
- Open ADFS mgnment
- Open Claims Provider Trusts
- Right-click the Claims Provider (idp) and select ”Edit claims rules”
- Add a new rule of type ”Send claims using custom rule”
- Enter a name for the rule
- Enter this in Custom rule:
c:[Type == “AccessGroup”]
=> issue(Type = “http://schemas.microsoft.com/ws/2008/06/identity/claims/role”, Issuer = c.Issuer, OriginalIssuer = c.OriginalIssuer, Value = c.Value, ValueType = c.ValueType);
- Save the rule
- Open Relying party trusts
- Right-click the relying party and select ”Edit claims rule”
- Add a new rule of type ”Passthrough or filter an incoming claim”
- Enter a name for the rule
- Select incoming claim type: Role
- Select passthrough all claim values
Adding role claim mapping to SharePoint
- Open Sharepoint 2013 management shell on the SharePoint server
- Execute the following commands on the server (in this example, the value ”Contribute” in the role claim will give the user access to SharePoint based on a SharePoint group called ”SiteTest Members”.)
#Add role claims handling to SharePoint
$ap = Get-SPTrustedIdentityTokenIssuer | where {$_.Name -eq “ADFSLAB” }
$ap.ClaimTypes.Add(“http://schemas.microsoft.com/ws/2008/06/identity/claims/role”)
$ap.Update()
$map1 = New-SPClaimTypeMapping -IncomingClaimType “http://schemas.microsoft.com/ws/2008/06/identity/claims/role” -IncomingClaimTypeDisplayName “Role” –SameAsIncoming
Add-SPClaimTypeMapping -Identity $map1 -TrustedIdentityTokenIssuer $ap
#Add mapping between role claims “Contribute” and SharePoint group “SiteTest Members”
#Users with Contribute value in role claim will be part of the group.
$web = Get-SPWeb “https://neo.sharepointlab.se/sites/sitetest/”
$Group = $web.SiteGroups[“SiteTest Members”]
$sts = Get-SPTrustedIdentityTokenIssuer “ADFSLAB”
$claimPrincipal = New-SPClaimsPrincipal -ClaimValue “Contribute” -ClaimType “http://schemas.microsoft.com/ws/2008/06/identity/claims/role” -TrustedIdentityTokenIssuer $sts
$newUser = New-SPUser -UserAlias $claimPrincipal.ToEncodedString() -Web $web
$group.AddUser($newUser)
Configure the SAML IdP
Configure the SAML IdP to add SAML attribute AccessGroup=Contribute based on local rules (this could be group membership, RBAC, ABAC etc).
If attribute AccessGroup=Contribute is not part of the SAML assertion, the user will be denied access to SharePoint.
DISCLAIMER
Information provided in this document is for your information only. PhenixID makes no explicit or implied claims to the validity of this information. Any trademarks referenced in this document are the property of their respective owners.The origin of this information may be internal or external to PhenixID. PhenixID makes all reasonable efforts to verify this information.
PhenixID - support.phenixid.se