Document version (last updated) : 2021, October 15th.
Prerequisite
- A PhenixID Identity Manager (IM) 5.6.6 or later running
- A PhenixID Identity Provisioning (PIP) 5.3.1 or later running
- NOTE: For better understanding of how PIP and PIP communicate using REST Web Service, please read PSD1062.
Overview
This use case demonstrate different use cases where PIM and PIP can be used in a school environment.
Use cases included
See screenshots further down in the document.
- Student
- Manage private mail and mobile
- Change password
- Teacher
- Manage passwords for its students, either individual or reset several/all at the same time
- Manage private mail and mobile for its individual students
- School administrator
- The same options as a teacher but for all students in a school
- Use Case administrator
- Role to setup the demo use case in your own environment (Active Directory)
Configuration
This PSD includes configuration so you can set this up in your own environment. First you need to download a ZIP file that contains a number of files. Open the different files and update them to map your environment, e.g change to your Active Directory name.
Use Cases
1. Download and extract configuration ZIP
Download the six files from the PSD1184 and add them to your server.
2. Create a PIM Use Case root folder
All Active Directory objects for all PIM/PIP Use Cases will be created under root of your domain and in an OU called PhenixID IM Use Cases. Copy and paste the name when you create since the use cases requires that it exits.
See screenshoot below.

3. Update PIM with files and configuration
3.1 – Add PIM configuration for use case
- From PIM folder, copy the four folders:
- UC – SchoolDemo – 1 – SchoolSynch
- UC – SchoolDemo – 2 – Student
- UC – SchoolDemo – 3 – Teacher
- UC – SchoolDemo – 4 – SchoolAdmin
- Paste them to your IM installation and the /role folder.
Example path to role folder \..\PhenixID\IM\customer\role - Open the DSEditor.properties for the UC – SchoolDemo – 1 – SchoolSynch role. Find and update below parameters to map your environment:
filter.PIPFilter.URL=http://127.0.0.1:8085 - Use for example Notepad++ to replace for all files in the four PIM roles DC=demo,DC=phenixid,DC=net with your AD domain name.
- Restart PIM and try verify that you can login using the four roles.
3.2 – Running the use case in Swedish (optional)
In the bottom of this document in the Misc section there is the Swedish translation words that you can add to your sv.lang file.
3.3 – Update theme (optional)
If you like students, teachers and principles to have different icons, in the bottom of this document in the Misc section there are some configuration to update the theme.
4. PIP files and configuration
4.1 – Import PIP – PSD1184.aax
- Open the Identity Provisioning Configurator
Make sure you have the folder PIP from the downloaded ZIP extracted and available. - Click File -> Import Objects
- Oen PIP folder and choose PIP – PSD1184.aax from the downloaded files.
- Click Import Objects
- Save the PIP configuration
4.2 – Change data source to map your Active Directory
- Open PIP configurator
- Expand Data Sources and click LDAP – PSD1184
- Change configuration to map you environment
4.3 – Import one Global parameter
- Open PIP configurator
- Click Tools -> Global Parameters -> Import
- Choose PIP – GlobalParameters.aax from the downloaded files
- Click Import Objects
- Change DC=demo,DC=phenixid,DC=net to map you environment
- Save the PIP configuration
4.4 – Copy data files to correct location
There are three data files used to setup a demo environment.
- From the downloaded files, copy the three *.CSV file to C:\temp
4.5 – Verify port for PIP web service
- Open PIP configurator
- Click Tools -> Options
- In Web Service, change Port: to map you environment
For this use case we are using 8085 as REST WS port. You can also verify this in each DSEditor.properties for the different use case roles. - Save the PIP configuration
4.6 – Start the PIP web service
Either you start the PIP service or open PIP Configurator and start the Web Service manually and do Run Policy
5. Test the use cases
Below is a short description how to use the different roles. What they do is explained earlier in this document.
UC – SchoolDemo – 1 – SchoolSynch
This role is the only role that uses PIM and PIP to create and update data. Role 2-4 is only PIM.
There are two functions in this role:
- Manage school use case environment
Click the three first option one by one or select all three at once. This will create a root OU called PSD1184_SchoolUseCase and some demo user accounts.
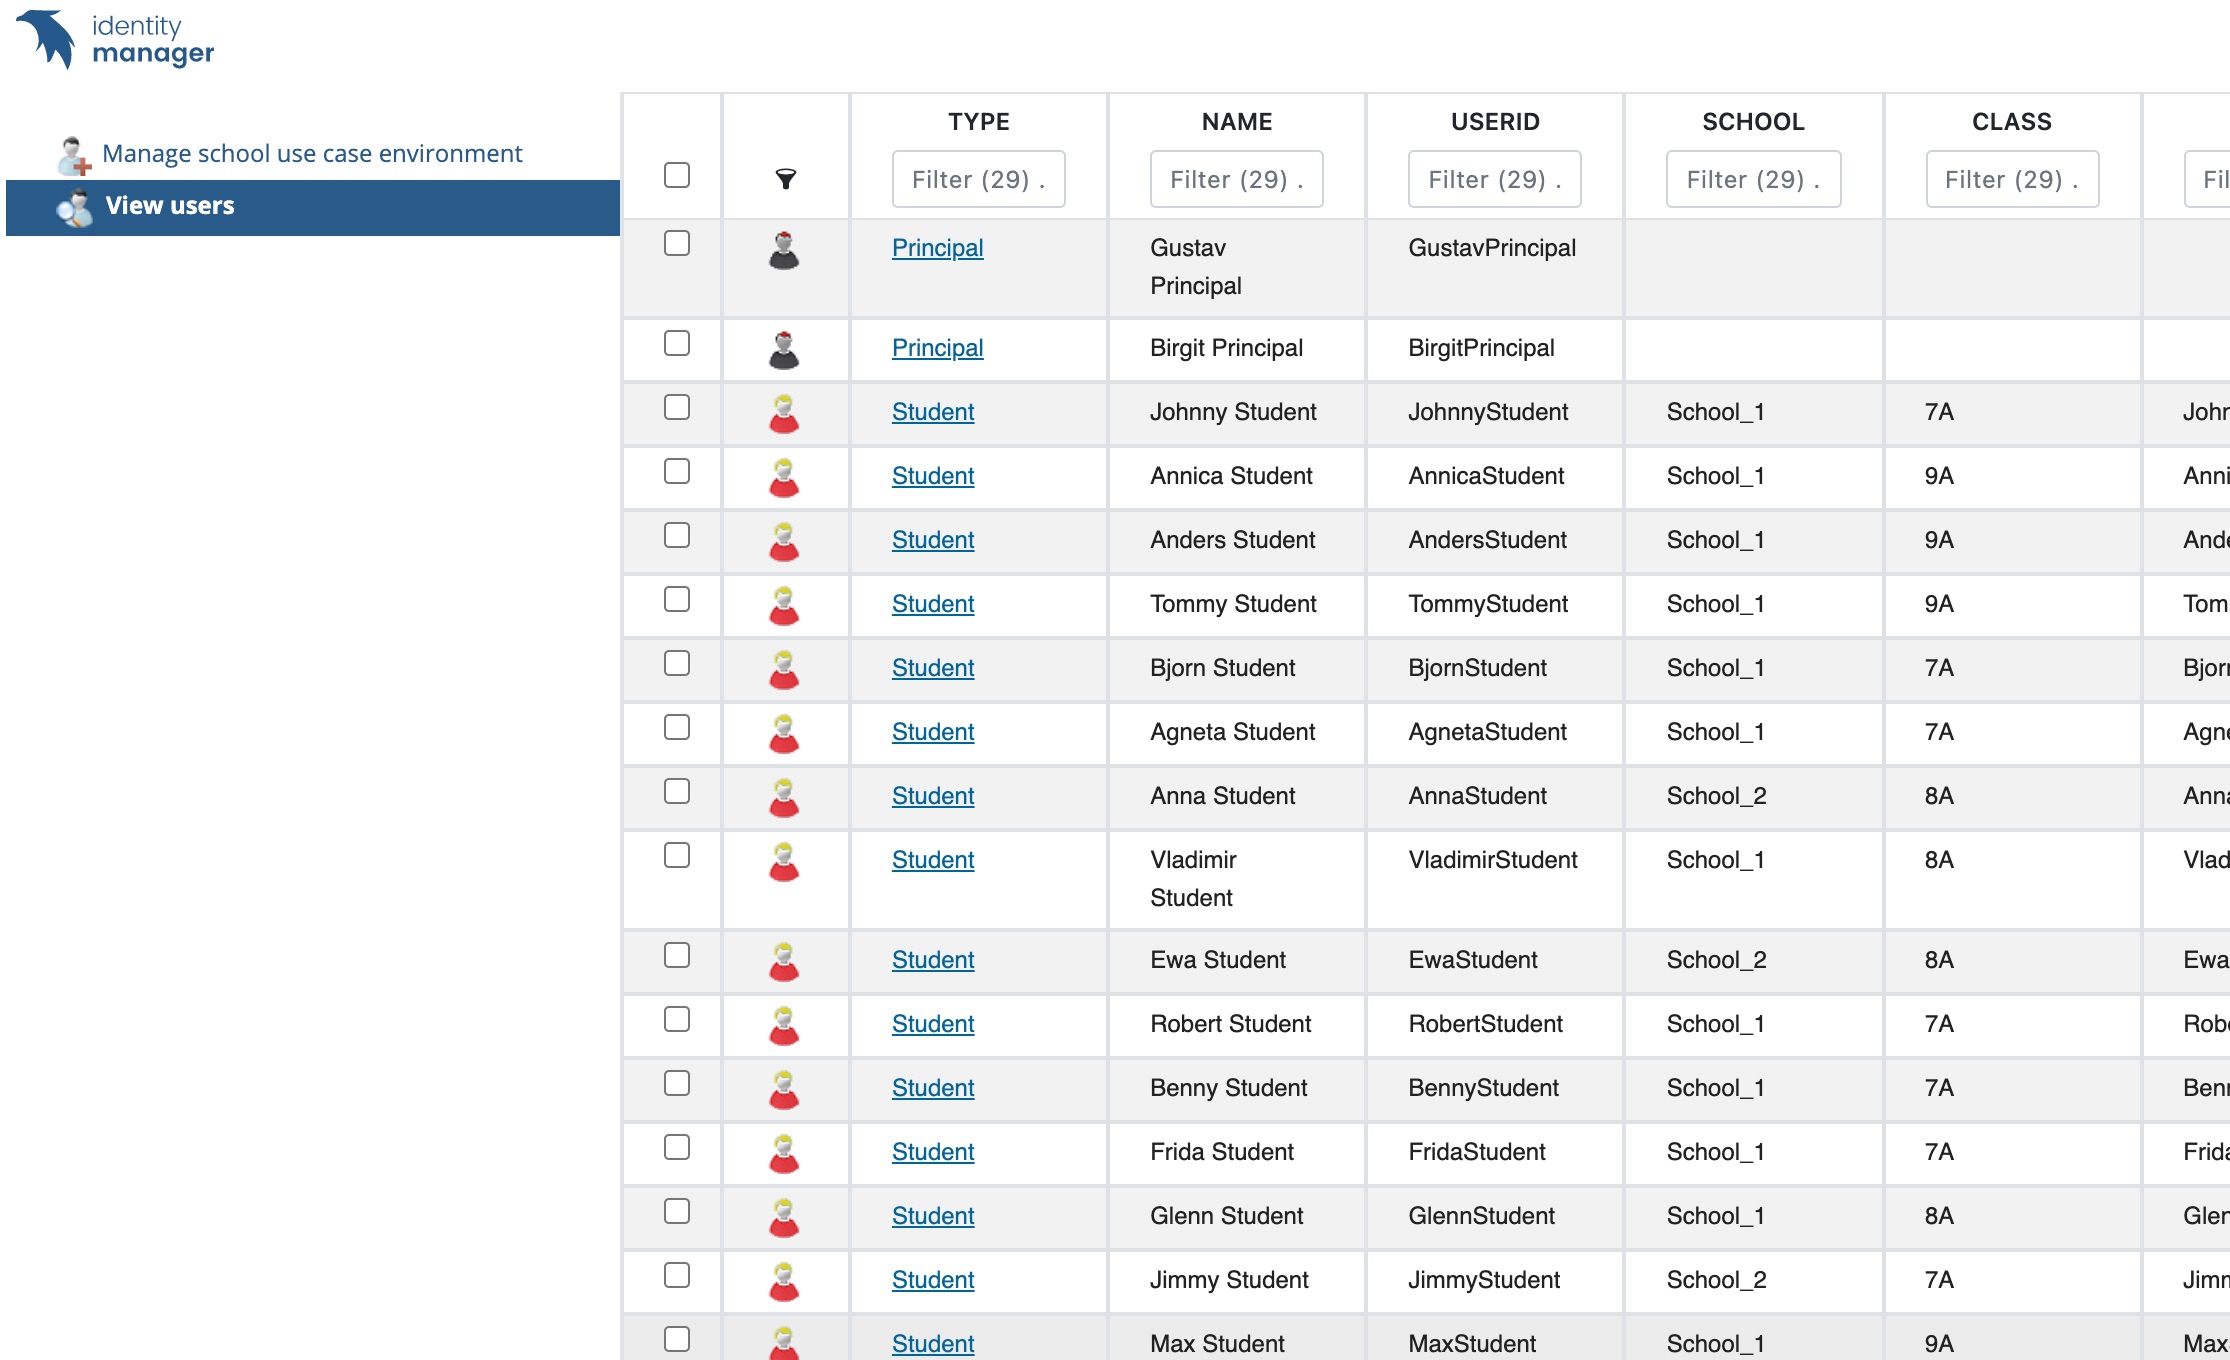
The last (fourth) option will remove OU=PSD1184_SchoolUseCase and all inside. - View users
Verify that the demo user accounts have been created. Note that by default all user are disabled, so you can select all user and choose edit to enable all.
This role is available for all users but the created the demo users.
So log in with any LDAP account except any PIP created once, for example your own admin account..
See below what the role looks like when demo users are created.
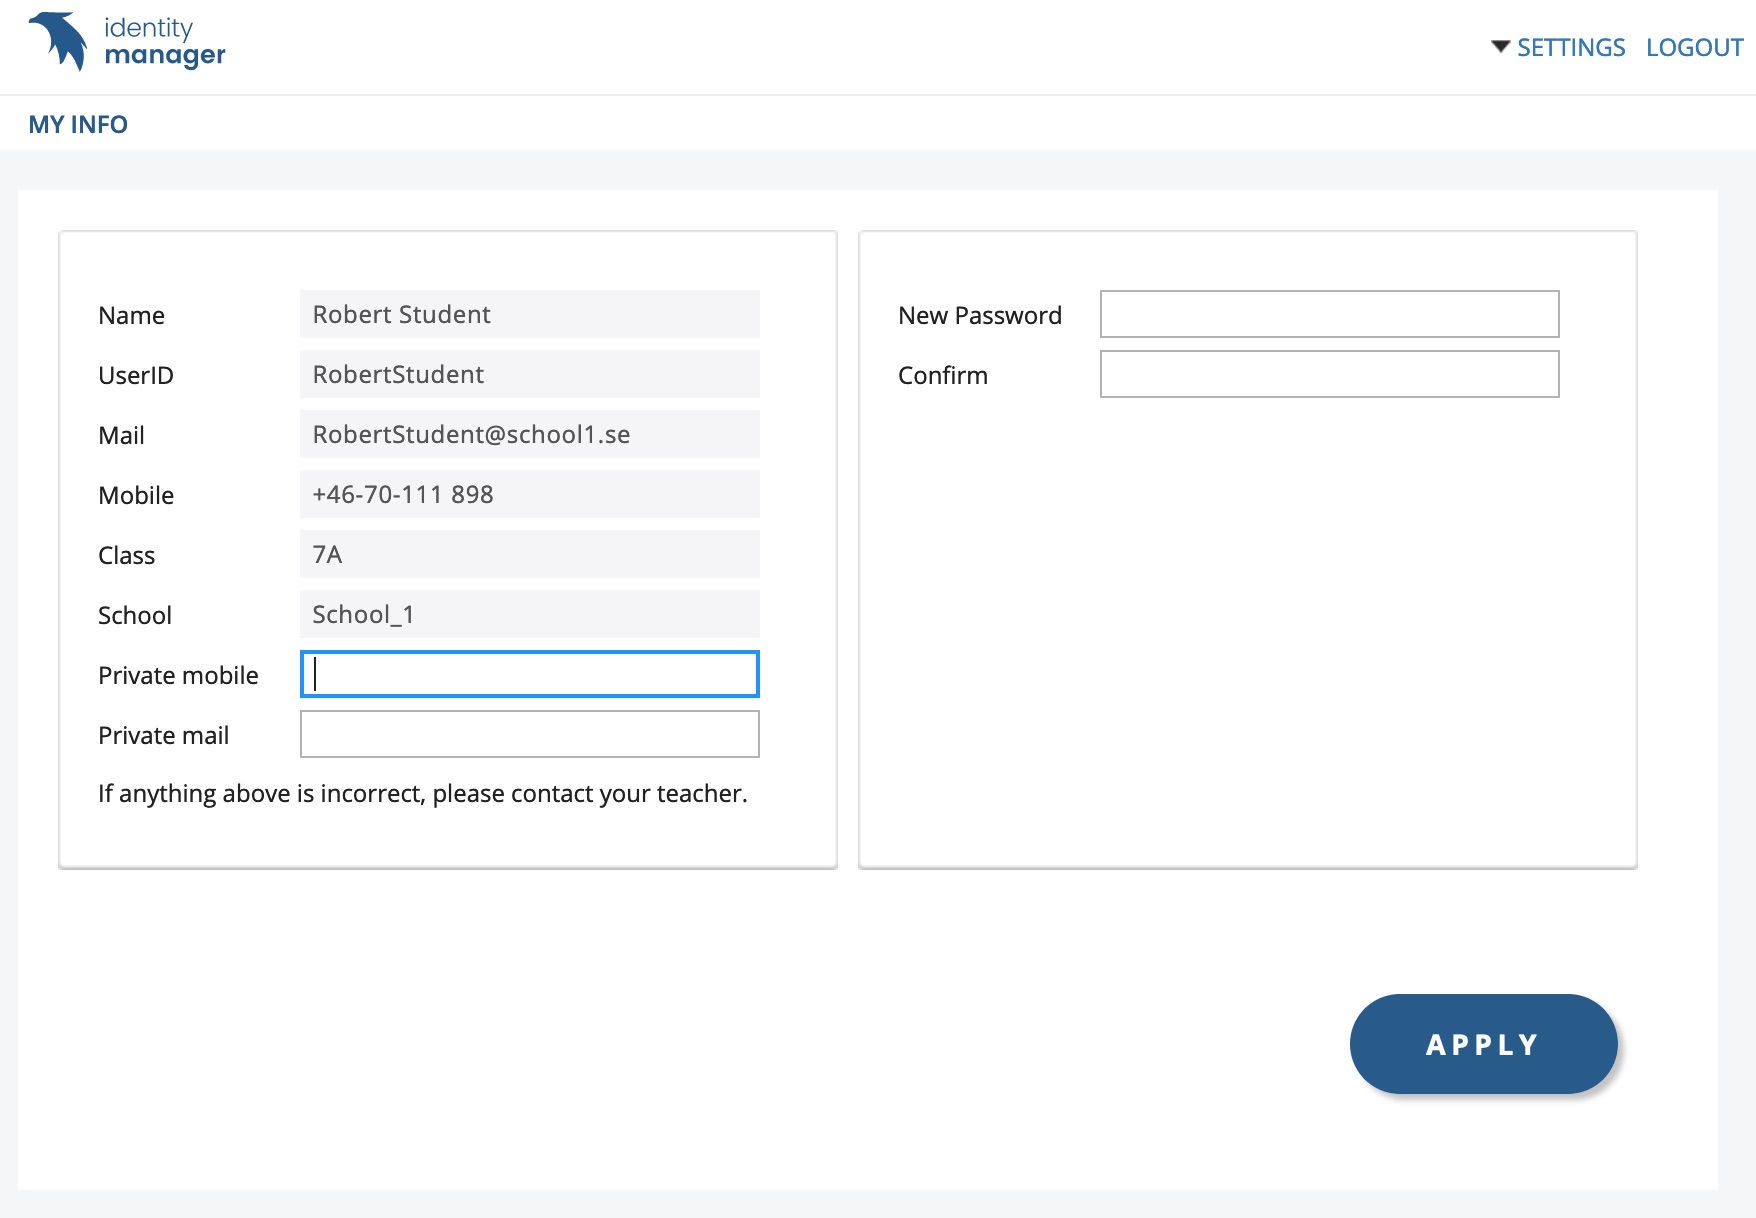
UC – SchoolDemo – 2 – Student
Login in as one of the students. Note that all accounts are disabled by default and needs to be enabled in previous role. All account has Password1 as password.
A student can update some data about it self and aslo reset its password.
See below when a student is logged in and can do some self administration.
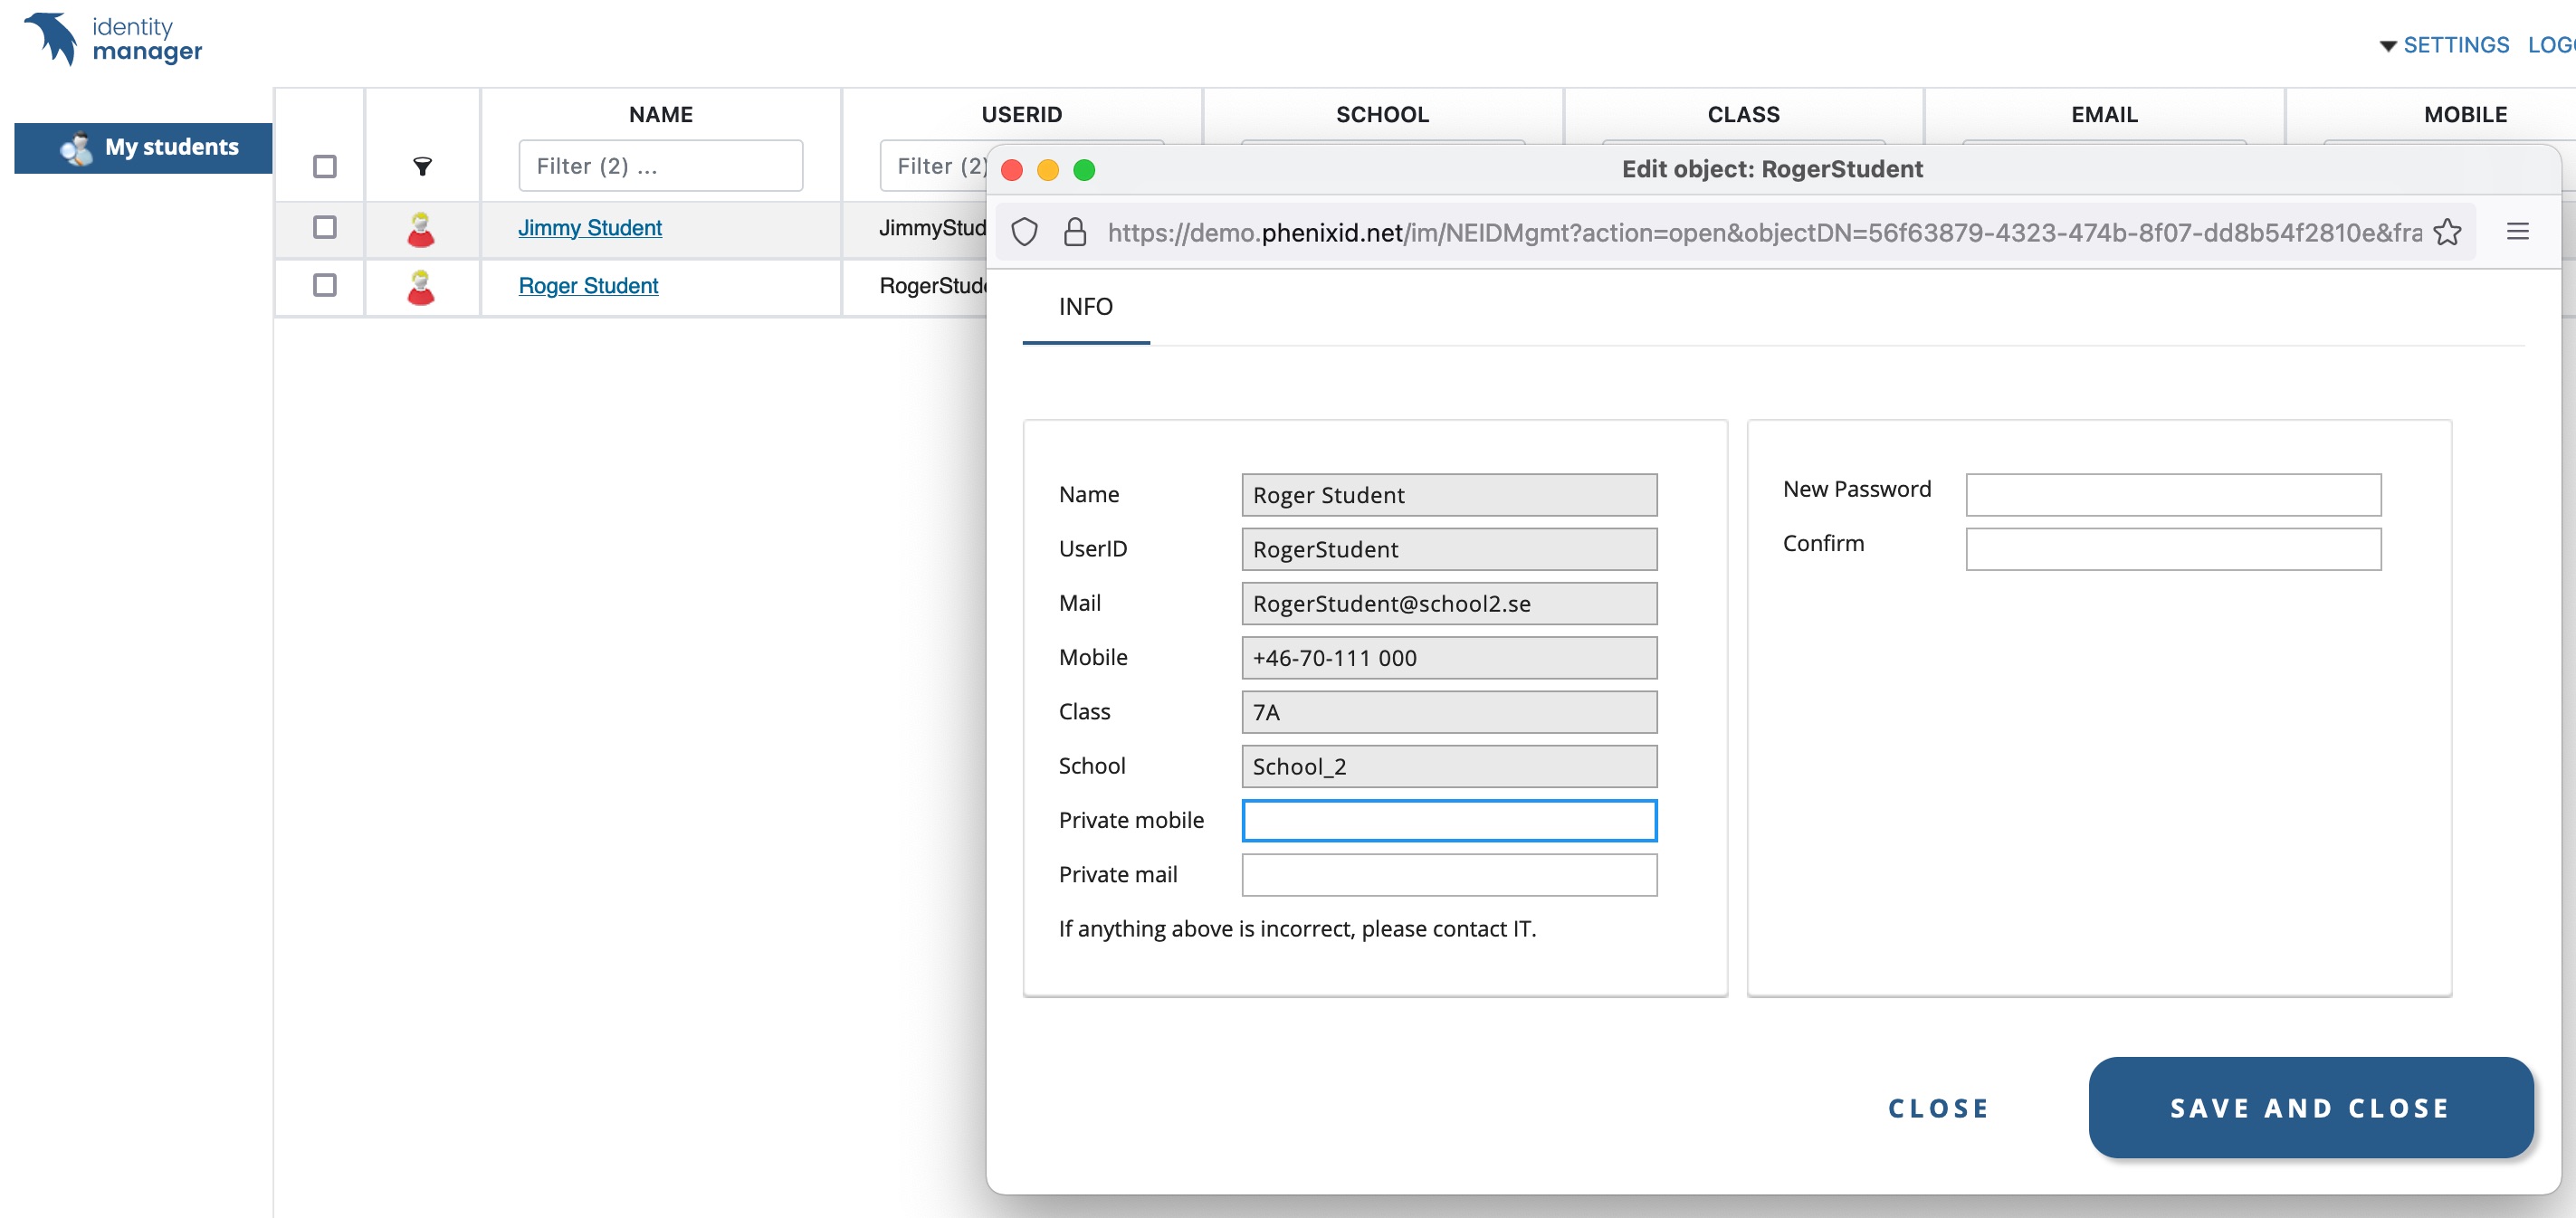
UC – SchoolDemo – 3 – Teacher
Login in as one of the teachers. All account has Password1 as password.
A teacher can manage some data for its students. The teacher can also reset a password of one of its students or all its students at once.
See below when a teacher is logged in and can see its two students and do some administration on them.
Note that saraTeacher is teacher for 2 classes at 2 different schools. Here we are using the new function to support multi-value attributes called MLDAP(attribute). This function was introduced with PIM 5.6.6.
UC – SchoolDemo – 4 – SchoolAdmin
Login in as one of the School admins. All account has Password1 as password.
SchoolAdmin can to everything that a teacher can but for all teachers and students in the schools.
See below when an SchoolAdmin is logged in and can do administration on all students in a school.

6. Misc
Swedish translation words
Add the configuration below to your sv.lang file if you like to test the use case with Swedish.
\..\PhenixID\IM\customer\lang
PIM needs to be restarted after you updated the file.
# School use case - PSD1184
Manage school use case environment=Hantera miljö för skolanvändningsfall
View users=Visa användare
Class=Klass
School=Skola
Private mail=Privat e-post
If anything above is incorrect, please contact IT.=Om något ovan är felaktigt, kontakta IT.
 Create School OU structure= Skapa skol OU struktur
 If you have a question about what you see, please reach out to your teacher.= Om du har en fråga om vad du ser, vänligen kontakta din lärare.
 Provision Users from School system= Provisionera användare från skolsystem
 Map Students and Teachers to Classes= Mappa elever och lärare till klasser
 Remove School demo structure= Ta bort miljö för skolanvändningsfall
EXECUTE=UTFÖR
Manage passwords=Hantera lösenord
Manage account status=Hantera kontostatus
My students=Mina elever
Generate New Passwords=Generera nya lösenord
Save Passwords as PDF=Spara lösenord till PDF
Save Passwords as Excel=Spara lösenord till Excel
Confirm Change=Bekräfta ändring
Changes will take immediate upon execution=Ändring träder i kraft omedelbart vid Verkställ!
Execute=Verkställ
Name=Namn
Find user or class=Sök användare eller klass
* All schools=* Alla skolor
If anything above is incorrect, please contact your teacher.=Om något ovan inte stämmer, vänligen kontakta din lärare.
Find user=Hitta användare
First name=Förnamn
Last name=Efternamn
School Use Case OU structure was created successfully!<BR>=OU struktur för skolanvändarfall skapades!<BR>
Example school user objects created.<BR>=Exempel av skolanvändare har skapats!<BR>
Students and teachers mapped to school and classes!<BR>=Elever och lärare kopplades ihop med skola och klass!<BR>
School Use Case OUs and users was removed!=OUs och användare för skolanvändarfallet togs bort!
School Use Case OU structure was created successfully!<BR>Example school user objects created.<BR>=OU struktur för skolanvändarfall skapades!<BR>Exempel av skolanvändare har skapats!<BR>
School Use Case OU structure was created successfully!<BR>Example school user objects created.<BR>Students and teachers mapped to school and classes!<BR>=OU struktur för skolanvändarfall skapades!<BR>Exempel av skolanvändare har skapats!<BR>Elever och lärare kopplades ihop med skola och klass!<BR>
Creating object=Skapar objekt
If you click check below all selected students account will be enabled.=Om du klickar på kryssrutan nedan aktiveras alla valda konton.
If you click the check box below all selected students account will be enabled.=Om du klickar på kryssrutan nedan aktiveras alla valda studentkonton.
Enable accounts=Aktivera konton
<i>Note: This change will affect all selected users.</i>=<i>Denna ändring kommer att påverka alla valda användare</i>
Update several users=Uppdatera flera användare
# End of School use case - PSD1184
Theme
Add the configuration below to your theme.properties file if you like to test the use case with Swedish.
\..\PhenixID\IM\customer\theme\PhenixID
Note: Put the lines at the top of the theme.properties file.
PIM needs to be restarted after you updated the file.
(sn\=student)=red-user.png
(sn\=teacher)=blue-user.png
(sn\=principal)=grey-user.png
DISCLAIMER
Information provided in this document is for your information only. PhenixID makes no explicit or implied claims to the validity of this information. Any trademarks referenced in this document are the property of their respective owners.The origin of this information may be internal or external to PhenixID. PhenixID makes all reasonable efforts to verify this information.
PhenixID - support.phenixid.se