Summary
There are some scenarios where you might like to have an Microsoft IIS in front of your Apache Tomcat (IM)
- Hide your Tomcat (IM) from the browser clients
- Add a SSL certificate on another instance than your Tomcat
- Single Sign-On. This can be done in two ways:
- IWA. On the IIS you enable Windows Authentication to support Integrated Windows Authentication (IWA). If you already logged in to a Windows domain client you will automatically be logged in to IM.
- SAML SP. You choose on the IIS to add a SSL certificate and Anonymous as authentication. IIS will just be used to handle HTTPS traffic from the client and then redirect the communication to the Tomcat.
To have IM act as an SAML Service Provider is not covered in this document.
System Requirements
- PhenixID Identity Manager 5.4.1 or later. (since GhostCat vulnerability was discovered and IM 5.4.1 ships with a fixed Tomcat version we only recommend IM 5.4.1 or later for AJP integrations. IM 5.4.1 includes Apache Tomcat 8.5.53)
- Microsoft Windows Server 2019/2016/2012R2/2008R2 running IIS
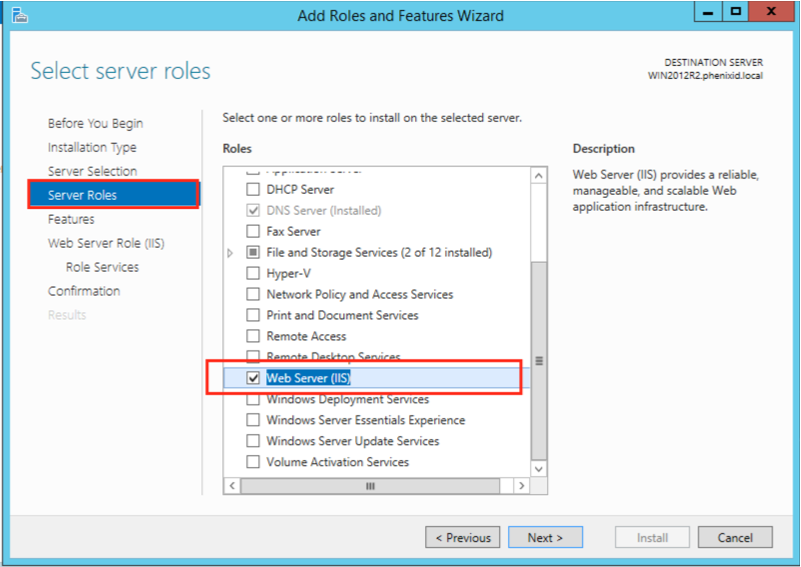
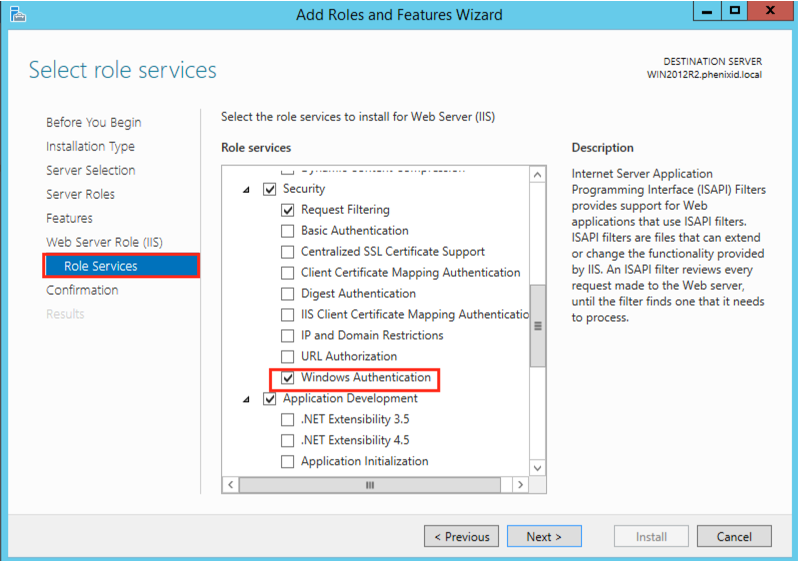
- IIS installed with the following roles and features:
- IIS Management Console
- ISAPI Extensions
- ISAPI Filters
- CGI
- Windows Authentication (optional)
- For Windows Authentication/Integrated Windows Authentication (IWA) the windows clients needs to be member of the same AD domain as the IIS server.
Instruction
Download Tomcat Connector for IM
Click the link to download Tomcat Connector for IIS and AJP.
Note: This document is only supported and tested for Apache Tomcat 8.5.53 or later.
PhenixID strongly recommend not to use any earlier version of Tomcat than 8.5.53.
Configure Microsoft IIS
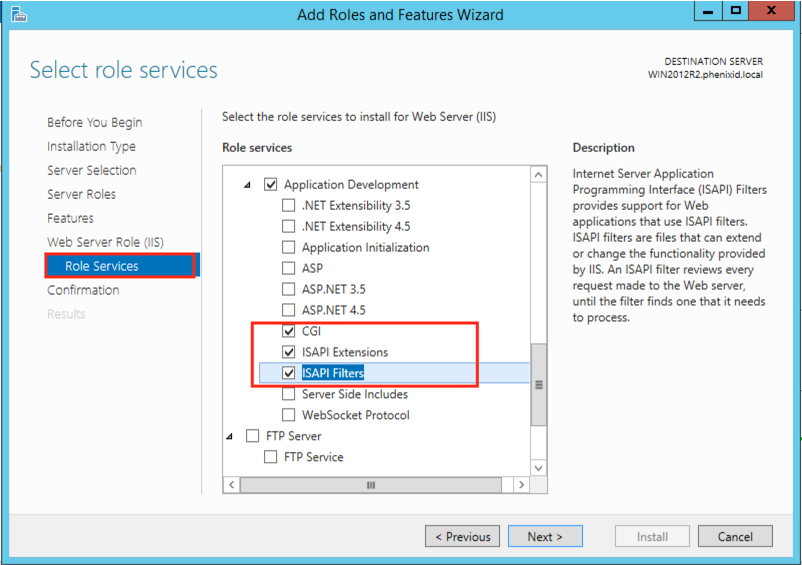
Add Microsoft IIS with the following features before
- Windows Authentication
- ISAPI Extensions
- ISAPI Filters
- CGI
See screenshots below for IIS configuration
Install Apache Tomcat Connector
Installation and configure IIS permissions
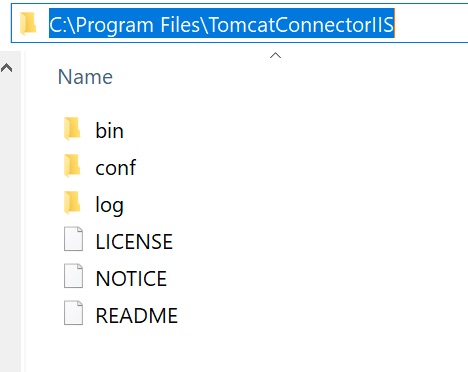
- Extract the previous downloaded file, TomcatConnectorIIS.zip, to C:\Program Files. Result should look like below.
- Add write permissions to the Apache Tomcat Connector for IIS log directory by running the following command as an administrator:
Important! Run the CMD as administrator!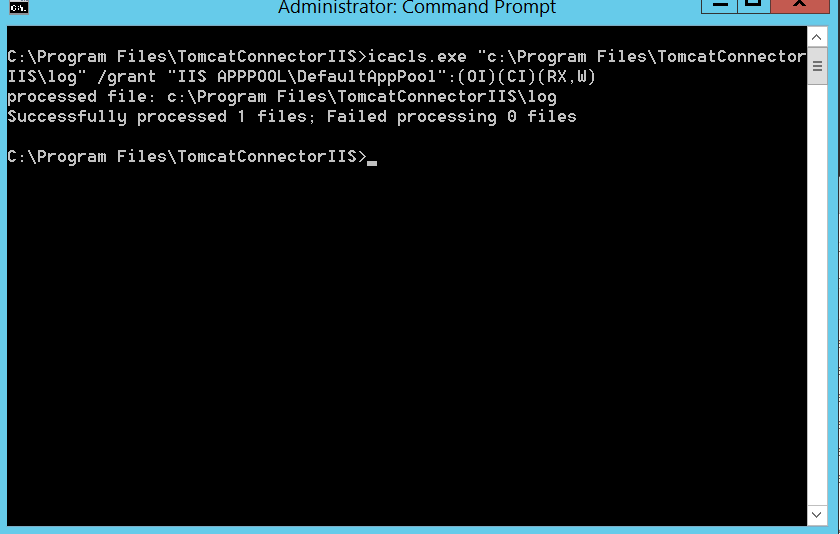
icacls.exe "c:\Program Files\TomcatConnectorIIS\log" /grant "IIS APPPOOL\DefaultAppPool":(OI)(CI)(RX,W)
Configure IIS Manager
Add the Apache Tomcat Connector for IIS as an ISAPI Filter
- Start the Internet Information Services (IIS) Manager
- Select “Default Web Site” and double click on “ISAPI Filters”
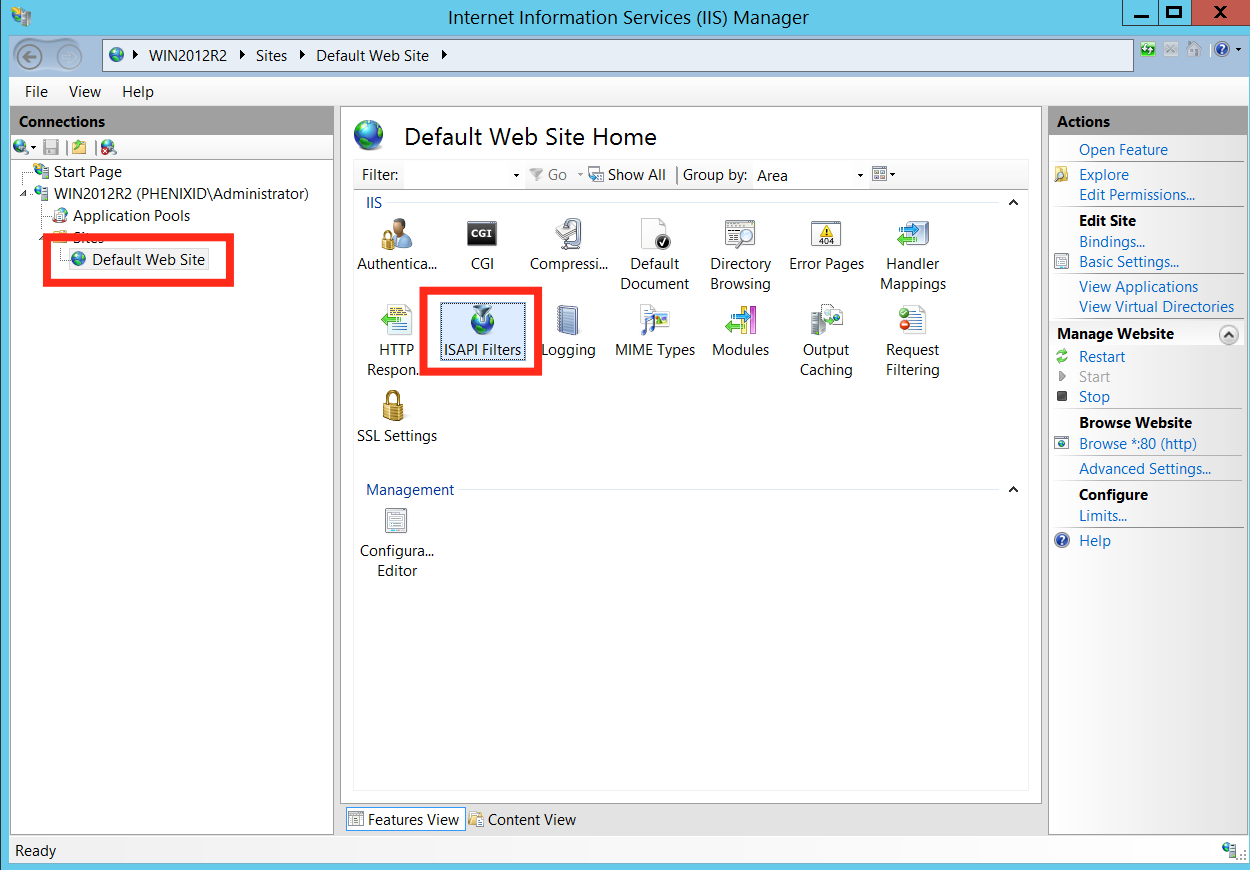
- Click “Add…”
- Type “TomcatConnectorIIS” as the Filter name
- Select the isapi_redirect.dll C:\Program Files\TomcatConnectorIIS\bin\isapi_redirect.dll

- Click OK
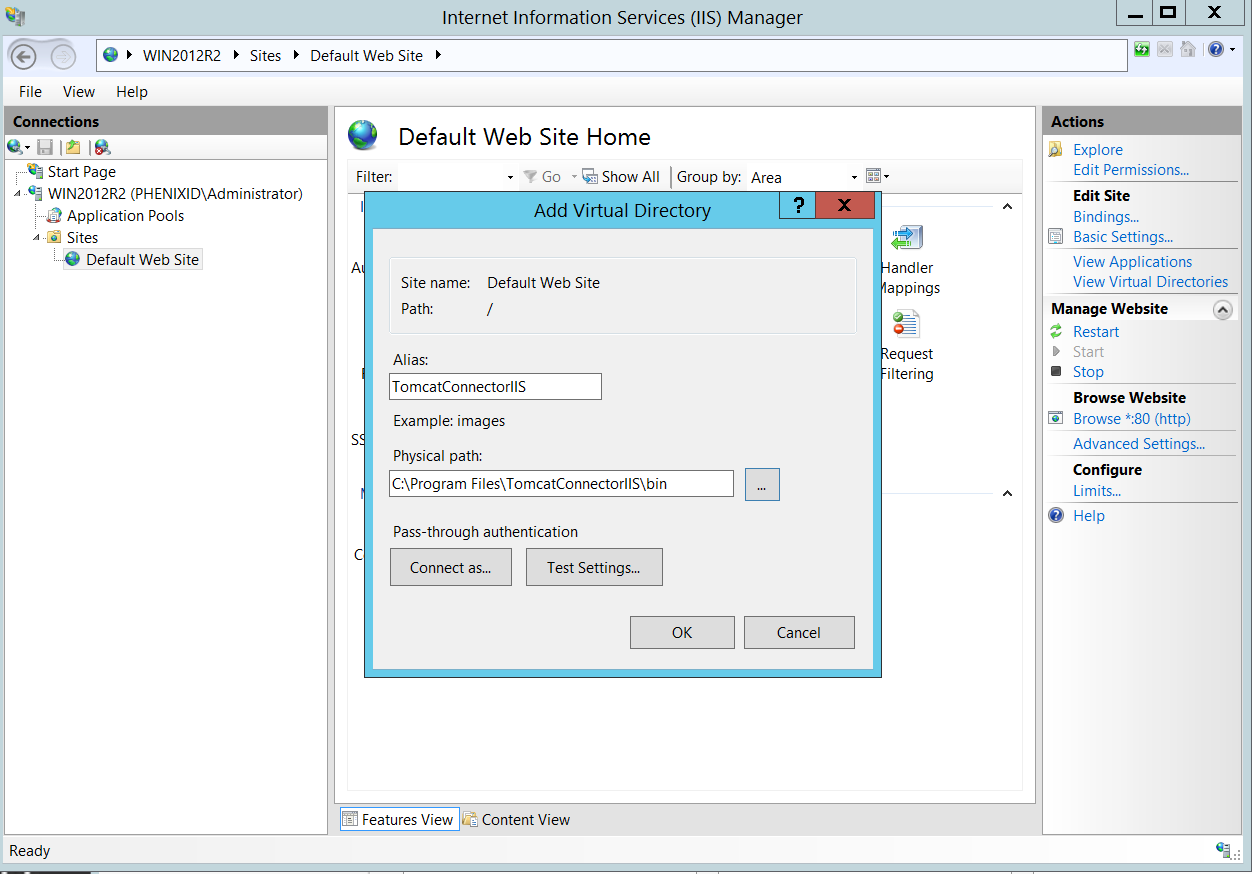
Add the Apache Tomcat Connector for IIS as a Virtual Directory
- Right click “Default Web Site” and select “Add Virtual Directory”
- Type “tomcatconnectoriis” as Alias (Make sure to type the name is lower case)
- Select C:\Program Files\TomcatConnectorIIS\bin as the Physical path.
- Click OK
Enable the ISAPI filter and set restrictions
- Select the server running IIS and open the feature “ISAPI and CGI Restrictions”
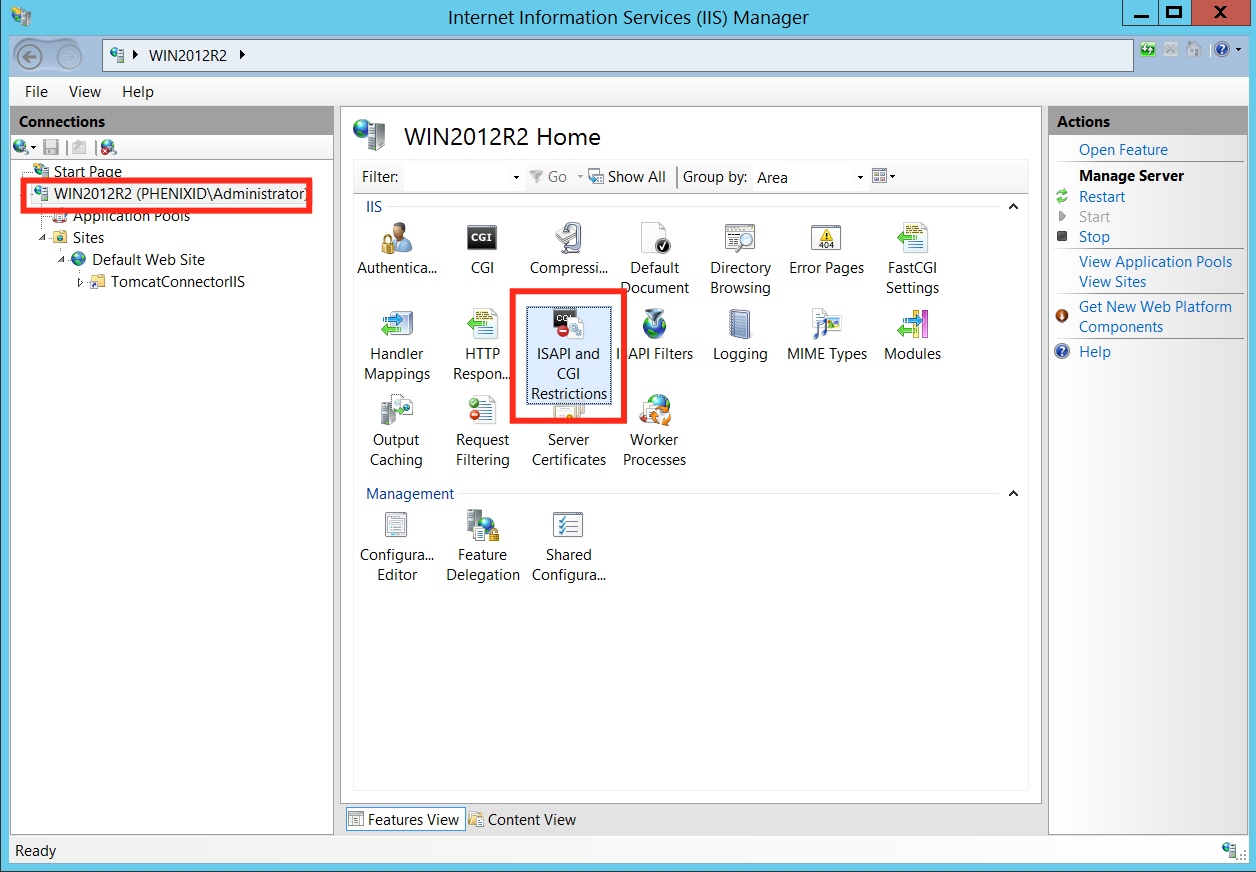
- Click “Add…”
- Select C:\Program Files\TomcatConnectorIIS\bin\isapi_redirect.dll as the ISAPI or CGI path
- Type “TomcatConnectorIIS” as Description.
- Tick the checkbox “Allow extension path to execute”
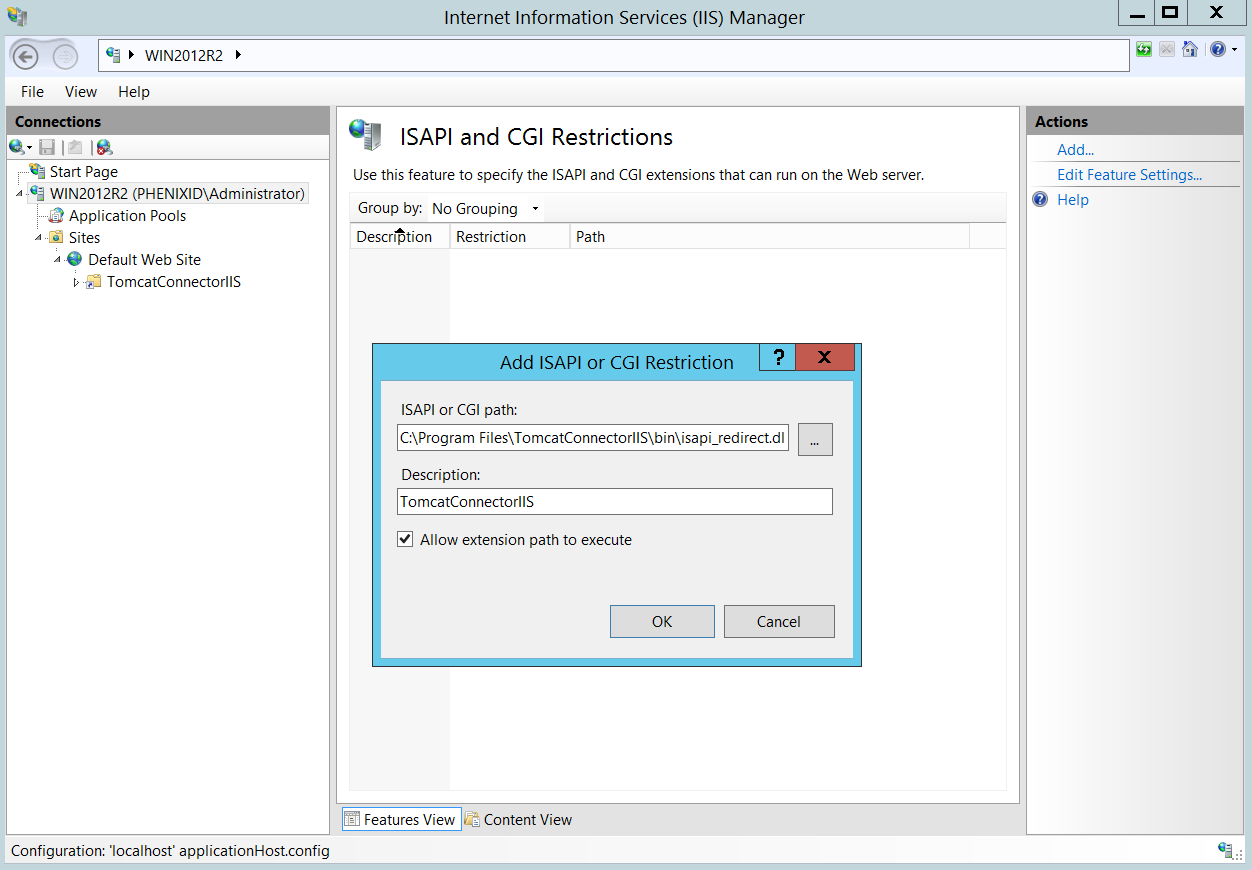
- Click OK
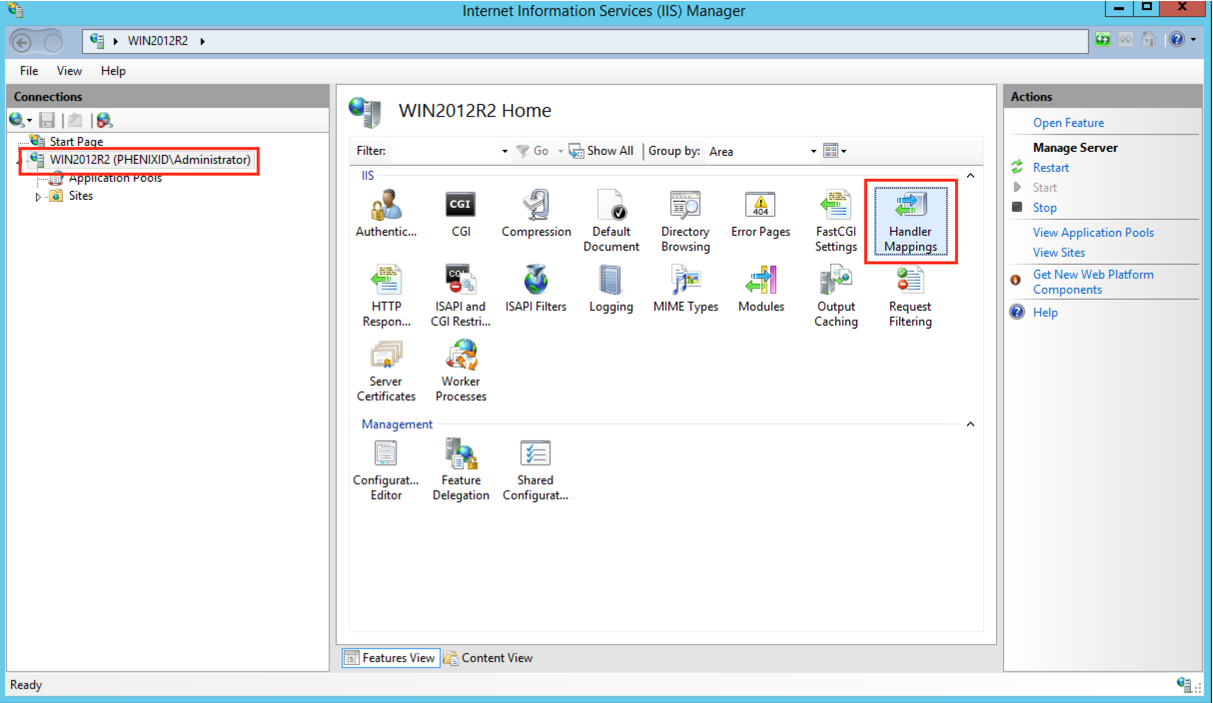
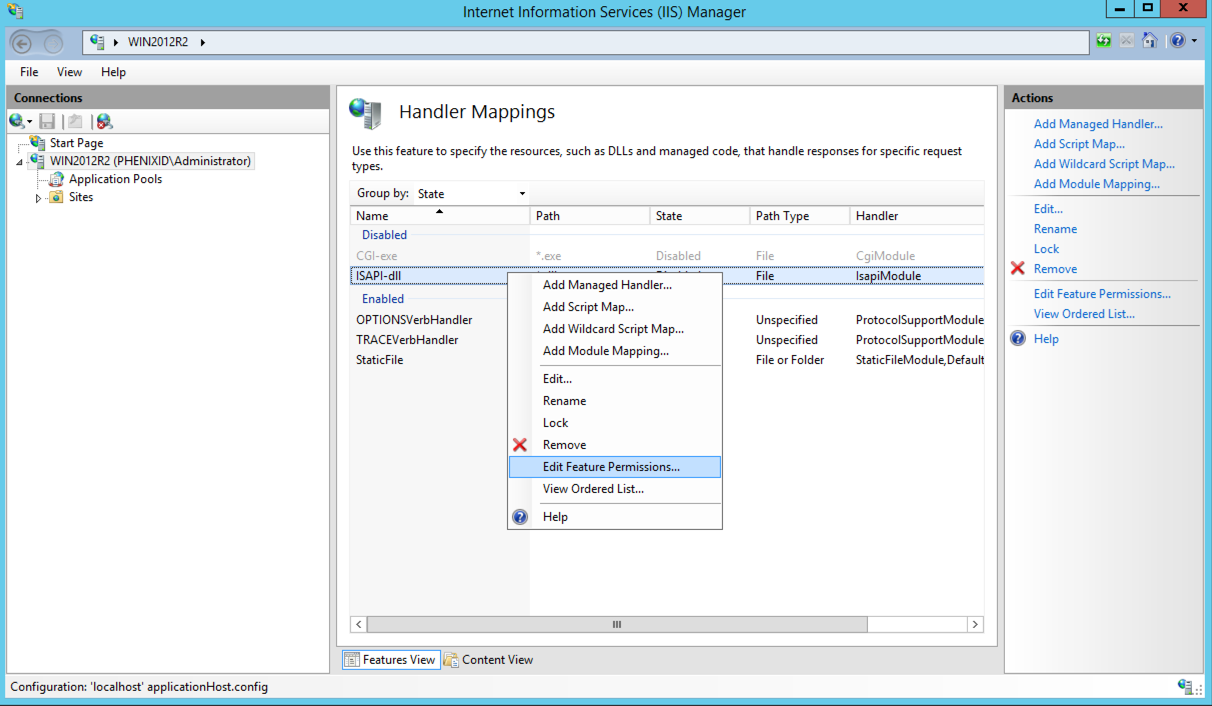
Enable ISAPI to execute
- Select the server running IIS and open the feature “Handler Mappings”
- Select ISAPI-dll, right-click and select “Edit Feature Permissions…”
- Select “Execute”
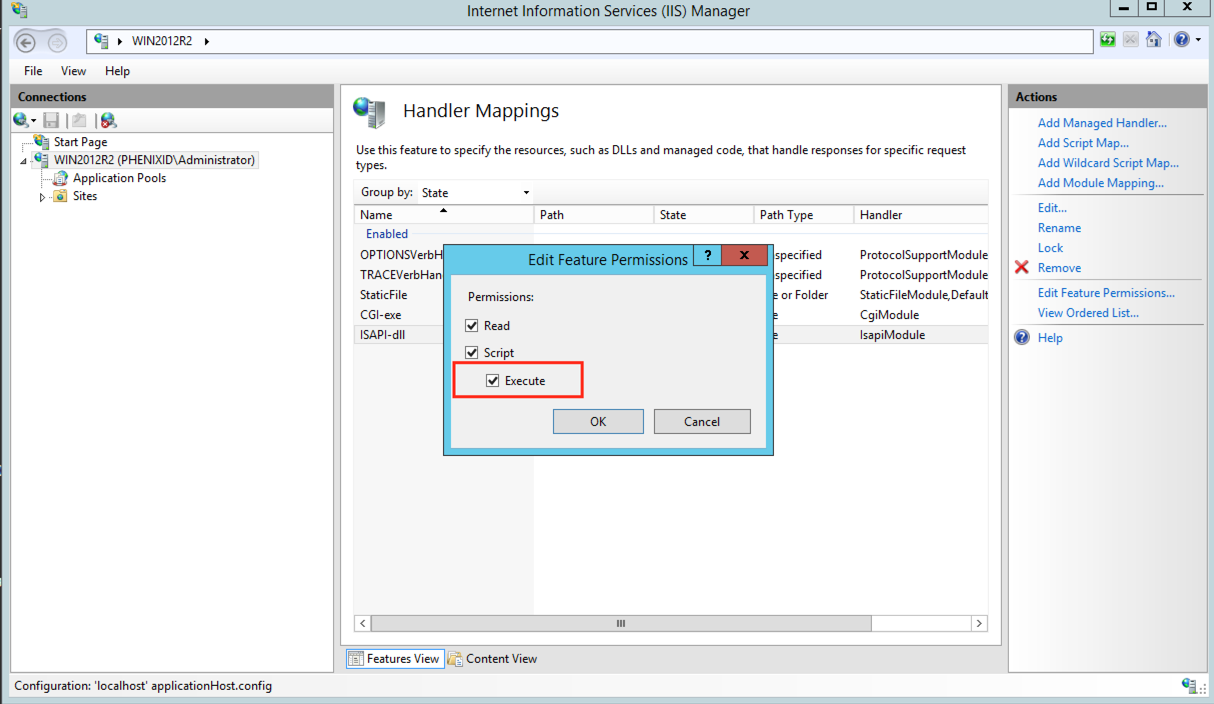
- Click OK
Enable IWA for SSO with IM
IWA = Integrated Windows Authentication
This step is optional. If you keep “Anonymous Authentication” enabled, IIS will only be used as reverse proxy. In some scenarios you like to have the browser communicate HTTPS with the IIS and then IIS tunnel the communication to IM (Tomcat).
The following steps helps you configure support for IWA with IM.
- Select the server running IIS and open the feature “Authentication”
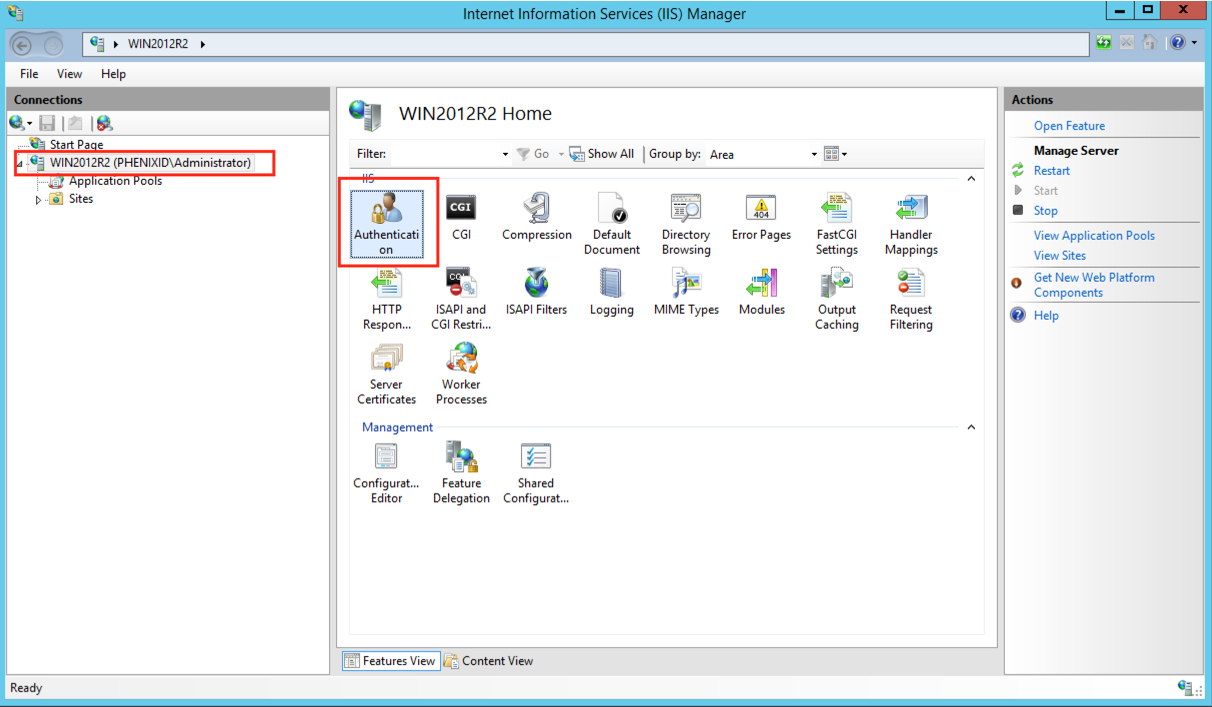
- Select “Anonymous Authentication” and click “Disable”
- Select “Windows Authentication” and click “Enable”
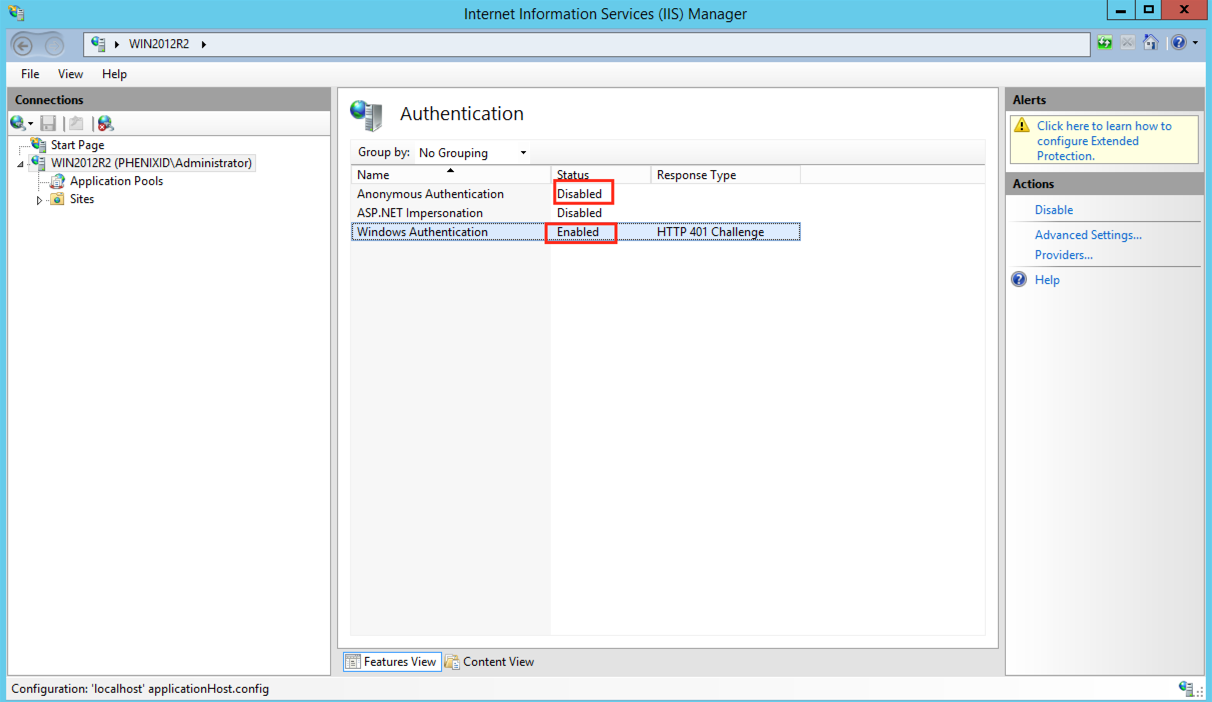
- Restart the IIS, Run “iisreset” or restart the IIS Windows Service “World Wide Web Publishing Service”.
Configuration of PhenixID Identity Manager
Configure server.xml
- Access to PhenixID Identity Manager:
- If all access to Identity Manager should be handled by IIS, remark the http connector part by putting <!– in front and –> at the end.
- Make sure a unique port is used for Tomcat by modifying the http connector if access to Identity Manager should be possible both by IIS and by Tomcat.
- Open server.xml (drive:\Program Files\PhenixID\IM\server\conf)
- Find the line <!– <Connector port=”8009″ protocol=”AJP/1.3″ redirectPort=”8443″ secret=”changePasswordreadPSD1097″/> –>
By default AJP is disabled. To enable AJP, remove <!– in front and –> at the end.
Result should look like:
<Connector port=”8009″ protocol=”AJP/1.3″ redirectPort=”8443″ secret=”changePasswordreadPSD1097″/> - If you configure to support IWA then MUST also add tomcatAuthentication=”false” to the AJP configuration.
Result should look like:
<Connector port=”8009″ protocol=”AJP/1.3″ redirectPort=”8443″ secret=”changePasswordreadPSD1097″ tomcatAuthentication=”false” />
Change password for the AJP connector
To make sure that only Tomcat answer the correct connector we use shared secret. By default for an IM installation the shared secret is changePasswordreadPSD1097. You should change this password to something unique for your installation.
Change password in workers.properties.minimal
- Open workers.properties.minimal in C:\Program Files\TomcatConnectorIIS\conf
- Change worker.ajp13w.secret=changePasswordreadPSD1097 to a password of your choice.
- Restart the IIS service
Change password in server.xml
- Open server.xml in C:\Program Files\PhenixID\IM\server\conf
- Find the AJP connector configuration
- Change secret=”changePasswordreadPSD1097″ to the same password as you chose in the workers.properties.minimal
- Restart the PhenixID Identity Manager service
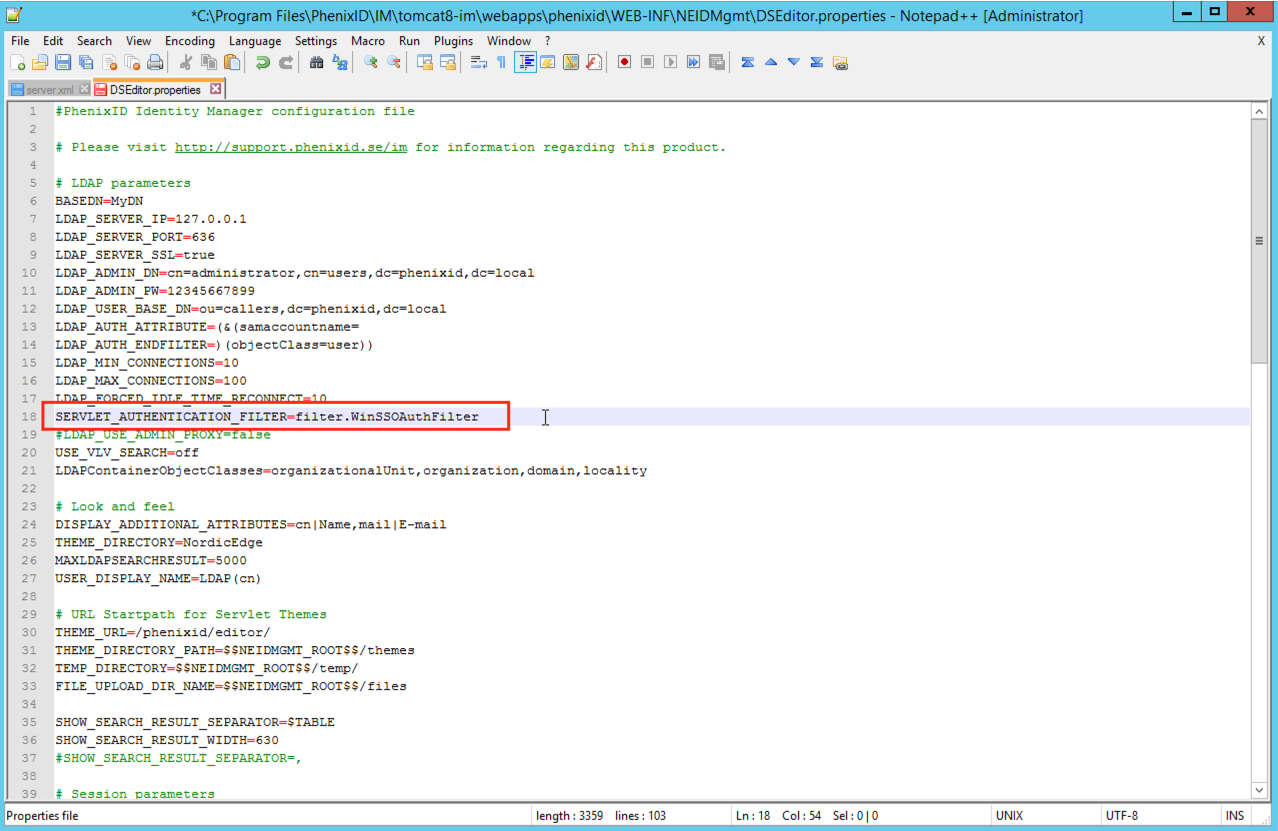
Configure DSEditor.properties to support IWA
This step is optional. This step apply if you like IM to support IWA.
- Open DSEditor.properties (drive:\Program Files\PhenixID\IM\customer\config)
- Add the SERVLET_AUTHENTICATION_FILTER in the upper part of the DSEditor.properties file to support windows authentication.
SERVLET_AUTHENTICATION_FILTER=filter.WinSSOAuthFilter
Restart PhenixID Identity Manager service
Restart PhenixID Identity Manager service to make sure the new configuration is read from the configuration files.
Configure Single Sign-On with a separate IIS server
If the Microsoft IIS server is installed on a different machine than PhenixID Identity Manager, the redirect settings in the Apache Tomcat Connector for IIS ISAPI filter has to be changed to the PhenixID Identity Manager server.
- Edit the C:\Program Files\TomcatConnectorIIS\bin\conf\workers.properties.minimal file and change the line:
worker.ajp13w.host=localhost
Use the IP/DNS address from the PhenixID Identity Manager server instead of localhost.
Update line might look like:
worker.ajp13w.host=PhenixID_IM_Server_Name_or_IP - Restart the IIS, Run “iisreset” or restart the IIS Windows Service “World Wide Web Publishing Service”
Test the Apache redirector
- Login to a domain member windows client other than the IIS server as the user to test PhenixID Identity Manager as.
- Add the IPaddress/hostname from the IIS server running the “Local intranet” security zone in Internet Explorer
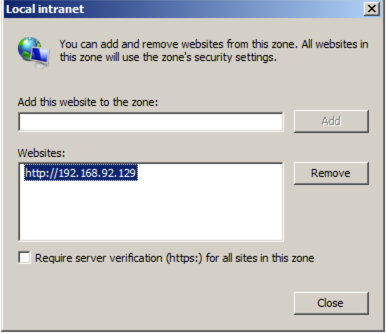
- Go to http://DNSNAME_OF_IIS_SERVER/phenixid
- Make sure the user is authenticated to PhenixID Identity Manager
Troubleshoot
1. Verify that SAN for the web address to be used is included
If you get an https error message in your browser stating that the certificate is not issued to the desired URL then verify that the URL is also included in the SAN and not just the server name address. In this example the user will be using the URL im.phenixid.se to reach the IM server using https.

2. Request Entity too large error with IIS integration
Symptoms
One or more users see a page displaying an error message similar to: “the page was not displayed because the request entity is too large”.
Relevant to
This article is relevant if you use IIS, the ISAPI filter and the Tomcat AJP1.3 connector.
Solution
Increase the max packet size as follows:
Open drive:\..\PhenixID\IM\server\conf/conf/server.xml and find the AJP 1.3 connector element. This will look something like this:
<Connector port=”8009″ protocol=”AJP/1.3″ redirectPort=”8443″ tomcatAuthentication=”false” />
Add an attribute called packetSize with a value larger than 8192 (the default) but never larger than 65536. For example:
<Connector port="8009" protocol="AJP/1.3" redirectPort="8443" tomcatAuthentication="false" packetSize="65536"/>
Open the workers.properties file: (drive:\..\TomcatConnectorIIS\conf)
Add the following line at the end of the file:
worker.ajp13w.max_packet_size=65536
The file should now appear like this:
worker.list=ajp13w
worker.ajp13w.host=localhost
worker.ajp13w.port=8009
worker.ajp13w.type=ajp13
worker.ajp13w.max_packet_size=65536
PhenixID Identity Manager and IIS needs to be restarted after changes.
DISCLAIMER
Information provided in this document is for your information only. PhenixID makes no explicit or implied claims to the validity of this information. Any trademarks referenced in this document are the property of their respective owners.The origin of this information may be internal or external to PhenixID. PhenixID makes all reasonable efforts to verify this information.
PhenixID - support.phenixid.se