Summary
This document will guide you through the steps to enable multi-factor authentication for the AWS Management Console (https://aws.amazon.com/console/) using SAML2.
This will enable usage of federated logins.
System Requirements
- PhenixID Authentication Server 3.0 or higher
- AWS instance administration rights
Instruction
Overview
This document will guide you through the steps to enable multi-factor authentication for AWS.
The user will be logged in through an IdP-initiated request. When logged in the user will be assigned a Role with attached Policies.
Configure PhenixID Authentication Services as Identity Provider
- Login to Configuration Manager.
- Setup PhenixID Authentication Services as a SAML IdP using one of the Federation scenarios described here. (If the desired authentication method is not provided by a scenario, use the documentation for the SAML authenticator here) Set these properties during configuration.
Change YOUR_PHENIXID_IDP_DOMAIN to the domain name of your PhenixID Authentication Services instance.
– EntityID = https://YOUR_PHENIXID_IDP_DOMAIN/saml/idp/aws
– Post SSO URL = https://YOUR_PHENIXID_IDP_DOMAIN/saml/authenticate/aws - Save changes.
- Click IDENTITY PROVIDER->View SAML Metadata.
- Save the Metadata as a xml-file
- Set Post SLO URL = https://YOUR_PHENIXID_IDP_DOMAIN/saml/authenticate/logout/
- Save the changes.
Add trust to AWS on PhenixID Authentication Services
- Login to configuration manager
- Open Scenarios->Federation->SAML Metadata upload
- Click the plus sign
- Add URL= https://signin.aws.amazon.com/static/saml-metadata.xml
- Save the changes.
Configure AWS

- Login as a Amazon admin to your Amazon instance
- In the left-hand menu, select Services
- Locate “Security, Identity, & Compliance”
- Select “IAM”
- Following steps are found under “Access Management”
Add SAML Identity provider

- Select “Identity providers”
- Select “Add provider”
- Choose SAML as provider type
- Set a Provider name
- Upload the SAML Metadata (xml-file) for your IDP.
- Continue with “Add provider”
Setup Role with policy

- Select “Roles”
- Select “Create role”
- Select “SAML 2.0 federation”
- Choose your SAML provider and select “Allow programmatic and AWS Management Console access”
- Continue with “Next:Permission”
- Select the permissions policy/policies the user shall have.
- Continue with “Next:Tags”
- Continue with “Next:Review”
- Set a Role name
- Continue with “Create role”
Collect AWS attributes

- Select “Roles”
- Select your role
- Make a note of “Role ARN”: arn:aws:iam::YOUR_ACCOUNT:role/YOUR_ROLE
- Make a note of “Trusted entities”: arn:aws:iam::YOUR_ACCOUNT:saml-provider/YOUR_IDP
Configure PAS assertion
- Login to Configuration Manager.
- Locate the Scenario-Federation setup earlier for AWS.
- Select EXECUTION FLOW
- Add “PropertyAddValve” before “AssertionProvider”.
- NAME=https://aws.amazon.com/SAML/Attributes/Role
- VALUE=Role ARN,Trusted entities (from your notes)
- SPLITTER to other than comma (eg %).

- Add “PropertyAddValve” before “AssertionProvider”.
- NAME=https://aws.amazon.com/SAML/Attributes/RoleSessionName
- VALUE={{item.mail}} (replace “mail” if other identifier is used)

- Add “PropertyAddValve” before “AssertionProvider”.
- NAME=https://aws.amazon.com/SAML/Attributes/SessionDuration
- VALUE=1800
- Add information to “AssertionProvider”:
- ADDITIONAL ATTRIBUTES=https://aws.amazon.com/SAML/Attributes/Role,https://aws.amazon.com/SAML/Attributes/RoleSessionName,https://aws.amazon.com/SAML/Attributes/SessionDuration
- SOURCE ID=urn:amazon:webservices
- Add fields to MISCELLANIOUS
- signAssertion True
- nameID
- nameIdFormat urn:oasis:names:tc:SAML:2.0:nameid-format:persistent
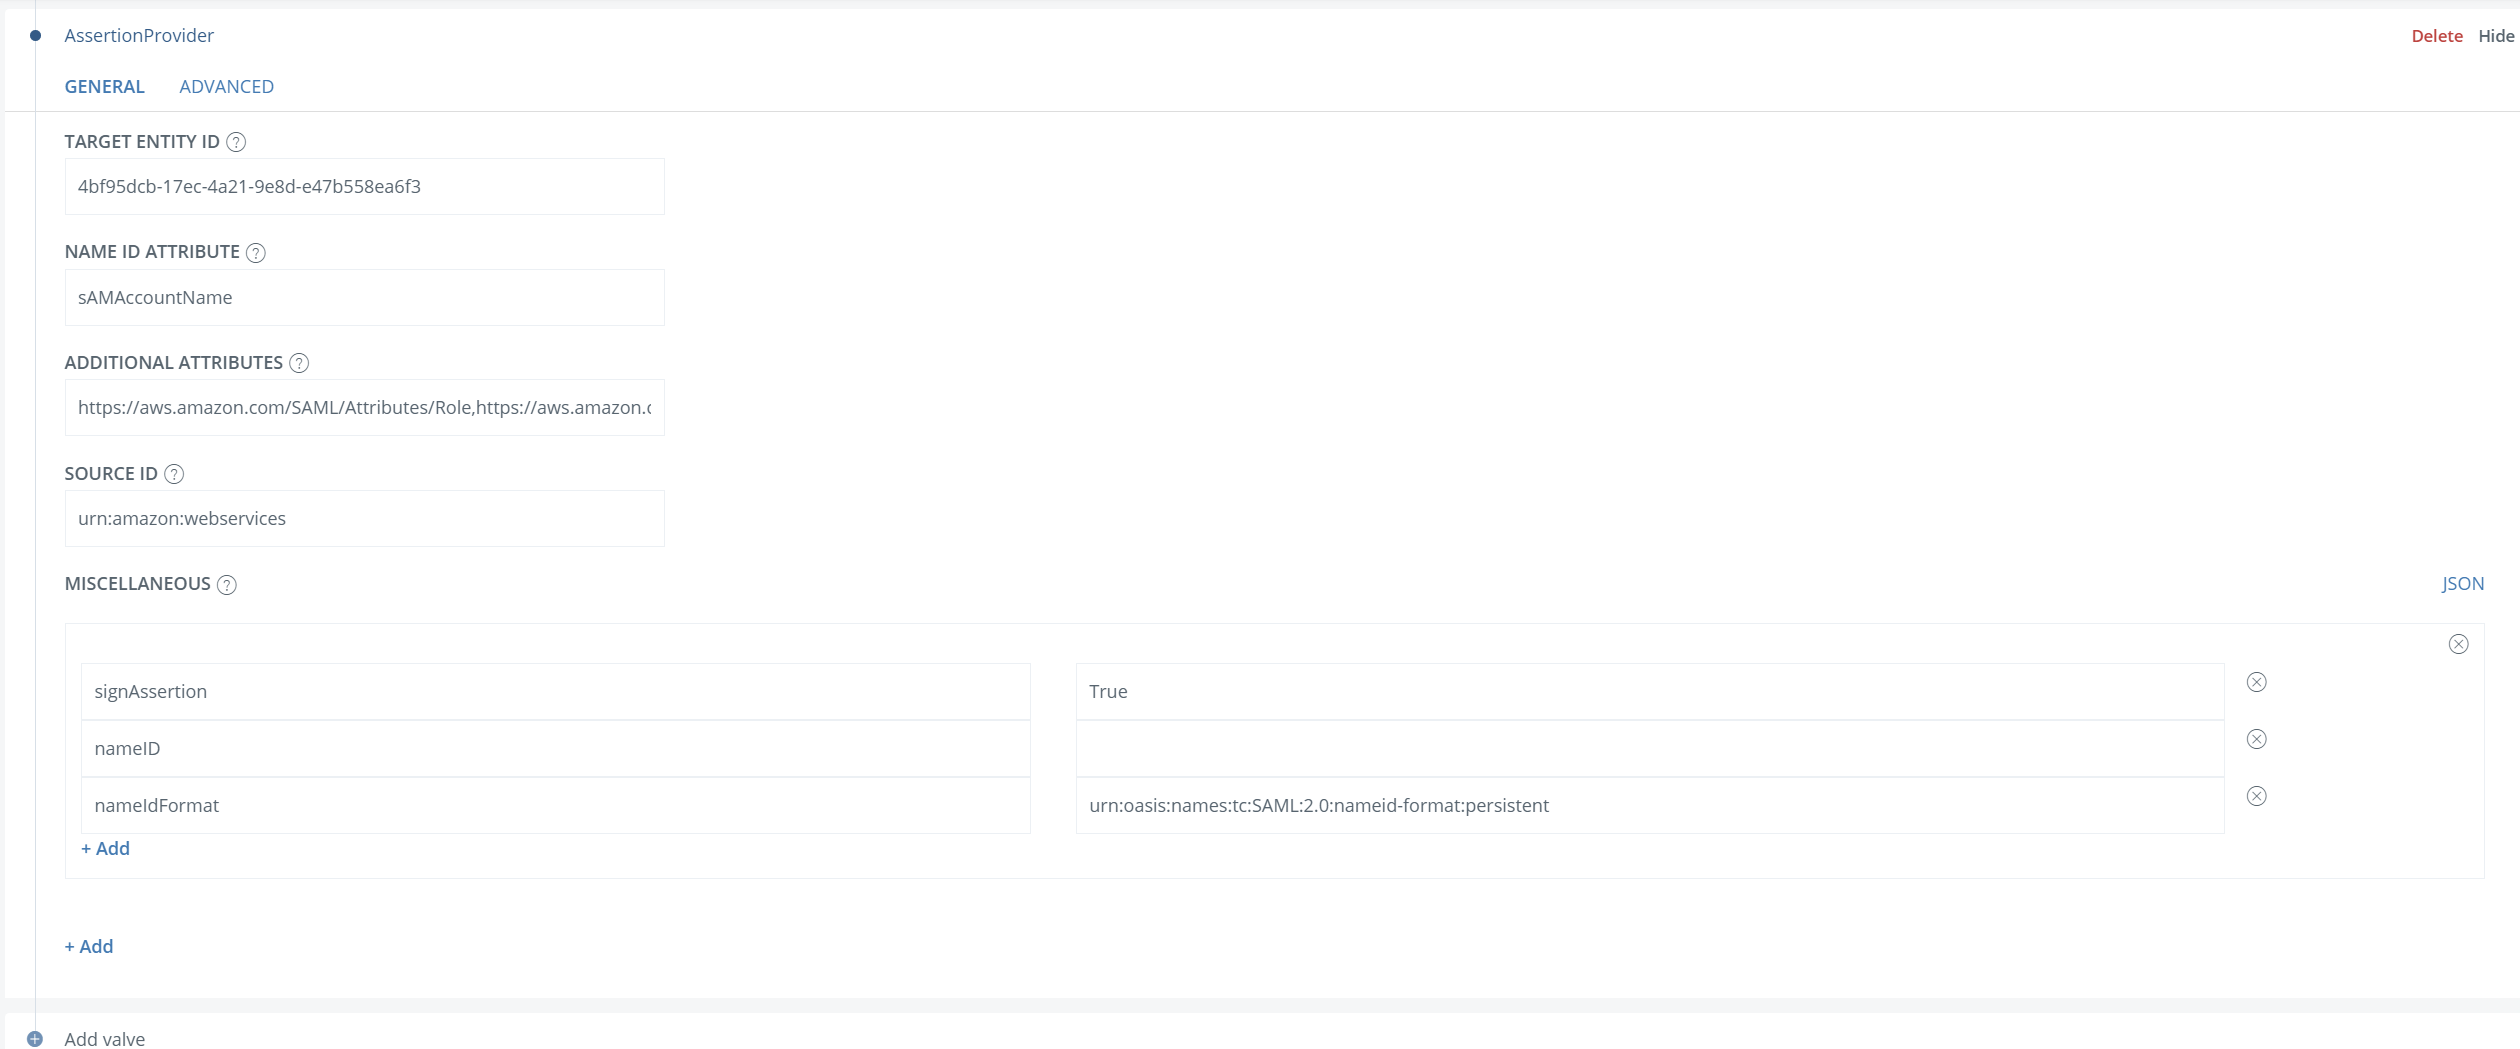
- Save the changes.
Test
-
- Browse to https://YOUR_PHENIXID_IDP_DOMAIN/saml/authenticate/aws
- Authenticate
- You should now be redirected to AWS and be logged in
DISCLAIMER
Information provided in this document is for your information only. PhenixID makes no explicit or implied claims to the validity of this information. Any trademarks referenced in this document are the property of their respective owners.The origin of this information may be internal or external to PhenixID. PhenixID makes all reasonable efforts to verify this information.
PhenixID - support.phenixid.se