Summary
This document will guide you through the steps to enable multi-factor authentication and Single-Sign On for Microsoft Azure B2B Direct Federation (https://docs.microsoft.com/en-us/azure/active-directory/b2b/direct-federation).
System Requirements
- Azure AD account with administrative rights.
- PhenixID Autentication Services 2.7 or higher installed
Instruction
Overview
This document will guide you through the steps to enable multi-factor authentication and Single-Sign on for Azure AD B2B Direct Federation.
PhenixID Server acting as SAML IdP
- Login to Configuration Manager
- Go to Scenarios->Federation.
- Setup PhenixID Authentication Services as a SAML IdP using one of the scenarios.
(If the desired authentication method is not provided by a scenario, use the documentation for the SAML authenticator here) - Fetch the user email address in the Execution Flow.
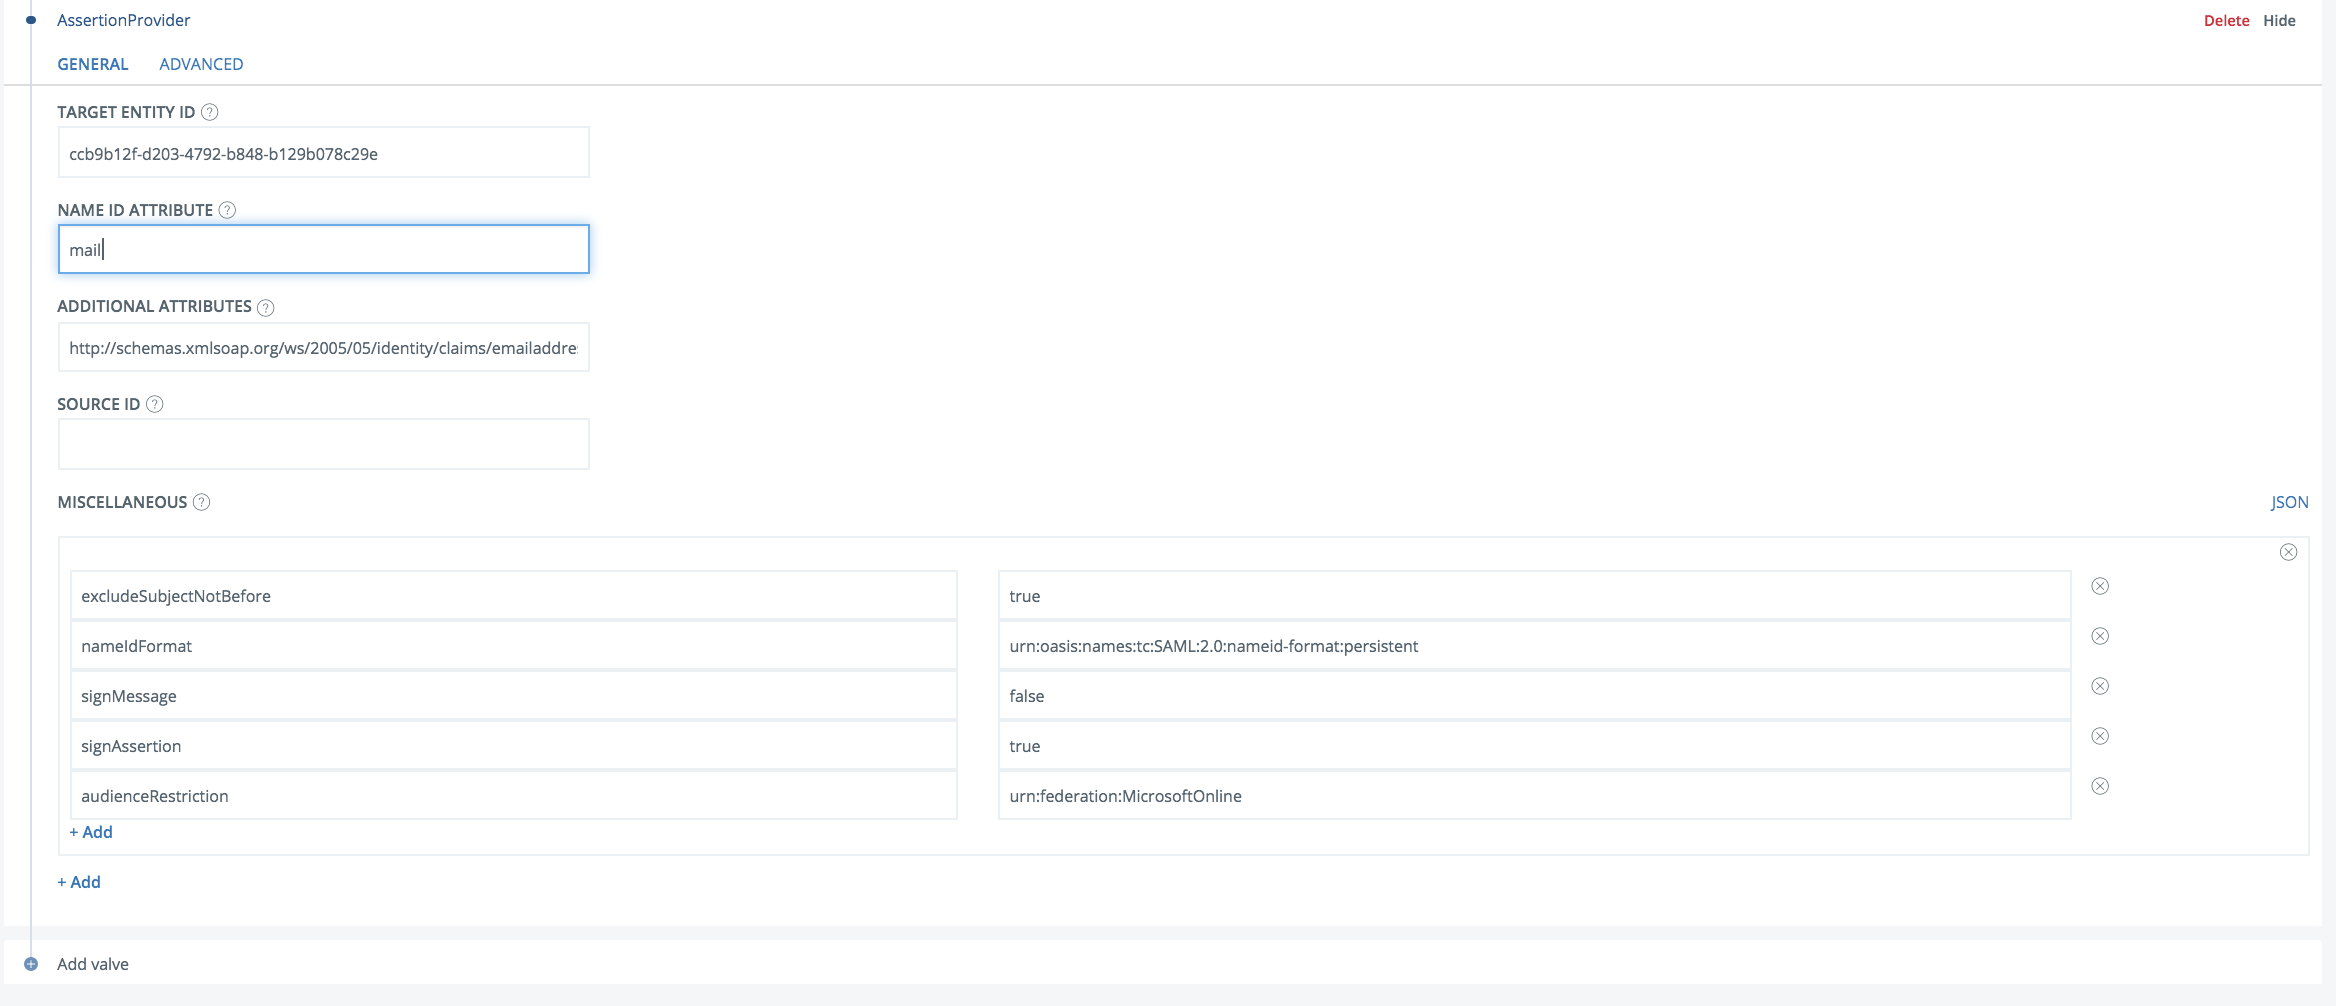
- Use mail as Name ID attribute.
- Go to Scenarios->Federation-> <newly_added_scenario> -> Identity Provider. Deselect “Require signed requests”. Save.
- Click “View SAML Metadata”.
- Download the metadata to a xml file.
- Open the XML metadata file in a text editor
- Remove the <md:EntitiesDescriptor….> tag from the file
- Remove the </md:EntitiesDescriptor> tag from the file
- Save the XML file.
- Configuration Manager -> Scenarios -> Federation -> <Your IDP>
- Click Execution flow
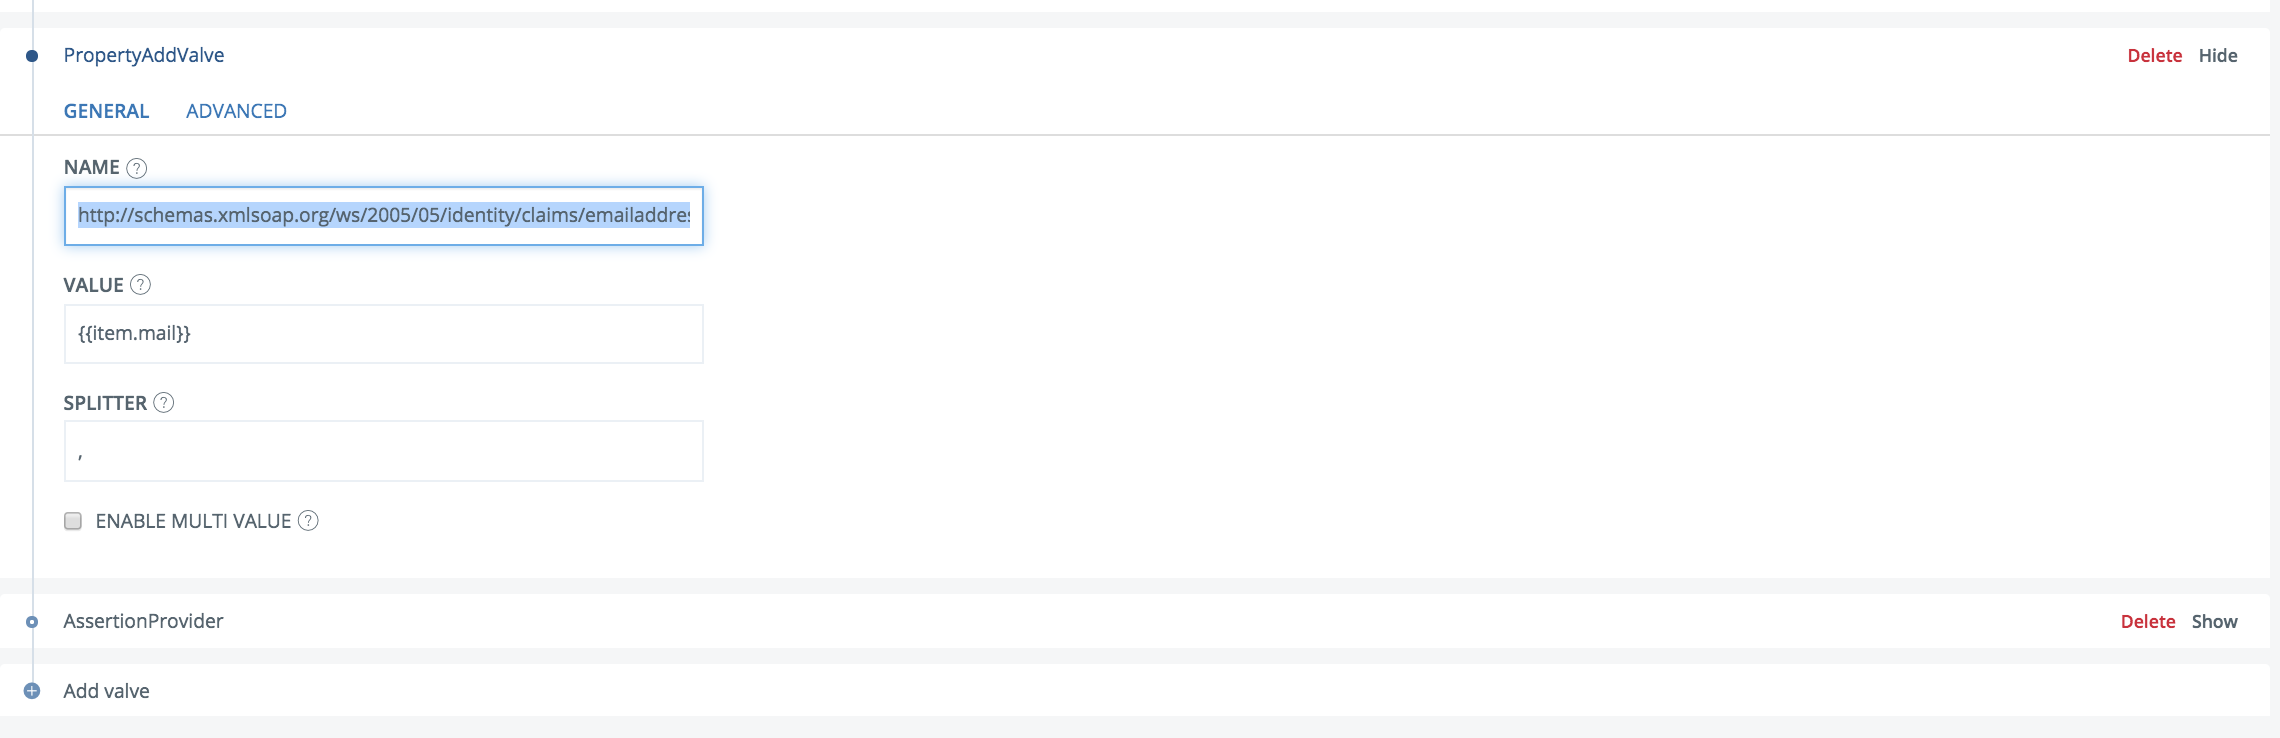
- Add a valve to the last execution flow – PropertyAddValve
Name = http://schemas.xmlsoap.org/ws/2005/05/identity/claims/emailaddress
Value = {{item.mail}}NB! If the mail address is collected from other attribute, change the mail value above to the correct attribute name
- Move the valve to be executed before the AssertionProvider valve.
- Collapse the AssertionProvider valve
- Set these values:
Additional attributes = http://schemas.xmlsoap.org/ws/2005/05/identity/claims/emailaddressMiscellanous:
“excludeSubjectNotBefore”: “true”,
“nameIdFormat”: “urn:oasis:names:tc:SAML:2.0:nameid-format:persistent”,
“signMessage”: “false”,
“signAssertion”: “true”,
“audienceRestriction”: “urn:federation:MicrosoftOnline”Example:
Configure Azure
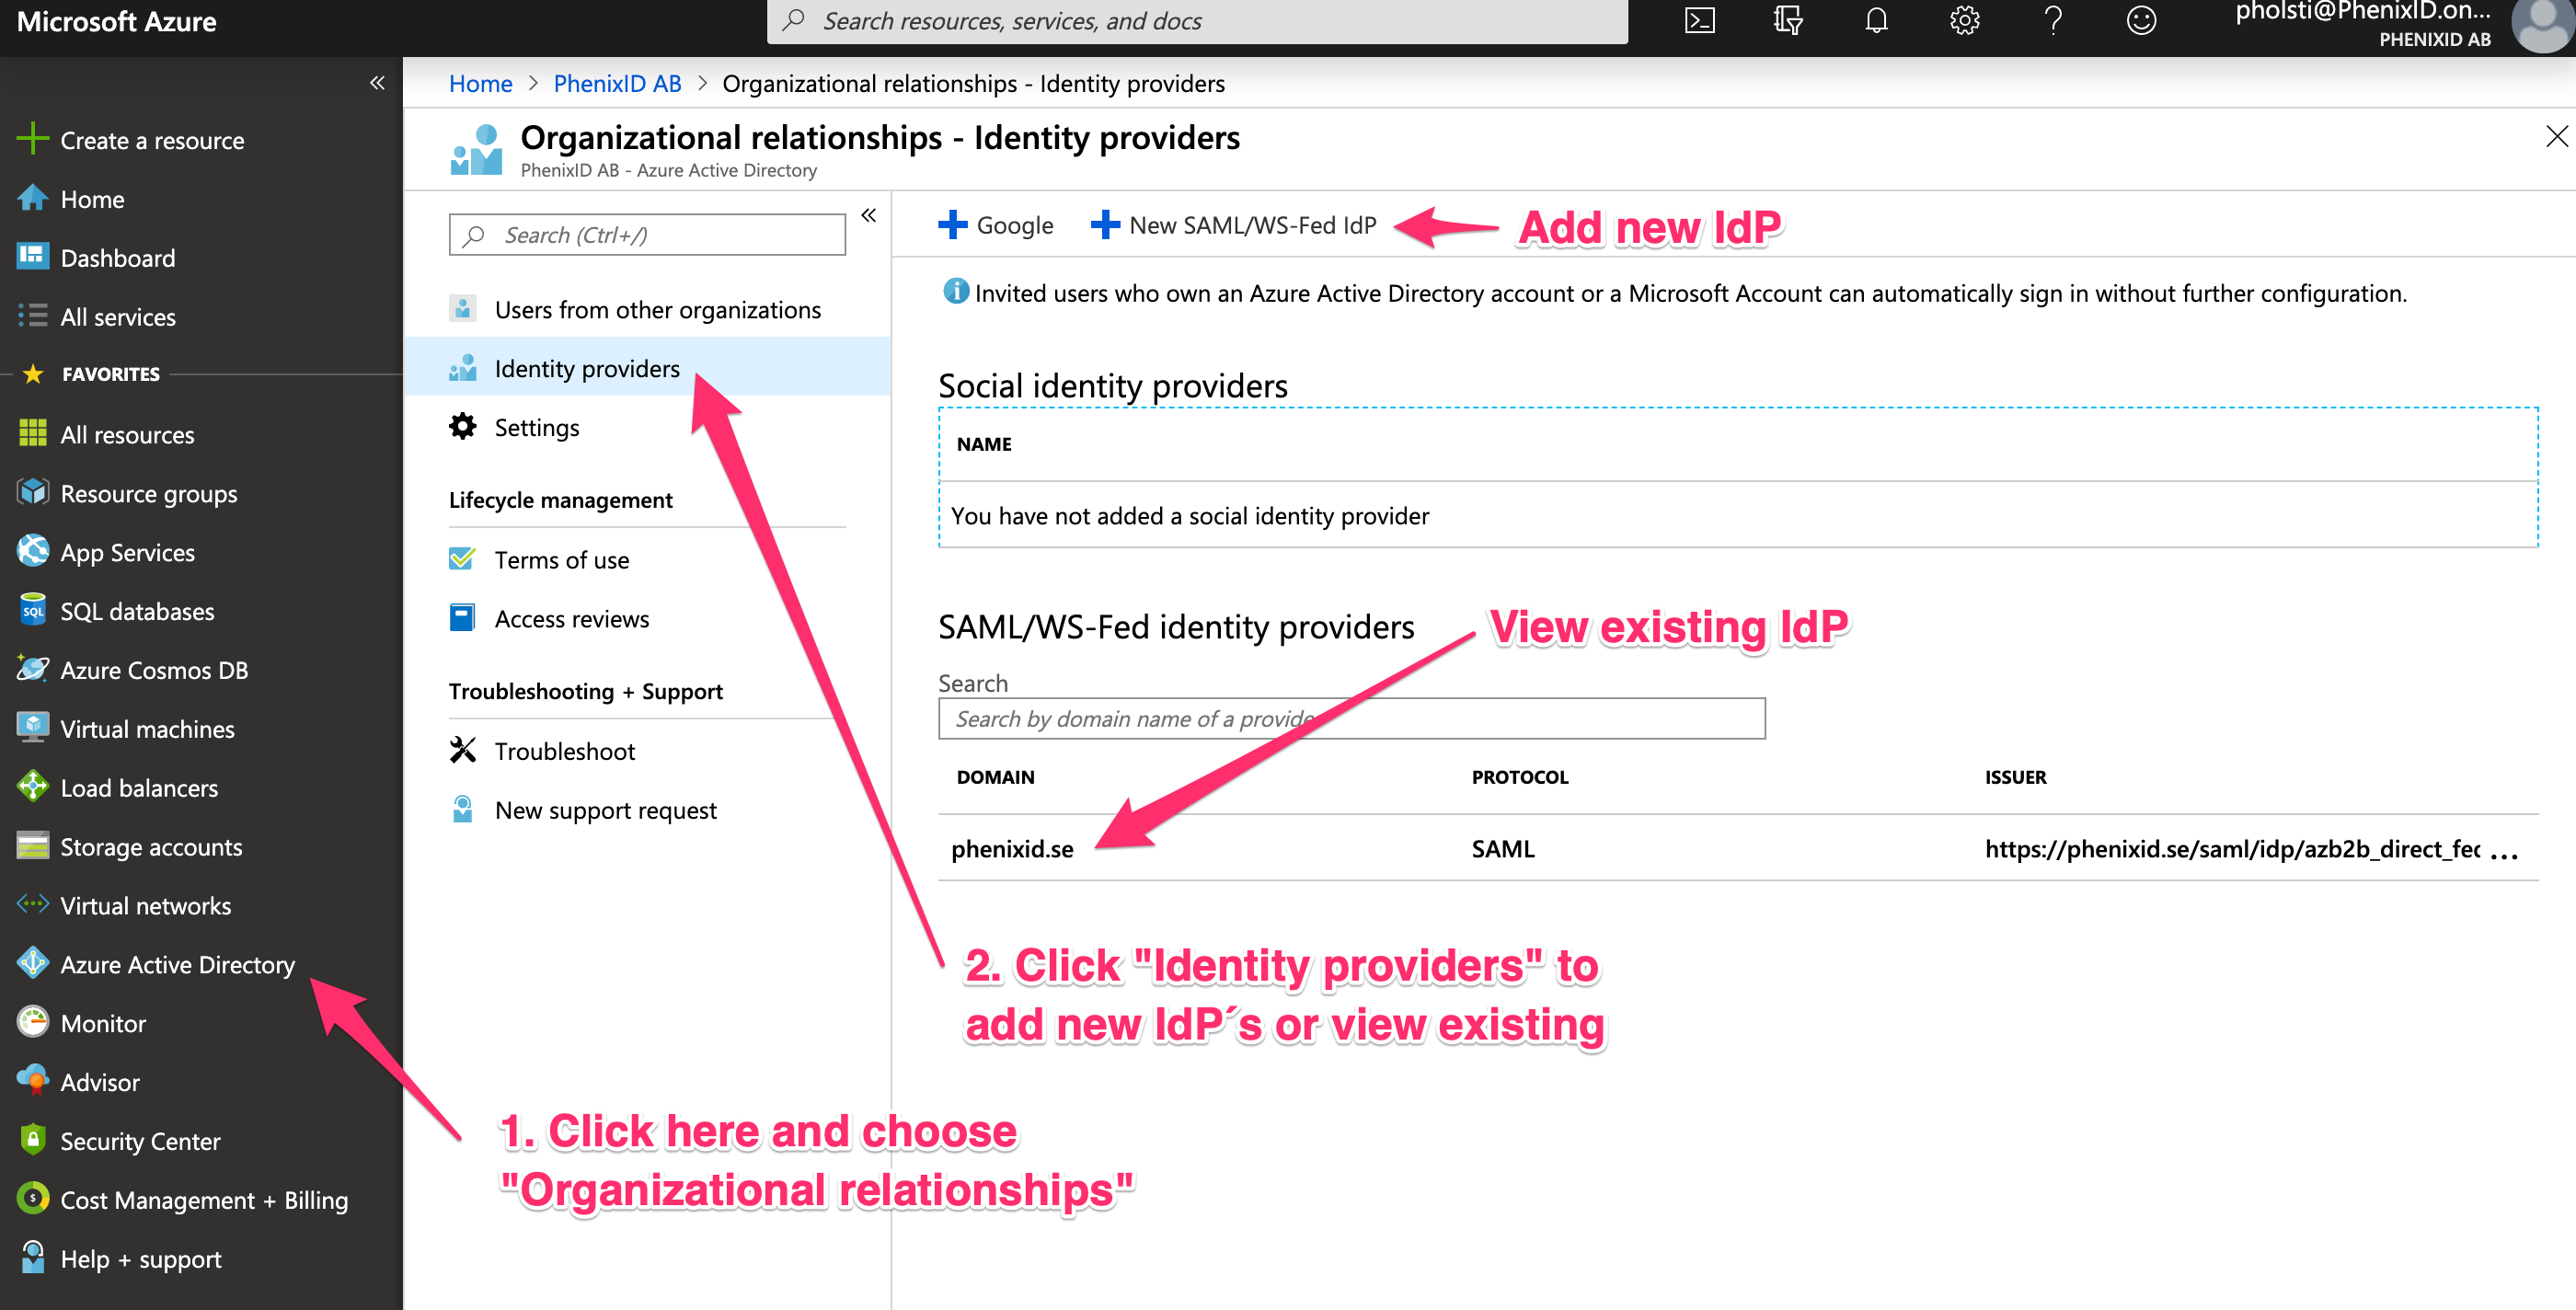
- Login to the Azure portal as an Azure admin (for your domain)
- Add new Identity Provider
- Enter values for the Identity Provider:
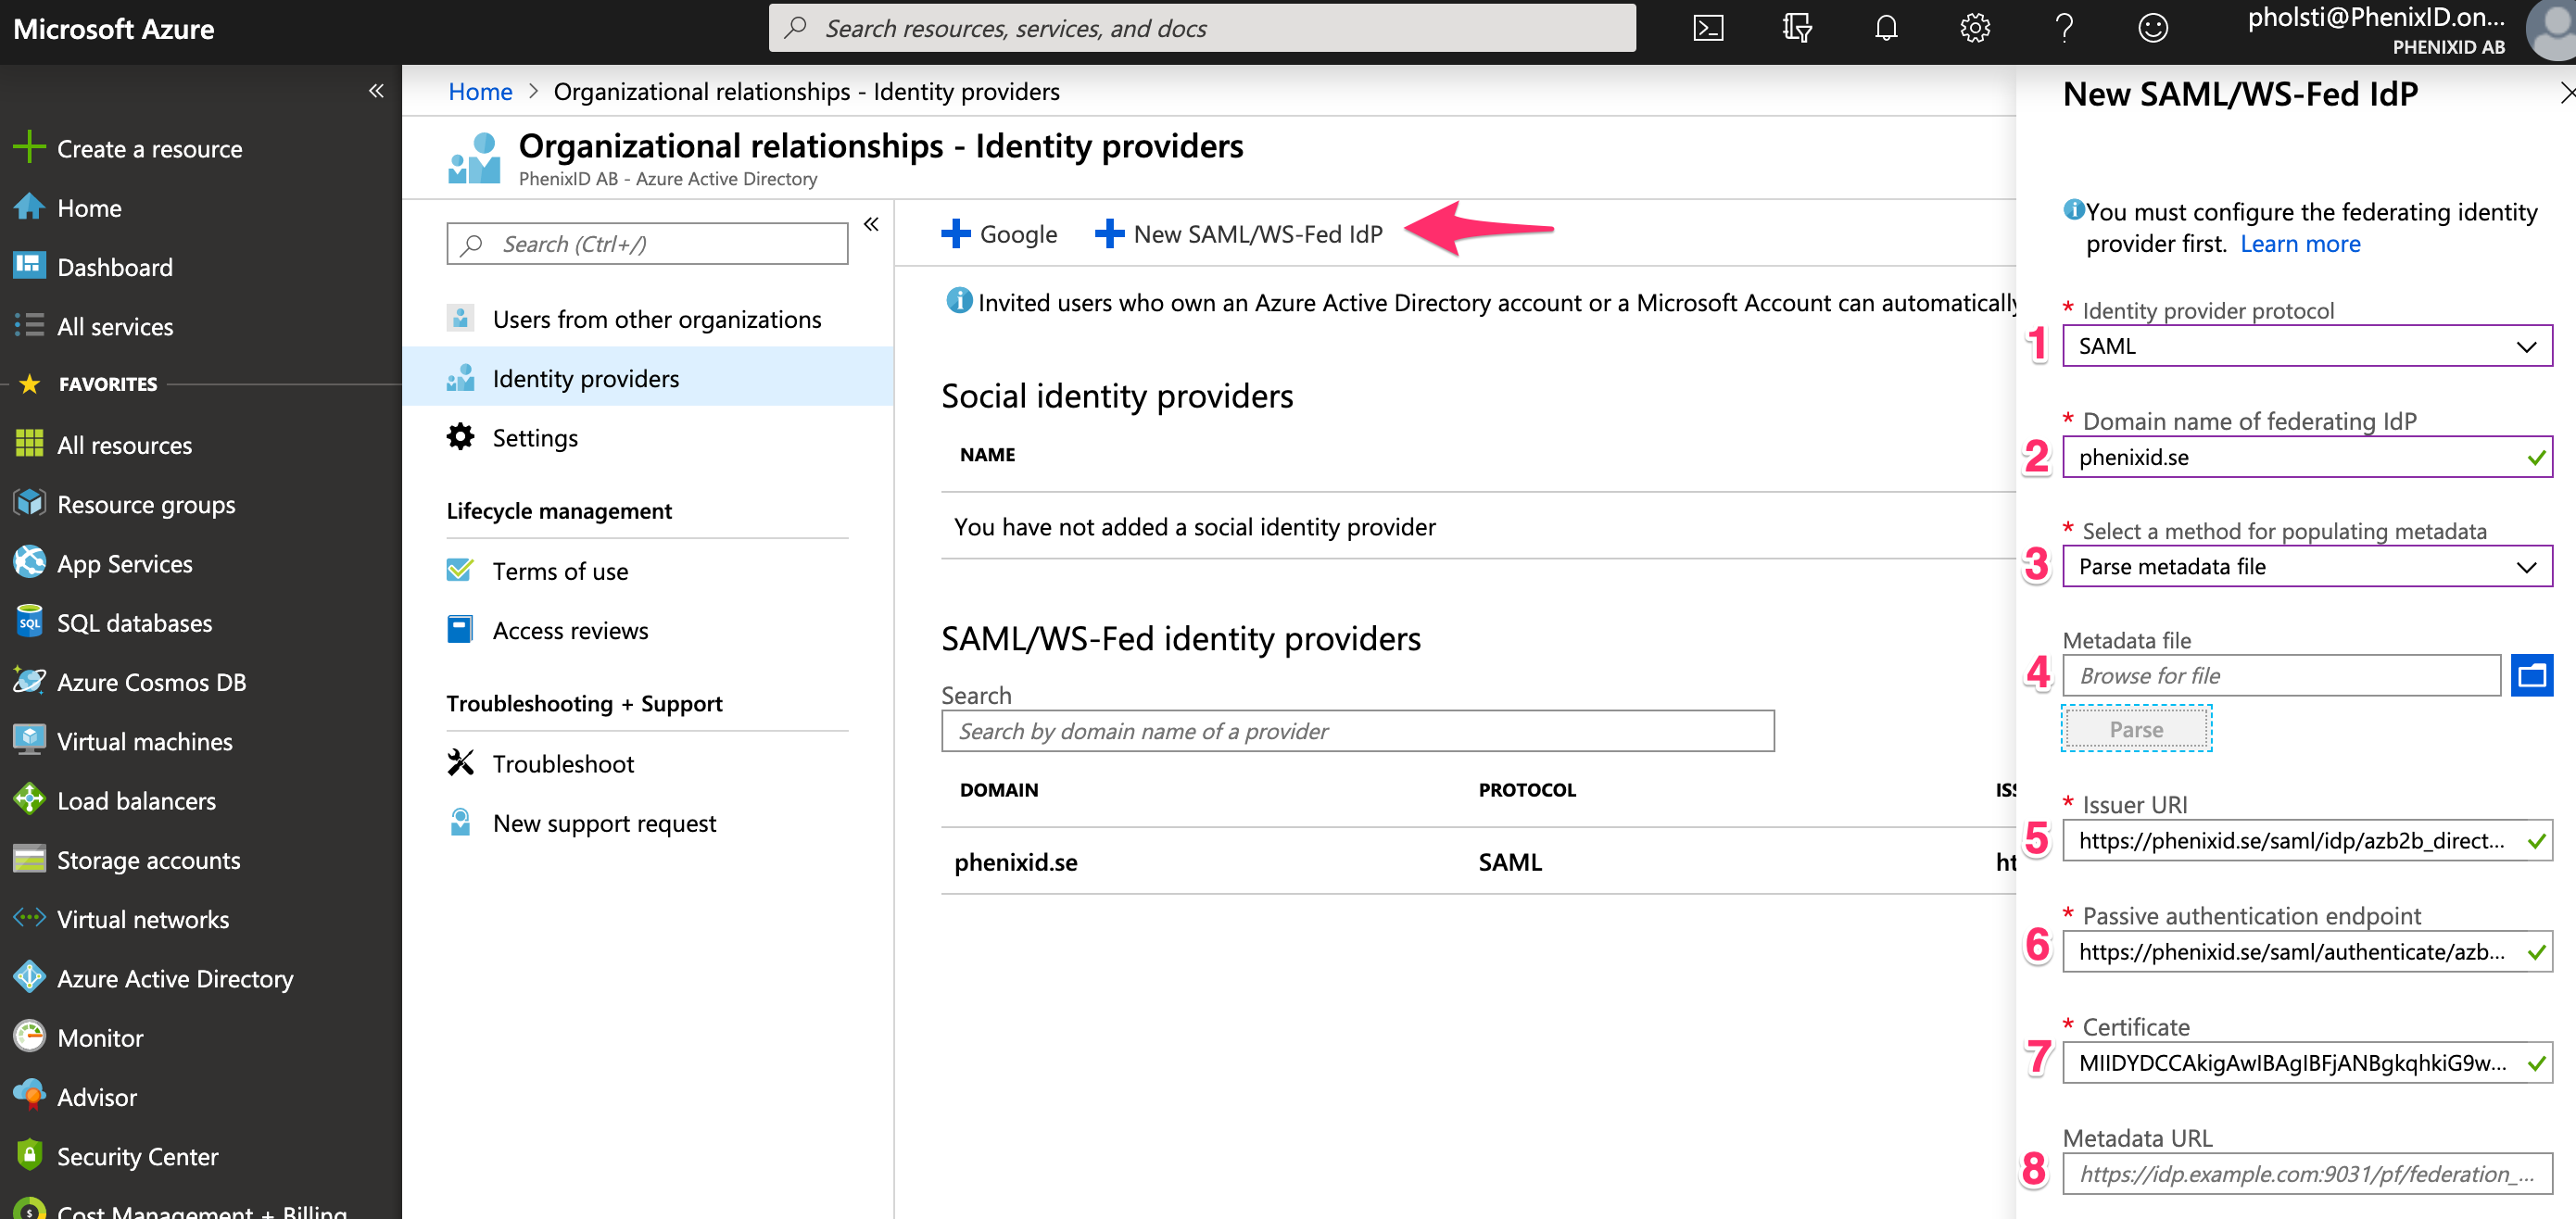
1. Select SAML
2. Enter domain name of IdP
3. Select “Parse metadata file”
4. Select the XML metadata file from previous step
5-7. Will be populated automatically after XML metadata upload.Click Add.
Add trust to Azure on PhenixID Authentication Services
- Open a text editor
- Copy this XML data and paste it into the XML editor<?xml version=”1.0″ encoding=”UTF-8″?><EntityDescriptor entityID=”urn:federation:MicrosoftOnline” xmlns=”urn:oasis:names:tc:SAML:2.0:metadata”><SPSSODescriptor protocolSupportEnumeration=”urn:oasis:names:tc:SAML:2.0:protocol”><NameIDFormat>urn:oasis:names:tc:SAML:1.1:nameid-format:unspecified</NameIDFormat><AssertionConsumerService index=”1″ Binding=”urn:oasis:names:tc:SAML:2.0:bindings:HTTP-POST” Location=”https://login.microsoftonline.com/login.srf”></AssertionConsumerService></SPSSODescriptor></EntityDescriptor>
- Save the file as azure_sp.xml.
- Login to configuration manager
- Open Scenarios->Federation->SAML Metadata upload
- Click the plus sign
- Add Azure metadata by uploading azure_sp.xml.
Test
- Login to the Azure portal as an Azure admin (for your domain)
- Add a guest user which is part of the federating IdP.
Please note that Azure rules dictate that the guest user email address domain must match the “Domain name of the federating IdP”. (Partial matches, ie mail subdomains, are also allowed).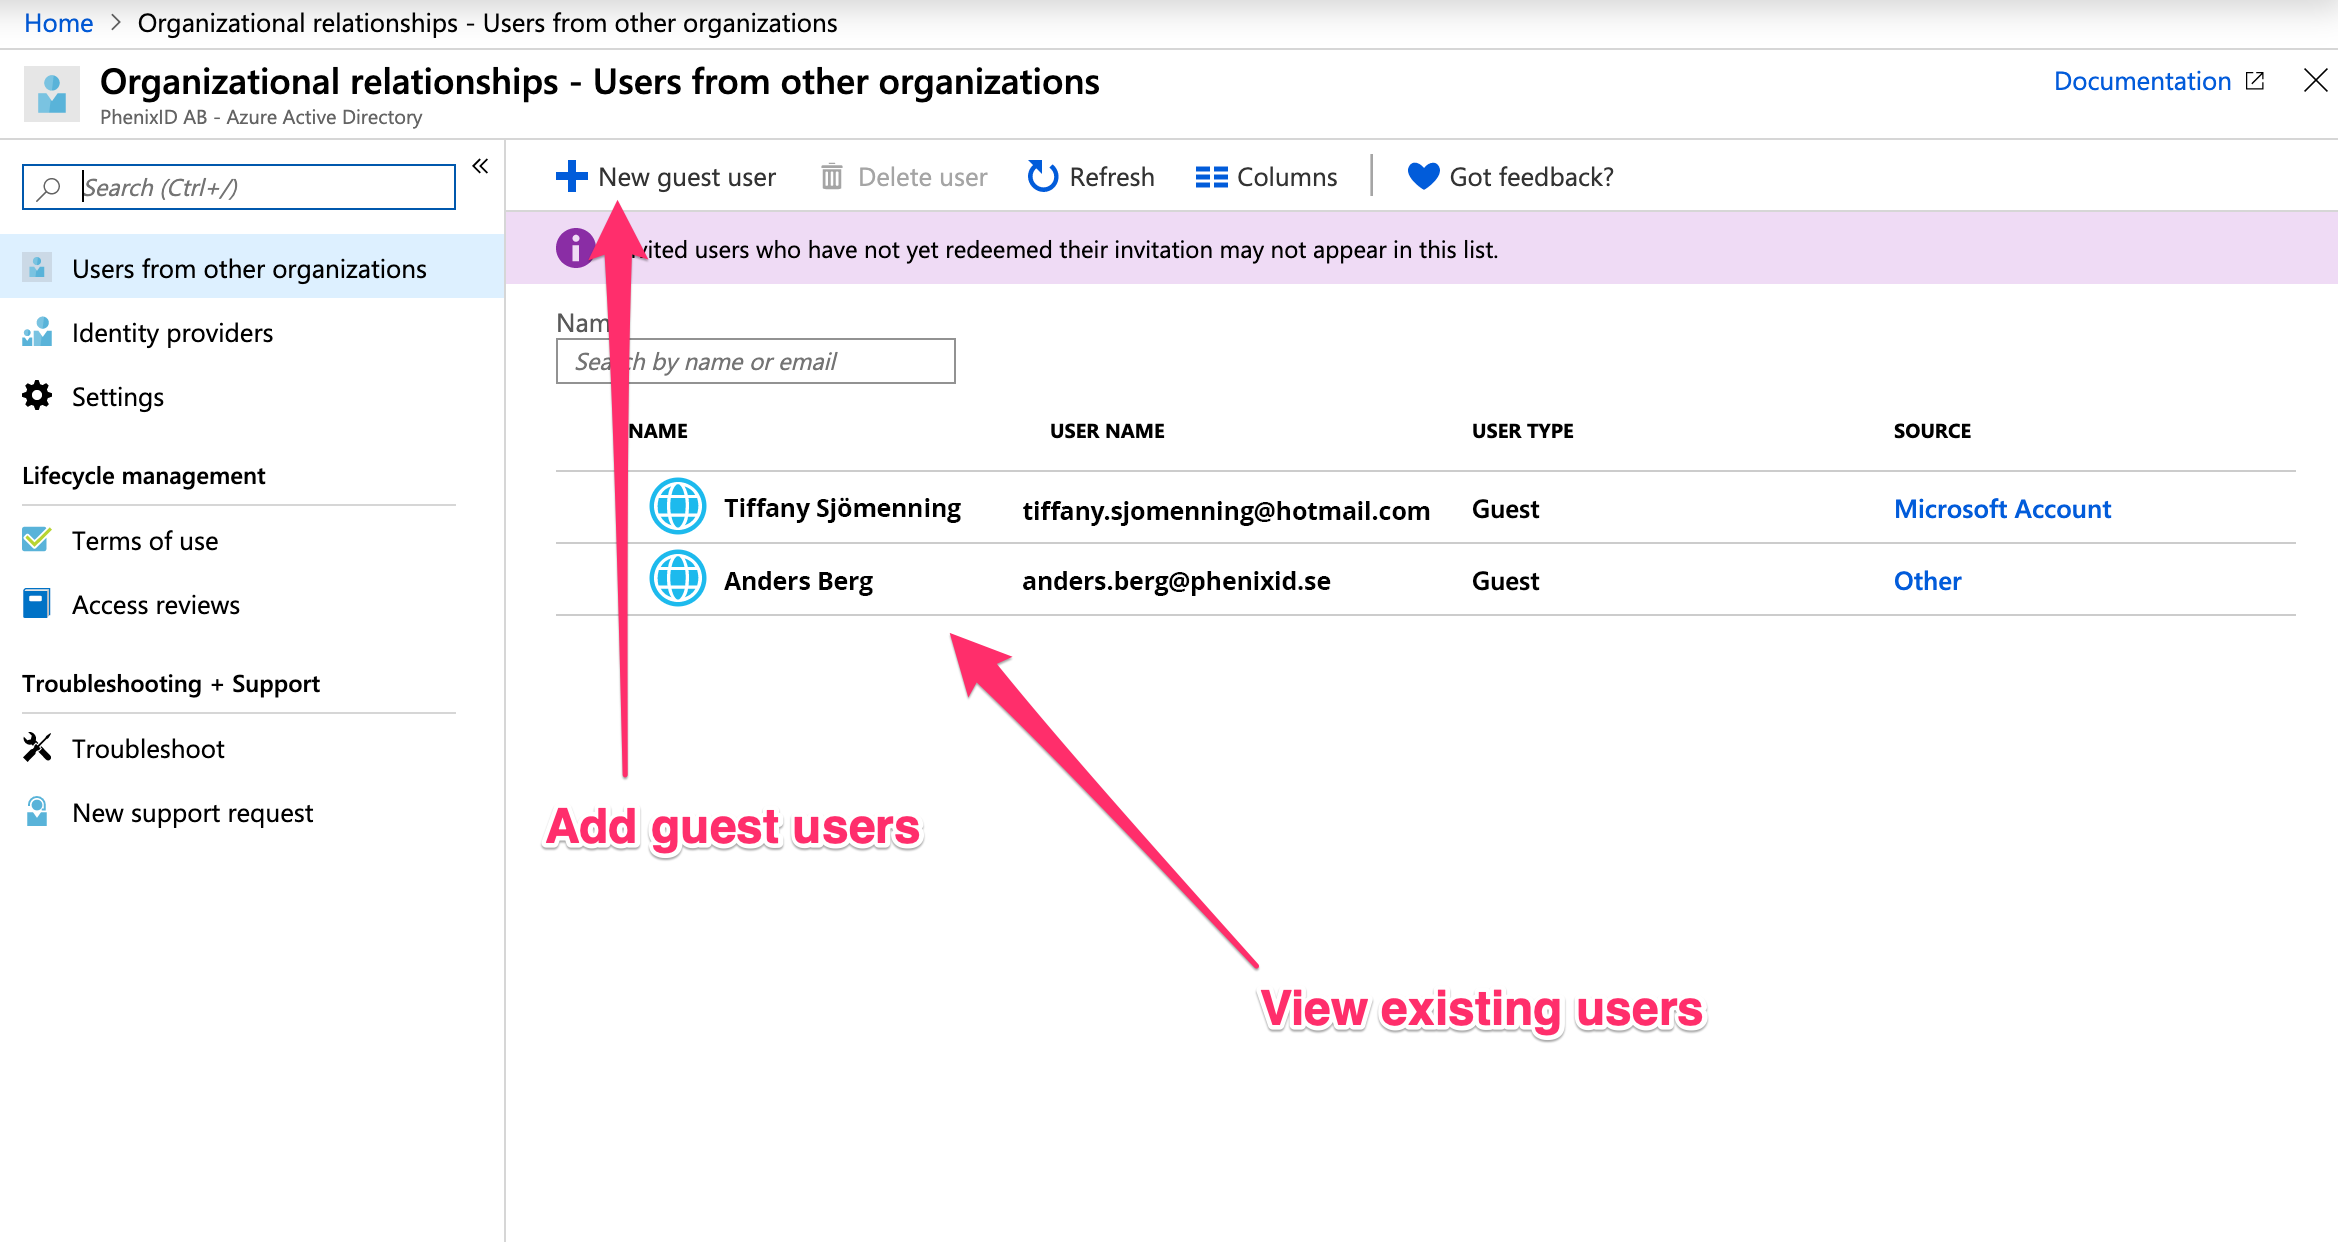
- The guest user will receive an email with a link.
- The guest user opens the link and will be redirected to the PhenixID Identity provider.
- Authenticate as the guest user.
- If authentication was successful, a redirect to Azure B2B should occur (with SAML assertion).
- Another redirect to PhenixID Identity Provider will occur (only performed the first time).
- Redirect back to Azure B2B.
- The guest user should now be logged in.
DISCLAIMER
Information provided in this document is for your information only. PhenixID makes no explicit or implied claims to the validity of this information. Any trademarks referenced in this document are the property of their respective owners.The origin of this information may be internal or external to PhenixID. PhenixID makes all reasonable efforts to verify this information.
PhenixID - support.phenixid.se