Summary
This document will guide you through the steps to enable multi-factor authentication for the pfSense webConfigurator.
System Requirements
- PhenixID Authentication Services 4.0 or higher
- pfSense version 2.4.4-RELEASE or higher
- pfSense SAML2 Authentication package (external pfSense package)
Instruction
Overview
This document will guide you through the steps to enable multi-factor authentication for pfSense webConfigurator SSO.
Configure PhenixID Authentication Services as Identity Provider
-
- Login to Configuration Manager.
- Setup PhenixID Authentication Services as a SAML IdP using one of the Federation scenarios described here. (If the desired authentication method is not provided by a scenario, use the documentation for the SAML authenticator here)
- Set Post SLO URL = https://YOUR_PHENIXID_IDP_DOMAIN/saml/authenticate/logout/
Configure PAS assertion
- Login to Configuration Manager.
- Locate the Scenario-Federation setup earlier for pfSense.
- Select EXECUTION FLOW
- Modify the AssertionProvider valve to include the attribute containing the group membership for the pfSense user (carLicense is used in this example)
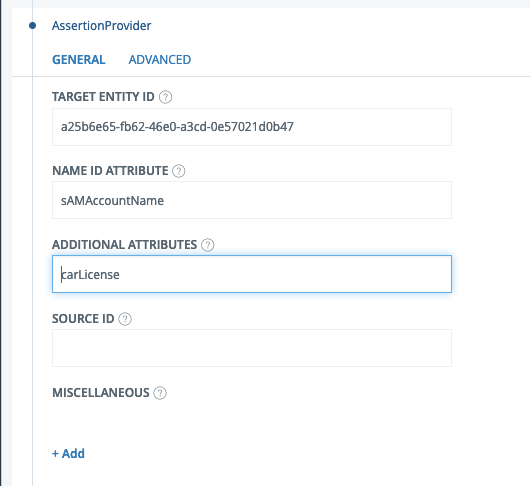
- Save the changes
Configure pfSense webConfigurator SAML IdP settings
Follow the steps in this guide to install and enable pfSense webConfigurator for SAML2. https://github.com/jaredhendrickson13/pfsense-saml2-auth
Configure Identity Provider (IdP) settings
Configure below settings to match the PAS settings for the previous configured SAML IdP
- Identity Provider Entity ID
- Identity Provider Sign-ON URL
- Identity Provider Groups Attribute

Configure Identity Provider x509 Certificate
- Fetch your IdP metadata by opening the URL: https://<pas-server>/saml/authenticate/<saml-authenticator-alias>?getIDPMeta
Note: The link is case sensitive - Copy the Certificate data from the <ds:X509Certificate> element and paste into a text editor.
- Add —–BEGIN CERTIFICATE—– as first row and —–END CERTIFICATE—– as last row

- Copy the certificate into Identity Provider x509 Certificate information.
- Save the changes
Add pfSense as a trusted Service Provider to PhenixID Authentication Services
- Login to configuration manager
- Scenarios->Federation
- SAML Metadata upload
- Enter a name. Click Next
- Add the pfSense metadata url (provided to you by clicking on System/SAML2 menu, copy the URL for ).
(If your PhenixID Authentication Services server is not able to reach external resources, browse to the pfSense metadata URL on another device and download the metadata to a file. Then upload the file in the SAML Metadata upload scenario).
Test
- Browse to https://<your-pfsense-url>/saml2_auth/sso/acs/
- Authenticate
- You should now be redirected to pfSense webConfigurator and be logged in
Debug
Verify server.log to make sure the SAML assertion contains the intended identity information and that correct user mapping has been made in pfSense.
DISCLAIMER
Information provided in this document is for your information only. PhenixID makes no explicit or implied claims to the validity of this information. Any trademarks referenced in this document are the property of their respective owners.The origin of this information may be internal or external to PhenixID. PhenixID makes all reasonable efforts to verify this information.
PhenixID - support.phenixid.se