Summary
This document will guide you through the steps to enable multi-factor authentication and Single-Sign On for the Apache 2.x authentication/authorization module mod_auth_openidc (https://github.com/zmartzone/mod_auth_openidc) using OpenID Connect to integrate with PhenixID Authentication Services.
mod_auth_openidc is an OIDC Relying party (RP) can be used to easily add strong authentication and authorization to any web application / page hosted on the Apache web server. (For example a simple html page or a tomcat web application).
System Requirements
- PhenixID Authentication Server 3.2 or higher
- Apache web server 2.x with php installed (on Linux OS. For Windows, a commercial agreement with zmartzone for mod_auth_openidc is required).
- (For the simple example page protected below to work, PHP must be installed on the Apache server.)
Instruction
Overview
This document will guide you through the steps to enable multi-factor authentication and Single-Sign on for mod_auth_openidc.
Setup Relying Party trust on PhenixID Authentication Services
- Login to Configuration Manager
- Go to Scenarios->OIDC
- Add a new Relying party
client_id = rp
client_secret = password
redirect_uri = https://<apache server domain>/protected_by_oidc_rp.php/callbackChange <apache_server_domain> to suite your environment. Example: https://integration.phenixid.se/protected_by_oidc_rp.php/callback
Configure PhenixID Authentication Services as OpenID Connect Provider
- Setup PhenixID Authentication Services as a OpenID Connect Provider using one of the OIDC scenarios described here. (If the desired authentication method is not provided by a scenario, use the SAML Identity Provider bridge and use applicable SAML scenario to set it up).
- Use Authorization code flow.
- Once done, if you need to change token attribute population, please do so below the Execution Flow tab.
- Select Advanced->OIDC_OP
- Locate the OpenID Connect Provider created in previous step.
- Change the token_endpoint_auth_methods_supported to client_secret_post.
"token_endpoint_auth_methods_supported": [
"client_secret_post"
], - Click Stage changes and commit changes.
- Go back to Scenarios->OIDC and find the OP created in previos step
- Click View OP Discovery
- Copy the URL of the page that just opened. This will be used in later step when configuring mod_auth_openidc.
Install mod_auth_openidc
- Access the server running Apache using SSH
- Run the command sudo apt-get install libapache2-mod-auth-openidc
(Follow any instructions that may follow) - Run the command sudo a2enmod auth_openidc to enable the new module
- Run the command service apache2 restart to restart Apache to apply the new setting.
Configure mod_auth_openidc
(In this example below, the simple php page protected_by_oidc_rp.php is protected with OIDC RP authentication. Change this to suite your environment by changing the params OIDCRedirectURI and Location below. The OIDCRedirectURI value must also be added to the PAS RP Trust (allowed redirect uris)
- Open the Apache main configuration file (httpd.conf or httpd-ssl.conf).
- Add this to the configuration:
OIDCProviderMetadataURL https://demo.phenixid.net/oidc/.well-known/openid-configuration
OIDCClientID rp
OIDCClientSecret password
OIDCCryptoPassphrase ChangeThisToAnyValueOfYourChoice
OIDCRedirectURI https://integration.phenixid.se/protected_by_oidc_rp.php/callback
OIDCResponseType code
OIDCScope "openid"
OIDCSSLValidateServer Off
OIDCPassClaimsAs environment
OIDCClaimPrefix USERINFO_
OIDCPassIDTokenAs payload

<Location "/protected_by_oidc_rp.php">
Require valid-user
AuthType openid-connect
</Location>
Change the values for:
– OIDCProviderMetadataURL
– OIDCCryptoPassphrase (this can be set to any value. Just generate a random value and use that)
– OIDCRedirectURI
to suite your environment. - Save the changes and restart Apache
Add test page to Apache
- Create a new file, /var/www/html/protected_by_oidc_rp.php.
- Add this content:
<html>
<body>
<h1>If you can see this, the OIDC login procedure was successful.</h1>
<a href="/protected_by_oidc_rp.php/callback?logout=%2Findex.html">Logout</a>
<H2>OIDC ID TOKEN PAYLOAD:</H2>
<pre><?php echo str_replace(' ', ' ', (json_encode(json_decode($_SERVER['OIDC_id_token_payload']), JSON_PRETTY_PRINT | JSON_UNESCAPED_SLASHES))); ?> </pre>
<H2>All content</H2>
<pre><?php print_r($_SERVER); ?></pre>
</body>
</html> - Save the file.
Test
- Browse to https://<apache server domain>/protected_by_oidc_rp.php
- You should now be redirected to the PhenixID Authentication Services OpenID Connect Provider
- Authenticate
- This page should now be presented.
The value of OIDC_id_token_payload should contain the id_token claims.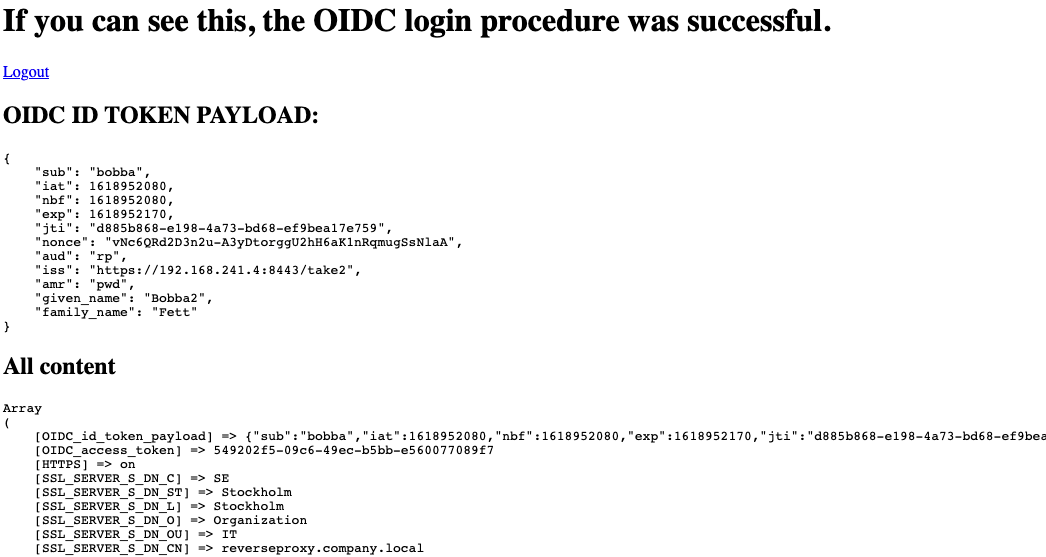
Troubleshooting
- If error message is presented on PhenixID Authentication Services page, please check server.log for details.
- If error message is presented on the OIDC RP, check Apache logs for errors.
- If an error message regaring token type is displayed on the OIDC RP, please add the property “token_type: Bearer” to the token endpoint execution flow.
DISCLAIMER
Information provided in this document is for your information only. PhenixID makes no explicit or implied claims to the validity of this information. Any trademarks referenced in this document are the property of their respective owners.The origin of this information may be internal or external to PhenixID. PhenixID makes all reasonable efforts to verify this information.
PhenixID - support.phenixid.se