Summary
This document will guide you through the steps to enable PhenixID MFA adapter for MS ADFS.
System Requirements
- PhenixID Server version 3.0 or higher
- Microsoft ADFS installed
- PhenixID ADFS MFA Adapter kit downloaded from here.
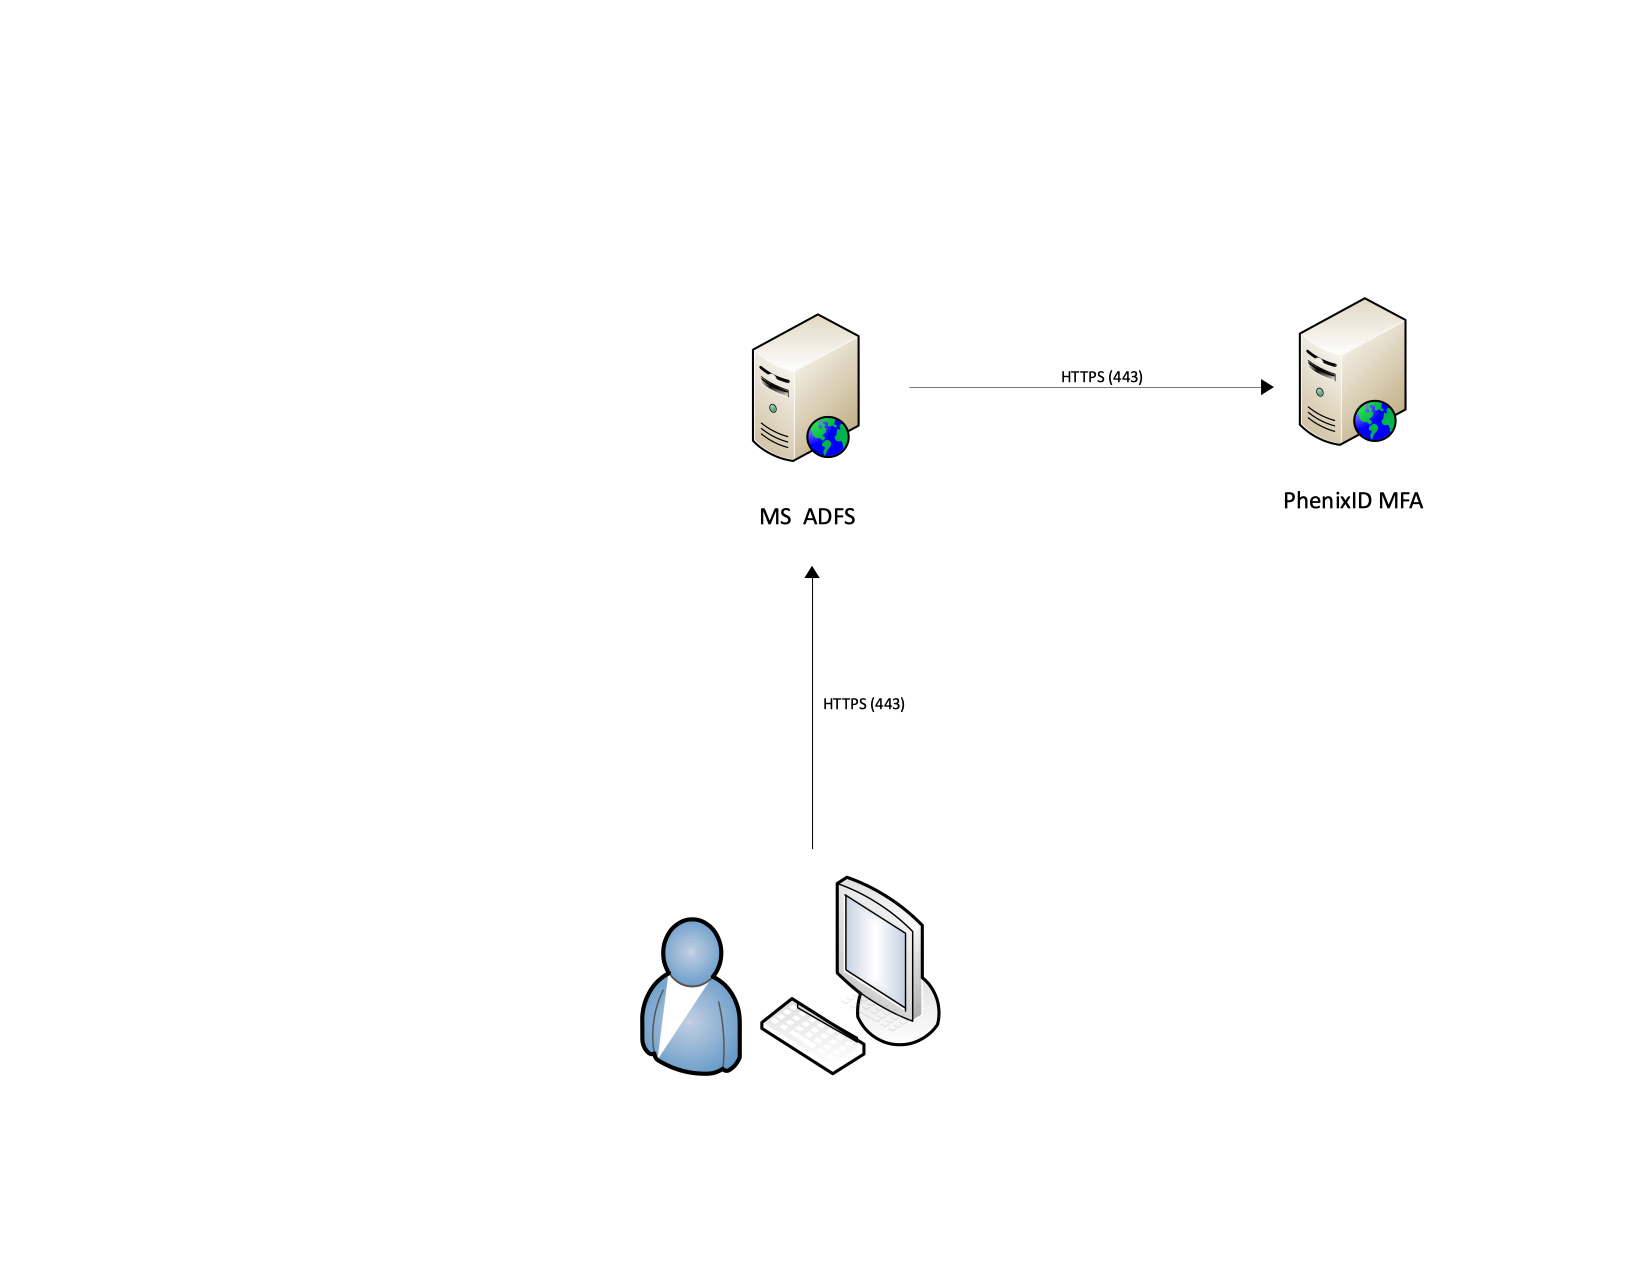
- Microsoft ADFS server(s) must be able to reach PhenixID MFA server using https:
- Verify communication (default SSL port for PhenixID MFA http server is 8443)
- ADFS Server must trust the https certificate used.
- Open a web browser on the ADFS server and enter a URL to PhenixID MFA server (https://<phenixid_server>/api/authentication/). Verify that the server is reachable and that the certificate is trusted.
Instruction
Overview
This document will guide you through the steps to enable PhenixID MFA adapter for MS ADFS. There are currently seven adapters available:
- PhenixID OneTouch authentication
- One-Time-Password authentication – SMS delivery
- One-Time-Password authentication – Email delivery
- One-Time-Password authentication – Software token
- One-Time-Password authentication – Hardware token
- BankID Authentication
- NetID Access authentication (SITHS, EFOS, own CA).
- SITHS eID authentication (Smartcard and mobile app)
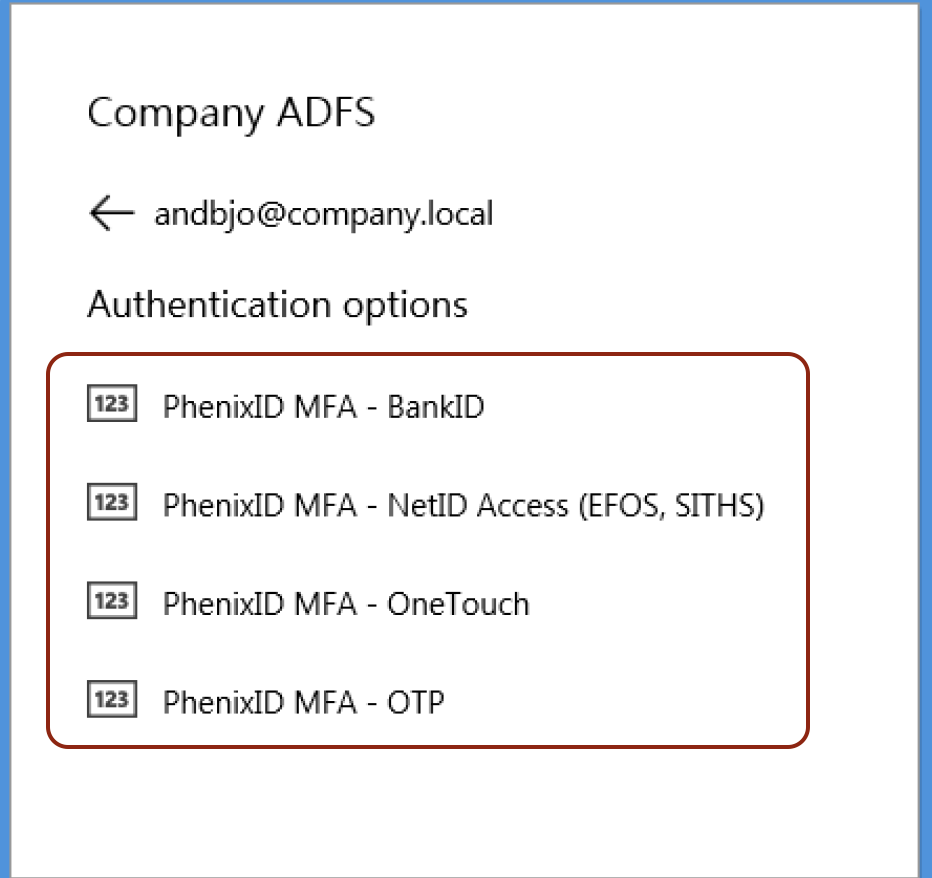
One or multiple adapters can be installed and used. If multiple adapters are enabled, a selection list will be presented to the end user: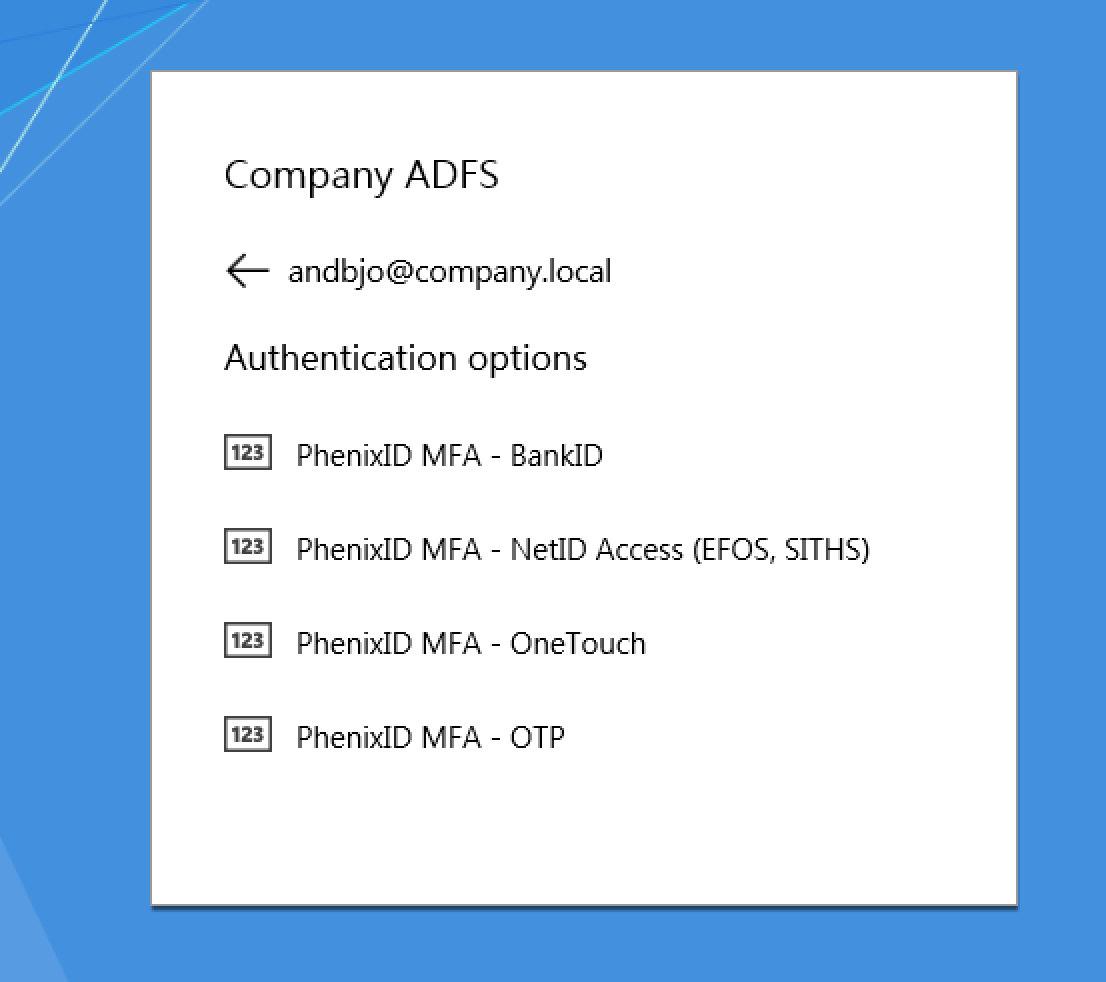
Besides the adapters described above, PhenixID MFA Server also supports additional sign-in methods. A full list of sign-in methods can be found below the Authentication section at PhenixID Integrations.
ADFS versions
PhenixID MFA Adapters for ADFS can be used on these versions of ADFS:
- AD FS 3 on Windows Server 2012 R2
- AD FS 4 on Windows Server 2016
- AD FS 2019 on Windows Server 2019
Please note that AD FS 2019 supports MFA adapter as primary authentication method which makes no-password authentication feasible.
System overview
Flows
PhenixID MFA Authentication – OTP – SMS delivery

- User client connects to ADFS
- ADFS asks user client for primary authentication or username (Windows 2019)
- User performs primary authentication or submits username (Windows 2019)
- PhenixID MFA Authentication – OTP – fetch the attributes userPrincipalName, samaccountname, mail, mobile (mobile attribute is configurable), givenName and sn from AD. These values, and a session state value created by ADFS, are sent to the PhenixID MFA Server.
- PhenixID MFA server produce a One-Time-Password. PhenixID MFA server sends the OTP to the mobilenumber from step 4. PhenixID MFA returns a HTTP Status Code 200 to ADFS.
- ADFS asks the user for a one-time password
- The user client sends OTP to ADFS
- ADFS sends the session state value (same as in point 4) and otp to PhenixID MFA Server.
- PhenixID MFA Server validates OTP. PhenixID MFA Server returns a http status code to the application:
200 – OTP Validation successful
401 – OTP Validation unsuccessful. Error message is returned in body. - If returncode 200 in previous step, the user is authenticated successfully. Otherwise, a new OTP is generated and sent to the end user. ADFS will prompt the user to enter new OTP.
PhenixID MFA Authentication – OTP – Email delivery

- User client connects to ADFS
- ADFS asks user client for primary authentication or username (Windows 2019)
- User performs primary authentication or submits username (Windows 2019)
- PhenixID MFA Authentication – OTP – fetch the attributes userPrincipalName, samaccountname, mail, mobile, givenName and sn from AD. These values, and a session state value created by ADFS, are sent to the PhenixID MFA Server.
- PhenixID MFA server produce a One-Time-Password. PhenixID MFA server sends the OTP to the mail attribute value from step 4. PhenixID MFA returns a HTTP Status Code 200 to ADFS.
- ADFS asks the user for a one-time password
- The user client sends OTP to ADFS
- ADFS sends the session state value (same as in point 4) and otp to PhenixID MFA Server.
- PhenixID MFA Server validates OTP. PhenixID MFA Server returns a http status code to the application:
200 – OTP Validation successful
401 – OTP Validation unsuccessful. Error message is returned in body. - If returncode 200 in previous step, the user is authenticated successfully. Otherwise, a new OTP is generated and sent to the end user. ADFS will prompt the user to enter new OTP.
PhenixID MFA Authentication – OTP – Software token

- User client connects to ADFS
- ADFS asks user client for primary authentication or username (Windows 2019)
- User performs primary authentication or submits username (Windows 2019)
- PhenixID MFA Authentication – OTP – fetch the attributes userPrincipalName, samaccountname, mail, mobile, givenName and sn from AD. These values, and a session state value created by ADFS, are sent to the PhenixID MFA Server.
PhenixID MFA server validates the user (if the user exists) and return status to ADFS. - The user fetches a software token OTP (from PocketPass app or other sw token app)
- ADFS prompt user for OTP
- The user client sends OTP to ADFS
- ADFS sends the session state value (same as in point 4) and otp to PhenixID MFA Server.
- PhenixID MFA Server validates OTP. PhenixID MFA Server returns a http status code to the application:
200 – OTP Validation successful
401 – OTP Validation unsuccessful. Error message is returned in body. - If returncode 200 in previous step, the user is authenticated successfully. Otherwise, ADFS will prompt the user to enter new OTP.
PhenixID MFA Authentication – OTP – Hardware token
- User client connects to ADFS
- ADFS asks user client for primary authentication or username (Windows 2019)
- User performs primary authentication or submits username (Windows 2019)
- PhenixID MFA Authentication – OTP – fetch the attributes userPrincipalName, samaccountname, mail, mobile, givenName and sn from AD. These values, and a session state value created by ADFS, are sent to the PhenixID MFA Server.
PhenixID MFA server validates the user (if the user exists) and return status to ADFS. - The user fetches a hardware token OTP (yubico, feitian or any other OATH-compliant hardware token)
- ADFS prompt user for OTP
- The user client sends OTP to ADFS
- ADFS sends the session state value (same as in point 4) and otp to PhenixID MFA Server.
- PhenixID MFA Server validates OTP. PhenixID MFA Server returns a http status code to the application:
200 – OTP Validation successful
401 – OTP Validation unsuccessful. Error message is returned in body. - If returncode 200 in previous step, the user is authenticated successfully. Otherwise, ADFS will prompt the user to enter new OTP.

PhenixID MFA Authentication – OneTouch

- User client connects to ADFS
- ADFS asks user client for primary authentication or username (Windows 2019)
- User performs primary authentication or submits username (Windows 2019)
- PhenixID MFA Authentication – OneTouch – fetch the userID from the configured attribute in AD and sends it to PhenixID MFA Server.
- PhenixID MFA server creates a OneTouch assignment for the user and sends a push notice to the user cell phone.
- User push notice in cell phone. PhenixID OneTouch app is launched and the assignment is presented. User push “Confirm” to approve the assignment.
- PhenixID MFA server validates assignment and returns successfully authenticated to ADFS.
- The user is authenticated to ADFS successfully.
PhenixID MFA Authentication – BankID 
- User client connects to ADFS
- ADFS asks user client for primary authentication or username (Windows 2019)
- User performs primary authentication or submits username (Windows 2019)
- PhenixID MFA Authentication – BankID – will fetch the personalNumber from AD user attribute (configurable using the personalNumberAttribute property value).
- The PhenixID MFA Adapter sends the personal number to PhenixID MFA Server when using the legacy BankID ADFS adapter – without BankID Secure Start.
- When using the new BankID ADFS adapter, with support for BankID Secure Start, the personal number from LDAP will be compared against the personal number retrieved from BankID when the BankID authentication has finished.
- PhenixID MFA server creates BankID transaction for defined personal number
- PhenixID MFA servers returns transactionID to ADFS adapter.
- End user opens BankID application on device (mobile, tablet or computer) and approves BankID authentication.
- PhenixID MFA server returns transaction status to ADFS.
- If status was OK, the user is authenticated to ADFS successfully. Otherwise an error message is displayed.
- For the BankID Secure Start ADFS adapter, verification of the personal number is performed here
PhenixID MFA Authentication – NetID Access (SITHS/EFOS/Own CA) 
- User client connects to ADFS
- ADFS asks user client for primary authentication or username (Windows 2019)
- User performs primary authentication or submits username (Windows 2019)
- PhenixID MFA Authentication – NetID Access – will fetch the certificate subject (userid) from AD user attribute (configurable using the NetIDAccessSubjectAttribute property value). The PhenixID MFA Adapter sends the certificate subject to PhenixID MFA Server.
- PhenixID MFA server creates NetID Access transaction for defined certificate subject
- PhenixID MFA servers returns transactionID to ADFS adapter.
- End user opens NetID Access application on device (mobile, tablet or computer) and approves NetID Access authentication.
- PhenixID MFA server returns transaction status to ADFS.
- If status was OK, the user is authenticated to ADFS successfully. Otherwise an error message is displayed.
PhenixID MFA Authentication – SITHS eID

- User client connects to ADFS
- ADFS asks user client for primary authentication or username (Windows 2019)
- User performs primary authentication or submits username (Windows 2019)
- PhenixID MFA Authentication – SITHS eID – will fetch the personalNumber from AD user attribute (configurable using the personalNumberAttribute property value). The PhenixID MFA Adapter sends the personal number to PhenixID MFA Server.
- PhenixID MFA server creates SITHS eID order for the defined personal number
- PhenixID MFA servers returns SITHS eID order reference and autostarttoken to ADFS adapter.
- ADFS adapter creates QR code from autostarttoken. The QR code is displayed to the user client.
- The user triggers the SITHS eID authentication app by using one of these alternatives:
a) Open the SITHS eID app and scan the QR code (SITHS eID on other device)
b) Qlick the QR-code which will launch the SITHS eID app / application (SITHS eID on same device) - User approves the SITHS eID authentication.
- PhenixID MFA server returns order reference status to ADFS.
- If status was OK, the user is authenticated to ADFS successfully. Otherwise an error message is displayed.
Attributes
The “PhenixID MFA Authentication – OTP * ” adapters will fetch the attributes userPrincipalName, mail, mobile, sAMAccountName, sn and givenName from the Active Directory and send it to PhenixID Server.
With the “PhenixID MFA Authentication – OTP – SMS” adapter, it is possible to configure another mobile attribute to fetch cell phone number from.
Configure PhenixID MFA Server
The ADFS adapters will call out to PhenixID Server using the HTTP authentication API. This part will describe the steps to configure the HTTP Authentication API for the different adapters.
Global configuration
Install HTTP Authentication API module
- Login to PhenixID Configuration Manager
- Click on the Tab “Configuration”
- Click on the pencil beside “Modules”
- Add module api-authenticate:
{
 "module": "com.phenixidentity~phenix-api-authenticate",
 "enabled": "true",
 "config": {
"http_configuration_ref": "d8baaa02-2ead-473c-88b8-a7aa08a53332",
"tenant": [
{
"id": "phenixid",
"displayName": "PhenixID",
"allowedOperation": [ ] }]
},
"id": "http-auth-api"
}

"http_configuration_ref" is the ID of the used listener.
5. Press “Stage changes” and then “Commit changes”
6. Click on the pencil beside NODE_GROUPS.
7. Add the module id from previous step to module_refs:
"module_refs": "http-auth-api,sealapp,signapp_1,7746ae10-3939-4320-a1b3-c43e5de02ce8,01ffd70e-b5fb-4c06-b040-b61760424bf6,37d3dac4-c7b5-4045-aaf0-d01b441888f9,ce20250e-9a5b-449d-b264-898bc44202f5,111657c2-de00-426e-8694-5b9c8f293d2a,cec68683-821d-4f8b-9bd4-3d6407762bcb,7061ba14-8fe7-4a50-a2ee-8ae3ffacdd15,92c0c541-7dac-4b4c-bc36-d7173e57f2de,38b31471-436a-47ab-912f-fde88adf807e,4177c53d-60fa-41cc-b87a-42316a7dcf78,e713754b-67e6-4b66-a9b5-0380855d9870,1f1f186a-520e-4fff-90de-7761935fb33d"
8. Press Stage Changes and Commit changes
9. Verify that the module was loaded correctly by opening the <phenixid_root>/mods/ folder. It should now contain a folder named com.phenixidentity~phenix-api-authenticate~<version>
Create API consumer account for Basic Authentication
- Click on the pencil beside “Internal users”
- Add an internal account for adfs adapter basic auth. (The password will be encrypted after Stage-Commit)

- Press “Stage changes” and then “Commit changes”
Configure OTP Authentication – SMS delivery
This example will explain how to configure OTP authentication using SMS-OTP as the delivery method.
- Click on the pencil beside “Modules”
- Locate the api-authenticate module.
- Add “usernameValidator” and “otpValidator” as allowed operations.
{ "module": "com.phenixidentity~phenix-api-authenticate", "enabled": "true", "config": { "tenant": [ { "id": "phenixid", "displayName": "PhenixID", "allowedOperation": [ "usernameValidator", "otpValidator" ] } ] }, "id": "http-auth-api" } - Click Stage changes and Commit changes.
- Click on the pencil beside “Pipes”
-
Add the pipes “usernameValidator” and “otpValidator”. Please adjust to suite your environment:
{
  "id": "usernameValidator",
  "valves": [
    {
      "name": "InternalUserStoreValidatorValve",
      "enabled": "true",
      "config": {
        "username": "{{request.username_api}}",
        "pwd": "{{request.api_password}}",
        "password_param_name": "{{request.password_api}}"
      }
    },
    {
      "name": "ItemCreateValve",
      "config": {
        "dest_id": "{{request.username}}"
      }
    },
    {
      "name": "PropertyAddValve",
      "config": {
        "name": "mobile",
        "value": "{{request.mobile}}"
      }
    },
    {
      "name": "OTPGeneratorValve",
      "config": {
        "length": "6",
        "alpha_numeric": "false",
        "name": "generated_otp",
        "valid_time_in_seconds": "120"
      }
    },
    {
      "name": "OTPBySMSValve",
      "config": {
        "gw_username": "gwaccountname",
        "gw_password": "{enc}t2nLAw1y/D+k+SikYlQOYYiHYIyX8iiWhhv2kJg19iM=",
        "recipient_param_name": "mobile",
        "generated_otp_name": "generated_otp",
        "use_flash": "true"
      }
    },
    {
      "name": "SessionLoadValve",
      "config": {
        "id": "{{request.session_id}}"
      }
    },
    {
      "name": "SessionPropertyRemoveValve",
      "config": {
        "name": "generated_otp"
      }
    },
    {
      "name": "SessionPropertyAddValve",
      "config": {
        "name": "generated_otp",
        "value": "{{item.generated_otp}}"
      }
    },
    {
      "name": "SessionPersistValve",
      "config": {}
    }
  ]
},

{
  "id": "otpValidator",
  "valves": [
    {
      "name": "InternalUserStoreValidatorValve",
      "enabled": "true",
      "config": {
        "username": "{{request.username_api}}",
        "password_param_name": "{{request.password_api}}"
      }
    },
    {
      "name": "ItemCreateValve",
      "config": {
        "dest_id": "{{request.username}}"
      }
    },
    {
      "name": "SessionLoadValve",
      "config": {
        "id": "{{request.session_id}}"
      }
    },
    {
      "name": "OTPValidationValve",
      "config": {
        "provided_otp_param_name": "{{request.otp}}",
        "generated_otp_param_name": "generated_otp"
      }
    }
  ]
} - Press “Stage changes” and then “Commit changes”
Configure OTP Authentication – Email delivery
This example will explain how to configure OTP authentication using Email-OTP as the delivery method.
- Click on the pencil beside “Modules”
- Locate the api-authenticate module.
- Add “usernameValidatorEmail” and “otpValidatorEmail” as allowed operations.
{ "module": "com.phenixidentity~phenix-api-authenticate", "enabled": "true", "config": { "tenant": [ { "id": "phenixid", "displayName": "PhenixID", "allowedOperation": [ "usernameValidatorEmail", "otpValidatorEmail" ] } ] }, "id": "http-auth-api" } - Click Stage changes and Commit changes.
- Click on the pencil beside “Pipes”
- Add the pipes “usernameValidatorEmail” and “otpValidatorEmail”.
Please adjust to suite your environment:{
"id": "usernameValidatorEmail",
"valves": [
{
"name": "InternalUserStoreValidatorValve",
"enabled": "true",
"config": {
"username": "{{request.username_api}}",
"pwd": "{{request.api_password}}",
"password_param_name": "{{request.password_api}}"
}
},
{
"name": "ItemCreateValve",
"config": {
"dest_id": "{{request.username}}"
}
},
{
"name": "PropertyAddValve",
"config": {
"name": "mail",
"value": "{{request.mail}}"
}
},
{
"name": "OTPGeneratorValve",
"config": {
"length": "6",
"alpha_numeric": "false",
"name": "generated_otp",
"valid_time_in_seconds": "120"
}
},
{
"name": "OTPBySMTPValve",
"config": {
"smtp_settings": "7b8625b4-d0fb-4efa-a52e-30d0b6f14817",
"userid_param_name": "username",
"mail_param_name": "{{item.mail}}"
}
},
{
"name": "SessionLoadValve",
"config": {
"id": "{{request.session_id}}"
}
},
{
"name": "SessionPropertyRemoveValve",
"config": {
"name": "generated_otp"
}
},
{
"name": "SessionPropertyAddValve",
"config": {
"name": "generated_otp",
"value": "{{item.generated_otp}}"
}
},
{
"name": "SessionPersistValve",
"config": {}
}
]
},
{
"id": "otpValidatorEmail",
"valves": [
{
"name": "InternalUserStoreValidatorValve",
"enabled": "true",
"config": {
"username": "{{request.username_api}}",
"password_param_name": "{{request.password_api}}"
}
},
{
"name": "ItemCreateValve",
"config": {
"dest_id": "{{request.username}}"
}
},
{
"name": "SessionLoadValve",
"config": {
"id": "{{request.session_id}}"
}
},
{
"name": "OTPValidationValve",
"config": {
"provided_otp_param_name": "{{request.otp}}",
"generated_otp_param_name": "generated_otp"
}
}
]
} - Press “Stage changes” and then “Commit changes”
Configure OTP Authentication – Software token
This example will explain how to configure OTP authentication using Software Token OTP.
- Click on the pencil beside “Modules”
- Locate the api-authenticate module.
- Add “usernameValidatorToken” and “otpValidatorToken” as allowed operations.
{ "module": "com.phenixidentity~phenix-api-authenticate", "enabled": "true", "config": { "tenant": [ { "id": "phenixid", "displayName": "PhenixID", "allowedOperation": [ "usernameValidatorToken", "otpValidatorToken" ] } ] }, "id": "http-auth-api" } - Click Stage changes and Commit changes.
- Click on the pencil beside “Pipes”.
- Add the pipes “usernameValidatorToken” and “otpValidatorToken”.
Please adjust to suite your environment:{
"id": "usernameValidatorToken",
"valves": [
{
"name": "InternalUserStoreValidatorValve",
"enabled": "true",
"config": {
"username": "{{request.username_api}}",
"pwd": "{{request.api_password}}",
"password_param_name": "{{request.password_api}}"
}
},
{
"name": "ItemCreateValve",
"config": {
"dest_id": "{{request.username}}"
}
}
]
}{
"id": "otpValidatorToken",
"valves": [
{
"name": "InternalUserStoreValidatorValve",
"enabled": "true",
"config": {
"username": "{{request.username_api}}",
"password_param_name": "{{request.password_api}}"
}
},
{
"name": "ItemCreateValve",
"config": {
"dest_id": "{{request.username}}"
}
},
{
"name": "TokenValidationValve",
"config": {
"provided_otp_param_name":"{{request.otp}}",
"userid_param_name": "{{request.username}}"
}
}
]
}NOTE: The value “{{request.username}}” will use UPN.
If sAMAccountName should be used instead, set it like this:
“userid_param_name”: “{{request.sAMAccountName}}”7. Press “Stage changes” and then “Commit changes”
Configure OTP Authentication – Hardware token
This example will explain how to configure OTP authentication using Hardware Token OTP.
- Click on the pencil beside “Modules”
- Locate the api-authenticate module.
- Add “usernameValidatorHWToken” and “otpValidatorHWToken” as allowed operations.
{ "module": "com.phenixidentity~phenix-api-authenticate", "enabled": "true", "config": { "tenant": [ { "id": "phenixid", "displayName": "PhenixID", "allowedOperation": [ "usernameValidatorHWToken", "otpValidatorHWToken" ] } ] }, "id": "http-auth-api" } - Click Stage changes and Commit changes.
- Click on the pencil beside “Pipes”
- Add the pipes “usernameValidatorHWToken” and “otpValidatorHWToken”.
Please adjust to suite your environment:{
"id": "usernameValidatorHWToken",
"valves": [
{
"name": "InternalUserStoreValidatorValve",
"enabled": "true",
"config": {
"username": "{{request.username_api}}",
"pwd": "{{request.api_password}}",
"password_param_name": "{{request.password_api}}"
}
},
{
"name": "ItemCreateValve",
"config": {
"dest_id": "{{request.username}}"
}
}
]
},
{
"id": "otpValidatorHWToken",
"valves": [
{
"name": "InternalUserStoreValidatorValve",
"enabled": "true",
"config": {
"username": "{{request.username_api}}",
"password_param_name": "{{request.password_api}}"
}
},
{
"name": "ItemCreateValve",
"config": {
"dest_id": "{{request.username}}"
}
},{ "name": "TokenValidationValve", "config": { "provided_otp_param_name":"{{request.otp}}", "userid_param_name": "{{request.username}}",
"check_yubikey" : "true" }
}
]
} - Press “Stage changes” and then “Commit changes”
Configure PhenixID OneTouch Authentication
- Setup PhenixID OneTouch using Scenarios->System->OneTouch. [Skip if already configured]
- Configure the HTTP API for PhenixID OneTouch.
- Locate the api-authenticate module.
- Add “onetouch_start_auth” and “onetouch_check_auth” as allowed operations.
{ "module": "com.phenixidentity~phenix-api-authenticate", "enabled": "true", "config": { "tenant": [ { "id": "phenixid", "displayName": "PhenixID", "allowedOperation": [ "onetouch_start_auth", "onetouch_check_auth" ] } ] }, "id": "http-auth-api" } - Add this valve to the pipes onetouch_start_auth and onetouch_check_auth. The valve must be inserted as the first valve in the pipe.
{ "name": "InternalUserStoreValidatorValve", "enabled": "true", "config": { "username": "{{request.username_api}}", "pwd": "{{request.api_password}}", "password_param_name": "{{request.password_api}}" } } - Click Stage changes and Commit changes.
Configure BankID Authentication
- Configure BankID authentication by following the solution document How to setup the HTTP API for Swedish BankID authentication on document.phenixid.net. Skip Add local http-api module.
- Locate the api-authenticate module.
- Add “bankid_start_auth” and “bankid_check_auth” as allowed operations.
{ "module": "com.phenixidentity~phenix-api-authenticate", "enabled": "true", "config": { "tenant": [ { "id": "phenixid", "displayName": "PhenixID", "allowedOperation": [ "bankid_start_auth", "bankid_check_auth" ] } ] }, "id": "http-auth-api" } - Add this valve to the pipes bankid_start_auth and bankid_check_auth. The valve must be inserted as the first valve in the pipe.
{ "name": "InternalUserStoreValidatorValve", "enabled": "true", "config": { "username": "{{request.username_api}}", "pwd": "{{request.api_password}}", "password_param_name": "{{request.password_api}}" } } - Click Stage changes and Commit changes.
Configure NetID Access (SITHS/EFOS/Own CA) Authentication
- Configure NetID authentication by following the solution document How to setup the HTTP API for NetID Access (SITHS/EFOS/Own CA) authentication on document.phenixid.net. Skip Add local http-api module.
- Locate the api-authenticate module.
- Add “netid_start_auth” and “netid_check_auth” as allowed operations.
{ "module": "com.phenixidentity~phenix-api-authenticate", "enabled": "true", "config": { "tenant": [ { "id": "phenixid", "displayName": "PhenixID", "allowedOperation": [ "netid_start_auth", "netid_check_auth" ] } ] }, "id": "http-auth-api" } - Add this valve to the pipes netid_start_auth and netid_check_auth. The valve must be inserted as the first valve in the pipe.
{ "name": "InternalUserStoreValidatorValve", "enabled": "true", "config": { "username": "{{request.username_api}}", "pwd": "{{request.api_password}}", "password_param_name": "{{request.password_api}}" } } - Click Stage changes and Commit changes.
Configure SITHS eID Authentication
Requirements:
- PAS 4.0 or higher
- Apply the requirements described in this article.
- Locate the api-authenticate module.
- Add “sithseid_start_auth” and “sithseid_check_auth” as allowed operations.
{ "module": "com.phenixidentity~phenix-api-authenticate", "enabled": "true", "config": { "tenant": [ { "id": "phenixid", "displayName": "PhenixID", "allowedOperation": [ "sithseid_start_auth", "sithseid_check_auth" ] } ] }, "id": "http-auth-api" } - Add these pipes:
{
		"id": "sithseid_start_auth",
		"description": "Start auth with siths eid",
		"valves": [
			{
				"name": "InputParameterExistValidatorValve",
				"enabled": "true",
				"config": {
					"param_name": "personalIdentifier"
				}
			},
			{
				"name": "InternalUserStoreValidatorValve",
				"enabled": "true",
				"config": {
					"username": "{{request.username_api}}",
					"password_param_name": "{{request.password_api}}"
				}
			},
			{
				"name": "SithsEidAuthenticateValve",
				"config": {
					"keyStore": "5ca8fb2f-bb98-48eb-a1fd-f1e89879fd50",
					"sithseidURL": "https://secure-authservice.idp.ineratest.org",
					"organizationName": "PhenixID",
					"personalIdentifier": "{{request.personalIdentifier}}"
				}
			}
		]
	},
	{
		"id": "sithseid_check_auth",
		"description": "Check auth",
		"valves": [
			{
				"name": "InternalUserStoreValidatorValve",
				"enabled": "true",
				"config": {
					"username": "{{request.username_api}}",
					"password_param_name": "{{request.password_api}}"
				}
			},
			{
				"name": "SithsEidCollectAuthenticationStatusValve",
				"config": {
					"keyStore": "5ca8fb2f-bb98-48eb-a1fd-f1e89879fd50",
					"sithseidURL": "https://secure-authservice.idp.ineratest.org",
					"orderRef": "{{request.orderRef}}",
					"customerID": "kund"
				}
			}
		]
	}
Change these parameters to suite your environment:
– sithseidURL
– keyStore
– organizationNameDetailed configuration for the SITHS valves can be found here:
– SithsEidCollectAuthenticationStatusValve
– SithsEidAuthenticateValve - Click Stage changes and Commit changes.
Installation of PhenixID MFA adapter for ADFS
Make sure you have the following values before starting the ADFS configuration:
- PhenixID Server root url (https://phenix_server:port)
- If you use basic authentication, basic auth username and password
- The tenant-id value from the http authentication api module configuration.
NB! The installation must be performed on every node in the ADFS farm.
Global configuration
- Logon as an administrator on the ADFS Windows Server.
- The ADFS Adapter will log/debug to the Event log. In order to write to the event log, the adfs service account must be given permissions.
Give the ADFS Service account full permission on the EventLog registry keys HKLM\SYSTEM\CurrentControlSet\Services\EventLog and HKEY_LOCAL_MACHINE\SYSTEM\ CurrentControlSet\Services\ EventLog\Security. NB!
– Verify that the permissions set are propagated correctly to the registry subkeys.– In some environments this permission has to be set by a group policy as well.
– From Windows 2019, this subkey is owned by the SYSTEM account:
* HKLM\SYSTEM\CurrentControlSet\Services\EventLog\State
To change the permissions of this subkey, the Registry Editor must be run as SYSTEM. This guide shows how to launch a program as SYSTEM:
https://www.winhelponline.com/blog/run-program-as-system-localsystem-account-windows/– From Windows 2019, this subkey is owned by the TrustedInstaller account:
* HKLM\SYSTEM\CurrentControlSet\Services\EventLog\Security\AD FS Auditing
To change the permissions of this subkey, the Registry Editor must be run as TrustedInstaller. Follow this guide to launch a program as TrustedInstaller (the guide points to SYSTEM, simply change SYSTEM to TrustedInstaller):
https://www.winhelponline.com/blog/run-program-as-system-localsystem-account-windows/ - Create a folder on the ADFS server, C:\PhenixIDAuthenticationProvider
- Copy the dll and properties files from the Adapter kit to the folder
Install PhenixID MFA Adapter – OTP – SMS
- Open PhenixIDMFAAuthenticationProviderOTP-SMS.properties
- Change the generateOTPURL and validateOTPURL to match your PhenixID MFA environment.
- Change basicAuthUserName and basicAuthPassword to the values you added to the PhenixID MFA configuration.
- Change tenant to the value you added to the values you added to the PhenixID MFA configuration.
- [OPTIONAL] Add entry for the attribute containing the cell phone number. If omitted, the attribute mobile will be used.
mobileAttribute=extensionAttribute12 - Save the file.
- Run the powershell script “OTP_SMS_register_phxid_mfa_adapter.ps1”
- Restart ADFS Service
Install PhenixID MFA Adapter – OTP – Email
- Open PhenixIDMFAAuthenticationProviderOTP-Email.properties
- Change the generateOTPURL and validateOTPURL to match your PhenixID MFA environment.
- Change basicAuthUserName and basicAuthPassword to the values you added to the PhenixID MFA configuration.
- Change tenant to the value you added to the values you added to the PhenixID MFA configuration.
- Save the file.
- Run the powershell script “OTP_Email_register_phxid_mfa_adapter.ps1”
- Restart ADFS Service
Install PhenixID MFA Adapter – OTP – Software token
- Open PhenixIDMFAAuthenticationProviderOTP-Token.properties
- Change the generateOTPURL and validateOTPURL to match your PhenixID MFA environment.
- Change basicAuthUserName and basicAuthPassword to the values you added to the PhenixID MFA configuration.
- Change tenant to the value you added to the values you added to the PhenixID MFA configuration.
- Save the file.
- Run the powershell script “OTP_Token_register_phxid_mfa_adapter.ps1”
- Restart ADFS Service
Install PhenixID MFA Adapter – OTP – Hardware token
- Open PhenixIDMFAAuthenticationProviderOTP-HWToken.properties
- Change the generateOTPURL and validateOTPURL to match your PhenixID MFA environment.
- Change basicAuthUserName and basicAuthPassword to the values you added to the PhenixID MFA configuration.
- Change tenant to the value you added to the values you added to the PhenixID MFA configuration.
- Save the file.
- Run the powershell script “OTP_HWToken_register_phxid_mfa_adapter.ps1”
- Restart ADFS Service
Install PhenixID MFA Adapter – PhenixID OneTouch
- Open PhenixIDMFAAuthenticationProviderOneTouch.properties
- Change the startbackendURL and checkBackendURL to match your environment
- Change basicAuthUserName and basicAuthPassword to the values you added on PhenixID Server.
- Change tenant to the value you added on PhenixID Server.
- Change userIDAttribute to the AD user attribute where the personal number is stored.
- Save the file.
- Run the powershell script “onetouch_register_phxid_mfa_adapter.ps1”
- Restart ADFS Service
Install PhenixID MFA Adapter – BankID
- Open PhenixIDMFAAuthenticationProviderBankID.properties
- Change startBackendURL and checkBackendURL to match your environment
- Change basicAuthUserName and basicAuthPassword to the values you added on PhenixID Server.
- Change tenant to the value you added on PhenixID Server.
- Change personalNumberAttribute to the AD user attribute where the personal number is stored.
- Save the file.
- Run the powershell script “BankID_register_phxid_mfa_adapter.ps1”
- Restart ADFS Service
PhenixID MFA Adapter – BankID – Change GUI text
The default GUI text will show Starta din BankID app. You can change it by adding a new parameter to PhenixIDMFAAuthenticationProviderBankID.properties. Example:
labelText=Var god öppna din BankID-app.
Reinstall the adapter to apply the change.
Install PhenixID MFA Adapter – NetID Access (SITHS/EFOS/Own CA)
- Open PhenixIDMFAAuthenticationProviderNetIDAccess.properties
- Change startBackendURL and checkBackendURL to match your environment
- Change basicAuthUserName and basicAuthPassword to the values you added on PhenixID Server.
- Change tenant to the value you added on PhenixID Server.
- Change NetIDAccessSubjectAttribute to the AD user attribute where the certificate subject is stored.
- Save the file.
- Run the powershell script “NetIDAccess_register_phxid_mfa_adapter.ps1”
- Restart ADFS Service
Install PhenixID MFA Adapter – SITHS eID
- Open PhenixIDMFAAuthenticationProviderSithsEid.properties.
- Change startBackendURL and checkBackendURL to match your environment
- Change basicAuthUserName and basicAuthPassword to the values you added on PhenixID Server.
- Change tenant to the value you added on PhenixID Server.
- Change personalNumberAttribute to the AD user attribute where the personal number is stored.
- Save the file.
- Run the powershell script “SITHSeID_register_phxid_mfa_adapter.ps1”
- Restart ADFS Service
Configure ADFS to use adapter(s)
- Start AD FS Management
- Click on “Authentication Policies”
- Click edit on “Multifactor Authentication”
- In the list of additional Authentication methods you should now see the PhenixID MFA adapters you installed in the previous step.
- Configure ADFS to use the PhenixID MFA adapters to suite your needs.
Example configuration – use PhenixID MFA Adapter – BankID
This example describes how to use PhenixID MFA Adapter – BankID – as the primary authentication for extranet users while intranet users will be allowed to use Windows logon. To view the end user experience please view this video.
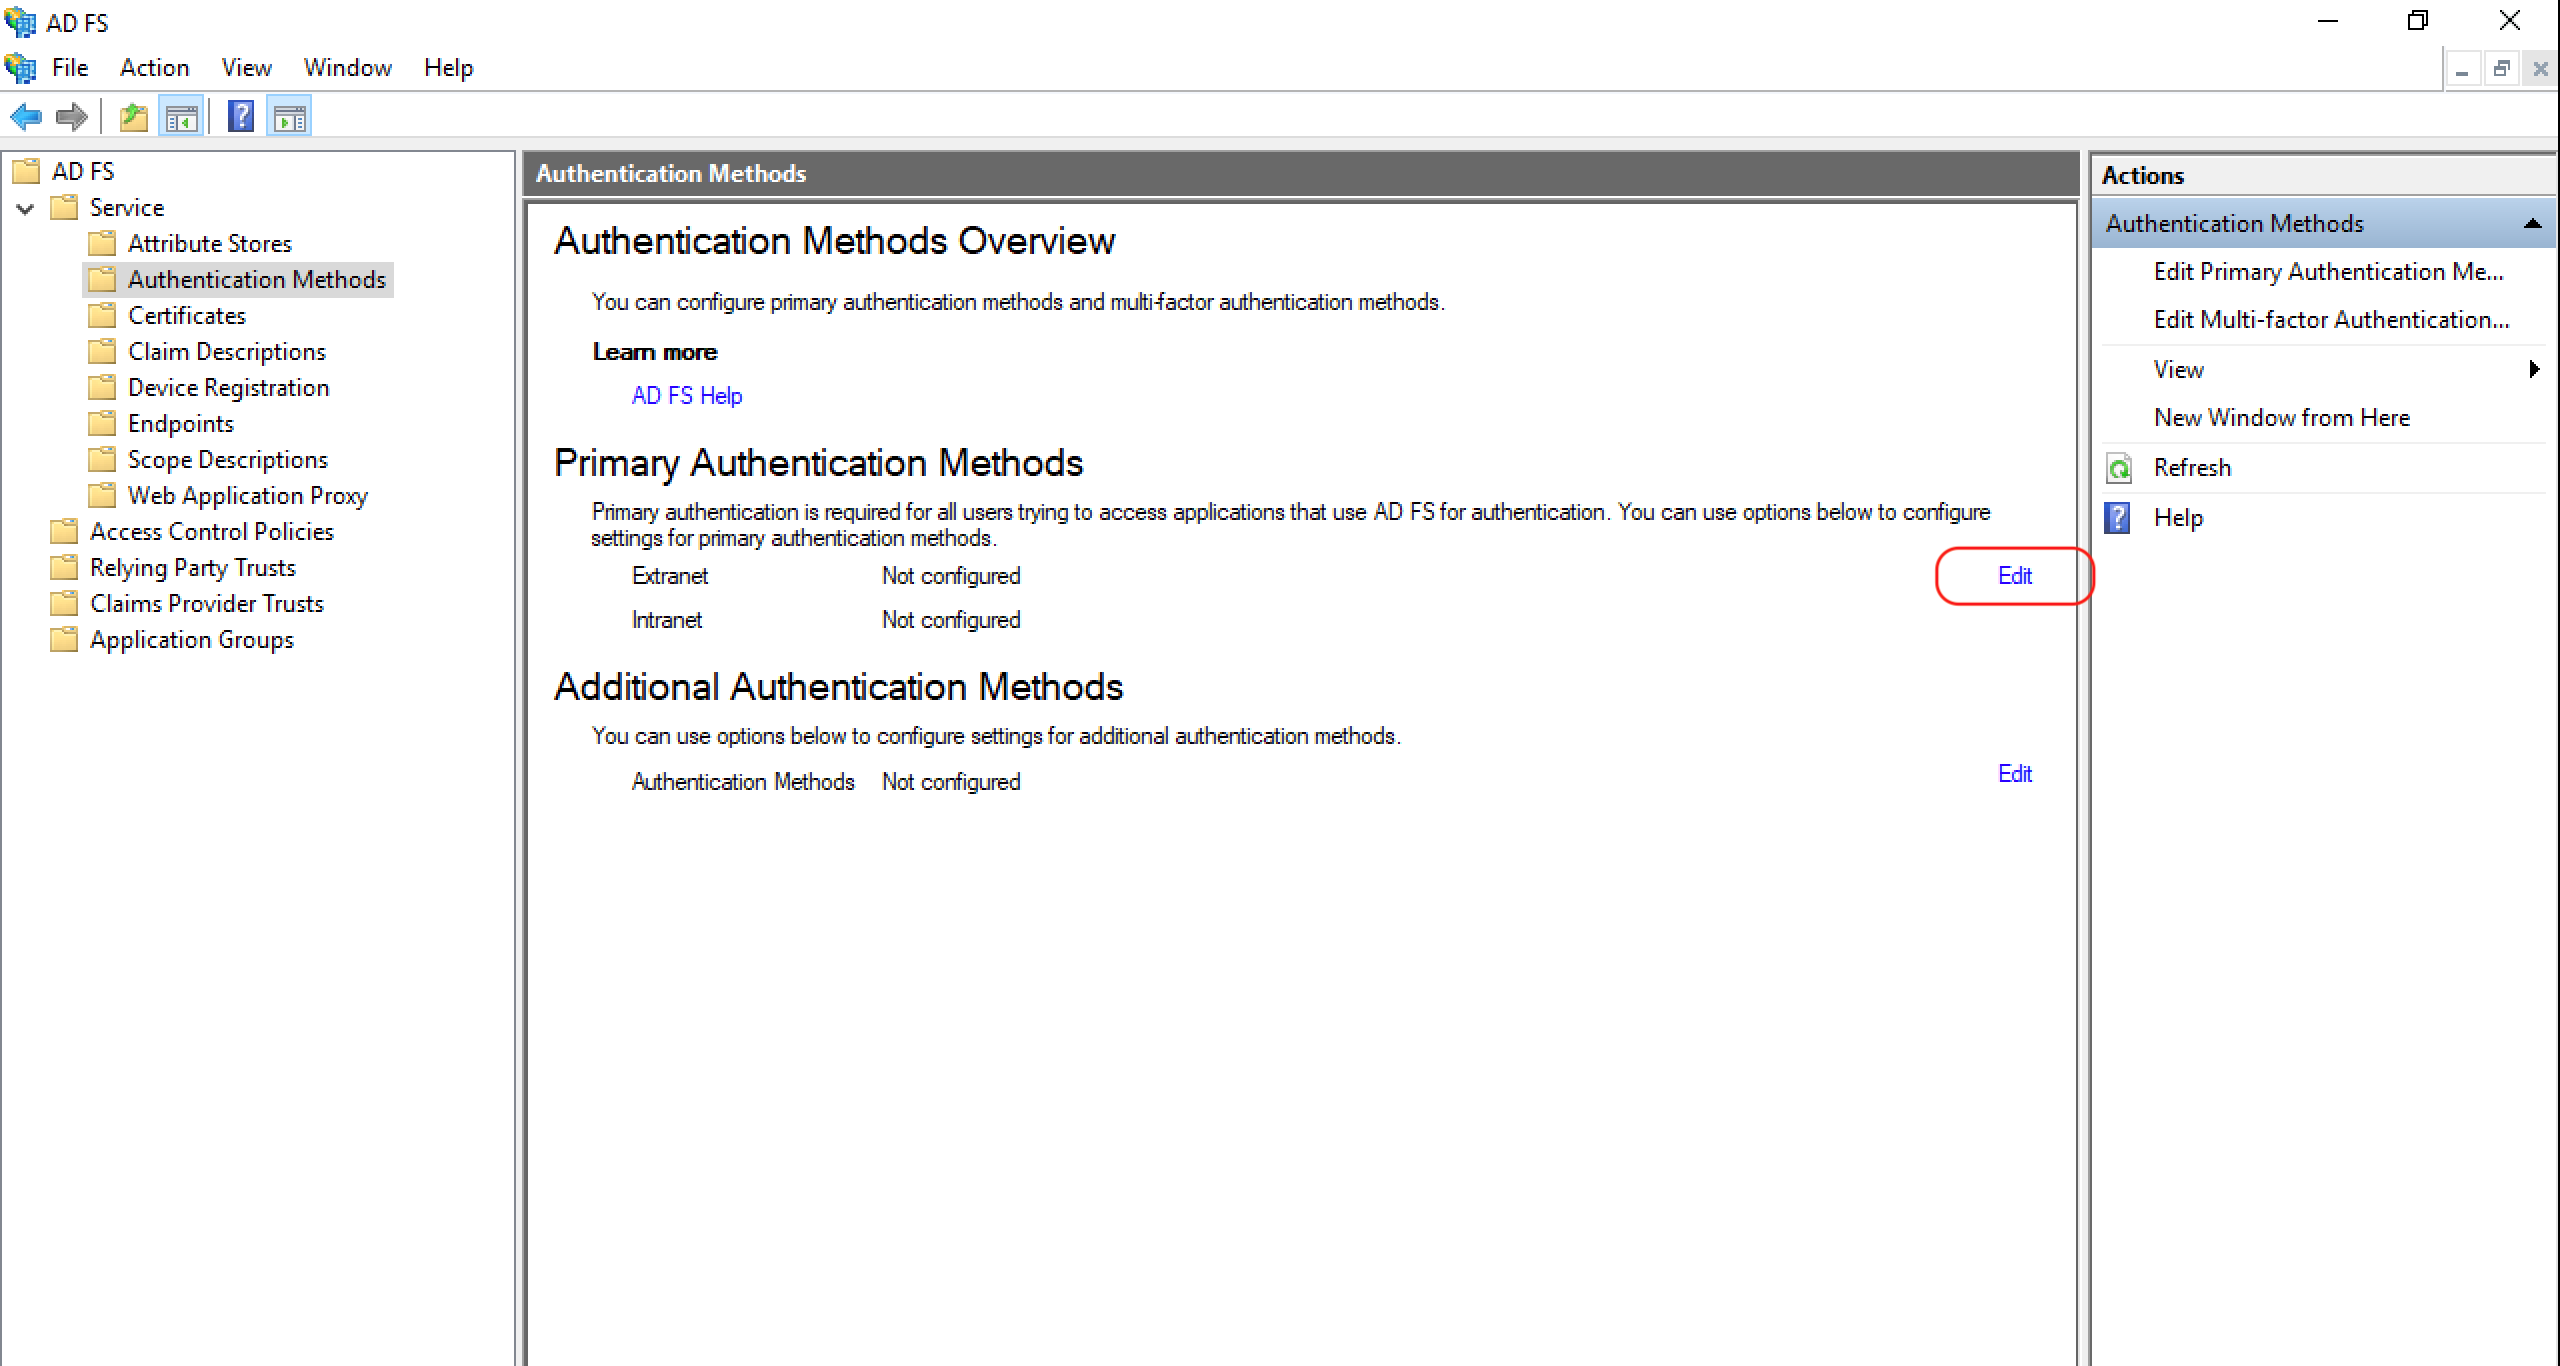
- Start AD FS Management
- Navigate to Authentication Methods and click Edit on Primary Authentication Methods
- Select the Primary tab.
Select “Allow additional authentication methods as primary”
In the Extranet list, select “PhenixID MFA – BankID”
In the Intranet list, select “Windows authentication”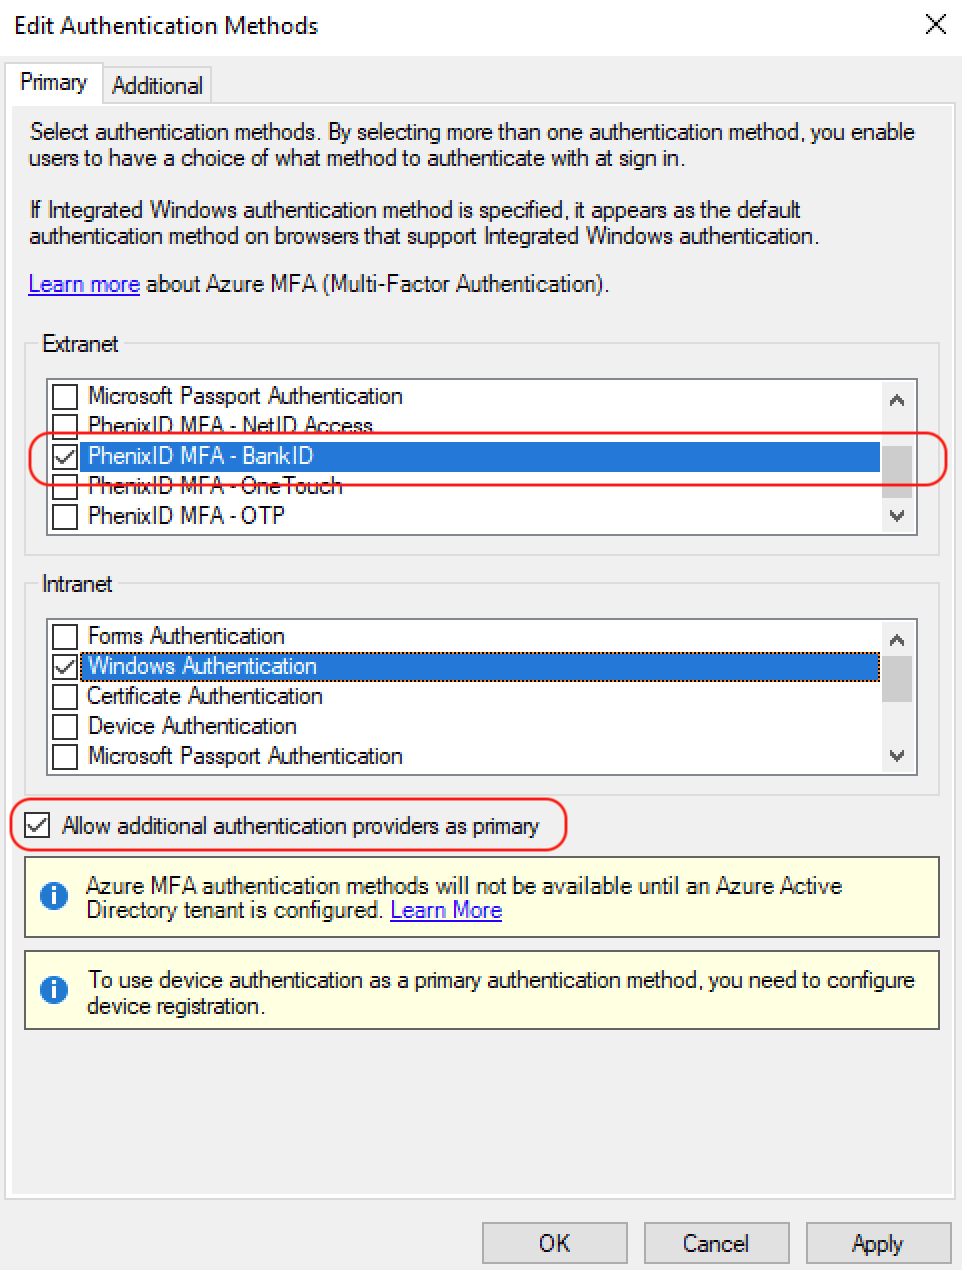
- Done!
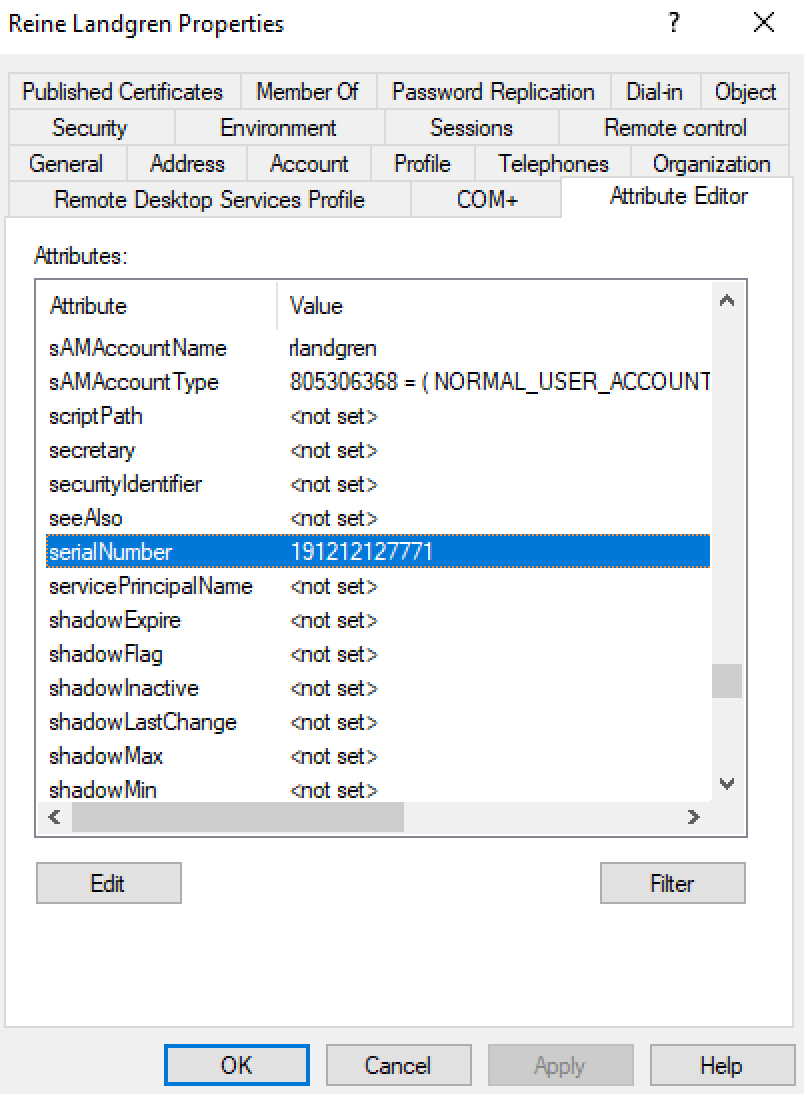
In this scenario, for BankID authentication to work, the user personal number must be stored in a AD attribute. This AD attribute is defined in the MFA adapter properties file. Example properties file: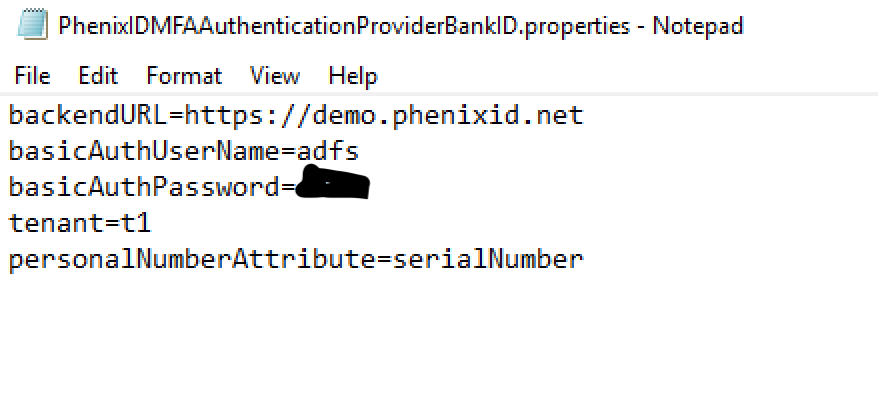
Example AD user object:
Modifying the PhenixID MFA adapters properties file
After the installation, if anything in the properties file is changed, the adapter must be unregistered and registered again. To unregister an mfa adapter, use the *_unregister_*.ps1 script.
This is an ADFS limit.
Change MFA adapter friendly name
If more than one MFA adapter is enabled in ADFS, ADFS will present a list to the end user prompting the user to select a method. The texts presented for each adapter is called a friendly name.
To change friendly name, please follow this instruction:
1. Open PowerShell on the ADFS server
2. Run the command “Get-AdfsAuthenticationProvider”
3. Find the name of the PhenixID provider you would like to change.
4. Run these powershell commands.
Replace NAME with the name from step 3.
Replace FRIENDLY_NAME with the display name you would like to display to the end users:
Set-AdfsAuthenticationProviderWebContent -Name NAME -DisplayName “FRIENDLY_NAME” -locale en
Set-AdfsAuthenticationProviderWebContent -Name NAME -DisplayName “FRIENDLY_NAME” -locale de
Set-AdfsAuthenticationProviderWebContent -Name NAME -DisplayName “FRIENDLY_NAME” -locale fr
Set-AdfsAuthenticationProviderWebContent -Name NAME -DisplayName “FRIENDLY_NAME” -locale es
Set-AdfsAuthenticationProviderWebContent -Name NAME -DisplayName “FRIENDLY_NAME” -locale sv
Set-AdfsAuthenticationProviderWebContent -Name NAME -DisplayName “FRIENDLY_NAME” -locale tr
Set-AdfsAuthenticationProviderWebContent -Name NAME -DisplayName “FRIENDLY_NAME” -locale da
Set-AdfsAuthenticationProviderWebContent -Name NAME -DisplayName “FRIENDLY_NAME” -locale nb
Set-AdfsAuthenticationProviderWebContent -Name NAME -DisplayName “FRIENDLY_NAME” -locale nn
NB! It is possible to have different display names for different language settings (locales). Just change FRIENDLY_NAME on the row matching the locale/language.
Example
In this example the FRIENDLY_NAME is set to “MFA with PhenixID PocketPass” for the MFA provider with NAME=PhenixIDMFAAuthenticationProviderOTP-Token.
It is also set differently based on the locale (language).
Set-AdfsAuthenticationProviderWebContent -Name PhenixIDMFAAuthenticationProviderOTP-Token -DisplayName “MFA with PhenixID PocketPass” -locale en
Set-AdfsAuthenticationProviderWebContent -Name PhenixIDMFAAuthenticationProviderOTP-Token -DisplayName “MFA mit PhenixID PocketPass” -locale de
Set-AdfsAuthenticationProviderWebContent -Name PhenixIDMFAAuthenticationProviderOTP-Token -DisplayName “MFA avec PhenixID PocketPass” -locale fr
Set-AdfsAuthenticationProviderWebContent -Name PhenixIDMFAAuthenticationProviderOTP-Token -DisplayName “MFA con PhenixID PocketPass” -locale es
Set-AdfsAuthenticationProviderWebContent -Name PhenixIDMFAAuthenticationProviderOTP-Token -DisplayName “MFA med PhenixID PocketPass” -locale sv
Set-AdfsAuthenticationProviderWebContent -Name PhenixIDMFAAuthenticationProviderOTP-Token -DisplayName “MFA ile PhenixID PocketPass” -locale tr
Set-AdfsAuthenticationProviderWebContent -Name PhenixIDMFAAuthenticationProviderOTP-Token -DisplayName “MFA med PhenixID PocketPass” -locale da
Set-AdfsAuthenticationProviderWebContent -Name PhenixIDMFAAuthenticationProviderOTP-Token -DisplayName “MFA med PhenixID PocketPass” -locale nb
Set-AdfsAuthenticationProviderWebContent -Name PhenixIDMFAAuthenticationProviderOTP-Token -DisplayName “MFA med PhenixID PocketPass” -locale nn
DISCLAIMER
Information provided in this document is for your information only. PhenixID makes no explicit or implied claims to the validity of this information. Any trademarks referenced in this document are the property of their respective owners.The origin of this information may be internal or external to PhenixID. PhenixID makes all reasonable efforts to verify this information.
PhenixID - support.phenixid.se