Summary
This document will guide you through the steps to enable multi-factor authentication and Single-Sign On for QlikView / Qlik Sense (https://www.qlik.com/us).
System Requirements
- PhenixID Authentication Server 2.0 or higher
- QlikView / Qlik Sense administration rights
- The users to be federated must be present in QlikView / Qlik Sense (Manually added or automatically provisioned)
Instruction
Overview
This document will guide you through the steps to enable multi-factor authentication and Single-Sign on for QlikView / Qlik Sense .
PhenixID Server acting as SAML IdP
- Login to Configuration Manager
- Scenarios->Federation
- Setup PhenixID Authentication Services as a SAML IdP using one of the Federation scenarios presented.
(If the desired authentication method is not provided by a scenario, use the documentation for the SAML authenticator here) - Open the execution flow for the IdP just added
- Make sure the attributes mail and userID (sAMAccountName if AD, uid if other LDAP store) are from the user store. (LDAPSearchValve)
- Add a new valve to the last execution flow
- PropertyCopyValve
Source = <user_id_attribute_name>
Destination = urn:oid:0.9.2342.19200300.100.1.1 - Place the valve (by drag-and-drop) before the AssertionProvider valve.
- PropertyCopyValve
- Add a new valve to the last execution flow
- PropertyCopyValve
Source = mail
Destination = urn:oid:0.9.2342.19200300.100.1.3 - Place the valve (by drag-and-drop) before the AssertionProvider valve.
- PropertyCopyValve
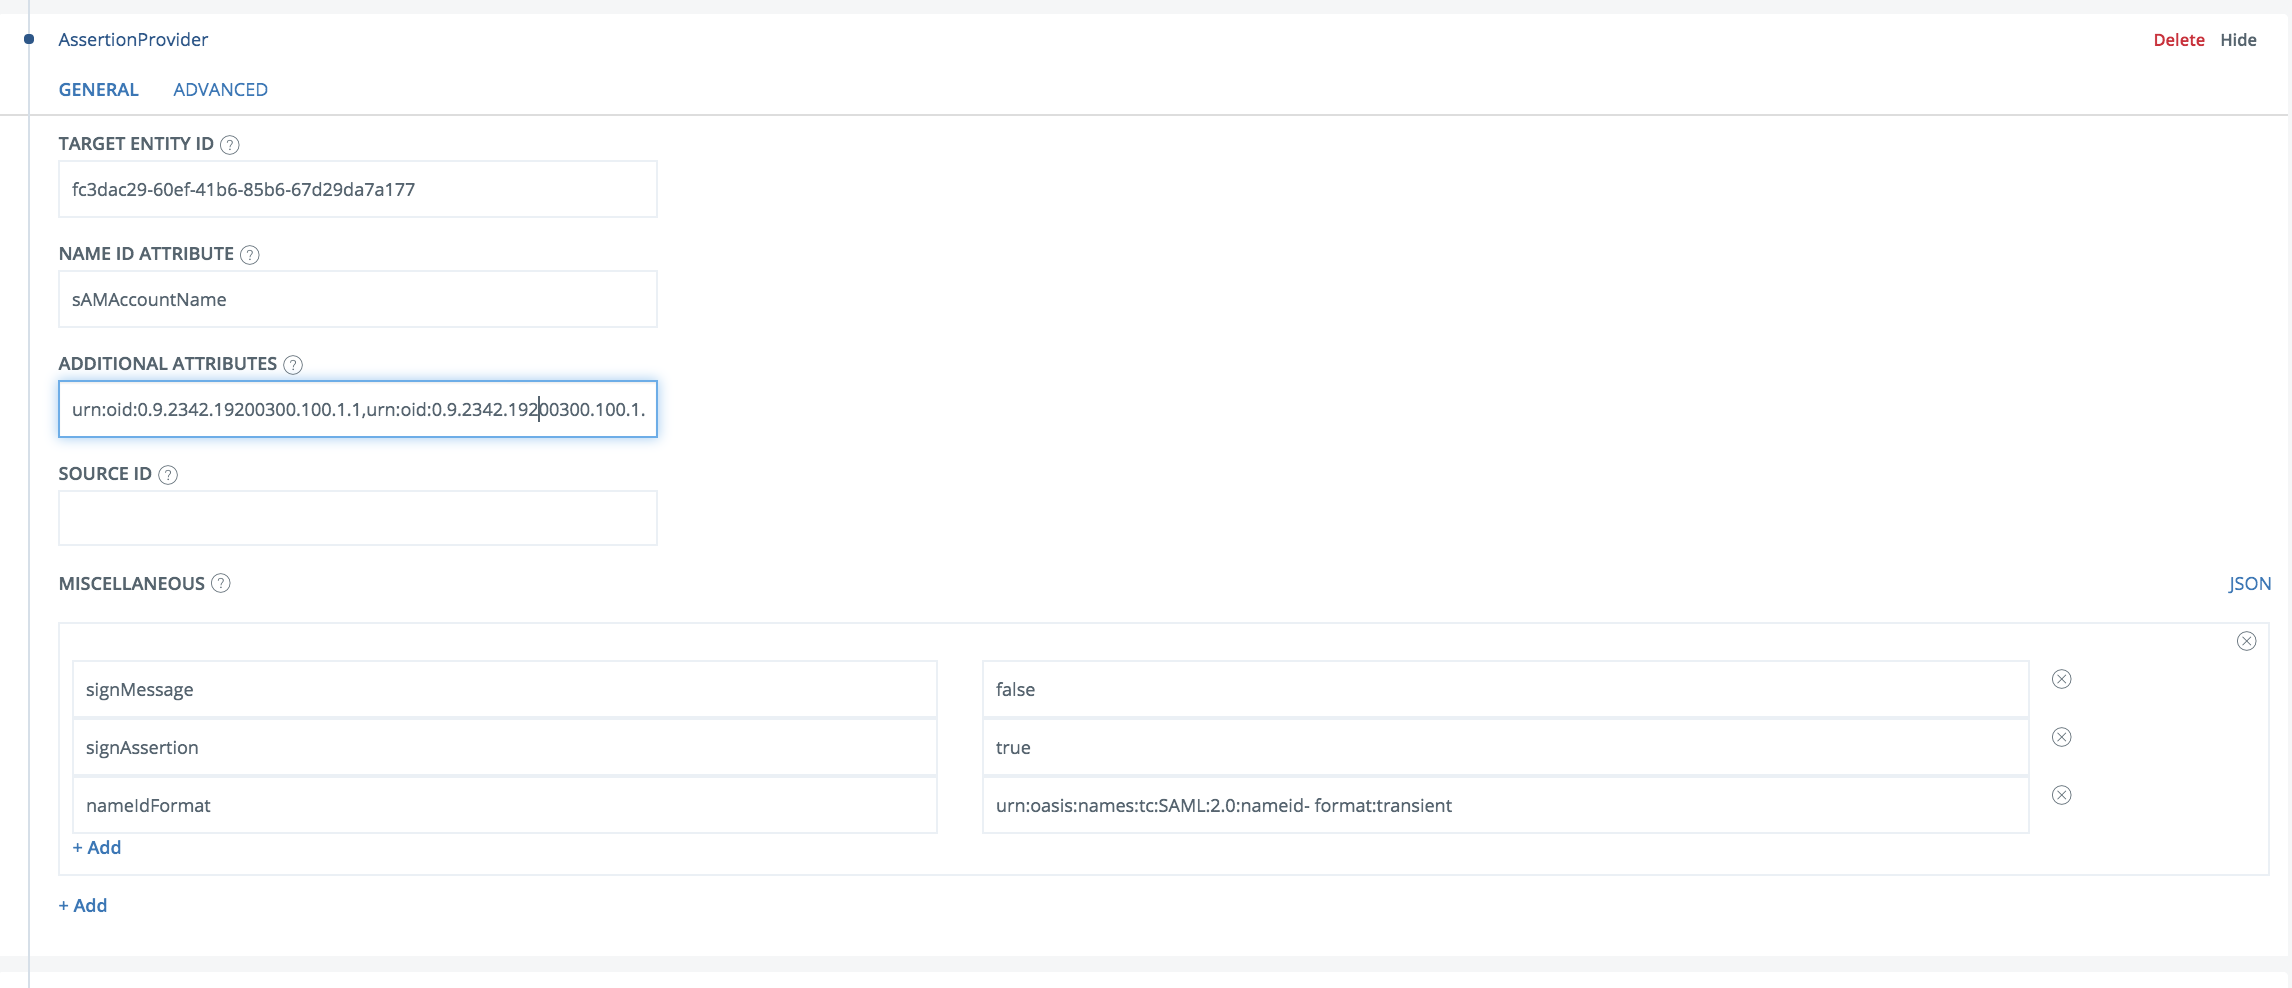
- Click the AssertionProvider
- Make these changes
- Additional attributes = urn:oid:0.9.2342.19200300.100.1.1,urn:oid:0.9.2342.19200300.100.1.3
- Add Miscellaneous value
- signMessage = false
- signAssertion = true
- nameIdFormat = urn:oasis:names:tc:SAML:2.0:nameid- format:transient
- Save
Sample AssertionProvider:
- Go to Scenarios->Federation-> <newly_added_idp_scenario> -> Identity Provider. Deselect “Require signed requests”. Save.
- Click “View SAML Metadata”.
- Download the metadata to a xml file.
Configure QlikView / Qlik Sense
It is recommended to consult a QlikView / Qlik Sense professional services resource for this step.
- Login to QlikView / Qlik Sense as an admin
- Navigate to SAML Settings (consult your Qlik technical contact to find it)
- Upload the SAML Identity Provider metadata
- Retrieve the SAML SP Metadata (as an xml file)
Add trust to QlikView / Qlik Sense on PhenixID Authentication Services
- Login to configuration manager
- Open Scenarios->Federation->SAML Metadata upload
- Click the plus sign
- Add QlikView / Qlik Sense SAML SP Metadata by uploading the XML file fetched in previous step.
Test
- Browse to your QlikView / Qlik Sense site
- This should result in a redirect to PhenixID Authentication Server
- Authenticate
- If authentication was successful, a redirect to QlikView / Qlik Sense should occur (with SAML assertion)
- The user should now be logged in.
DISCLAIMER
Information provided in this document is for your information only. PhenixID makes no explicit or implied claims to the validity of this information. Any trademarks referenced in this document are the property of their respective owners.The origin of this information may be internal or external to PhenixID. PhenixID makes all reasonable efforts to verify this information.
PhenixID - support.phenixid.se