Summary
This document will guide you through the steps to enable multi-factor authentication and Single-Sign On for the online multi-tool ServiceNow (https://www.servicenow.com/) using SAML2.
This will enable usage of logins and approvals with different eIDs, such as Swedish BankID, SITHS and eIDAS.
System Requirements
- PhenixID Authentication Server 3.0 or higher
- ServiceNow instance administration rights
- The users to be federated must be present in ServiceNow (account syncronization is also possible using PhenixID Identity Provisioning).
Instruction
Overview
This document will guide you through the steps to enable multi-factor authentication and Single-Sign on for ServiceNow.
PhenixID Authentication Services acting as SAML IdP
- Login to Configuration Manager.
- Setup PhenixID Authentication Services as a SAML IdP using one of the Federation scenarios described here. (If the desired authentication method is not provided by a scenario, use the documentation for the SAML authenticator here)Set these properties during configuration.
Change YOUR_PHENIXID_IDP_DOMAIN to the domain name of your PhenixID Authentication Services instance.
– EntityID = https://YOUR_PHENIXID_IDP_DOMAIN/saml/idp/sn
– Post SSO URL = https://YOUR_PHENIXID_IDP_DOMAIN/saml/authenticate/sn - Fetch the user mail value (corresponding to the ServiceNow userID) from the user store configured.
- Use mail as Name ID attribute.
- Save changes.
- Click General->View SAML Metadata.
- Save the IDP Signing Certificate as a file (follow this instruction)
- Set Post SLO URL = https://YOUR_PHENIXID_IDP_DOMAIN/saml/authenticate/logout/
- Save the changes
- Copy these values from the IdP:
1. EntityID
2. Post SSO URL
3. Post SLO URL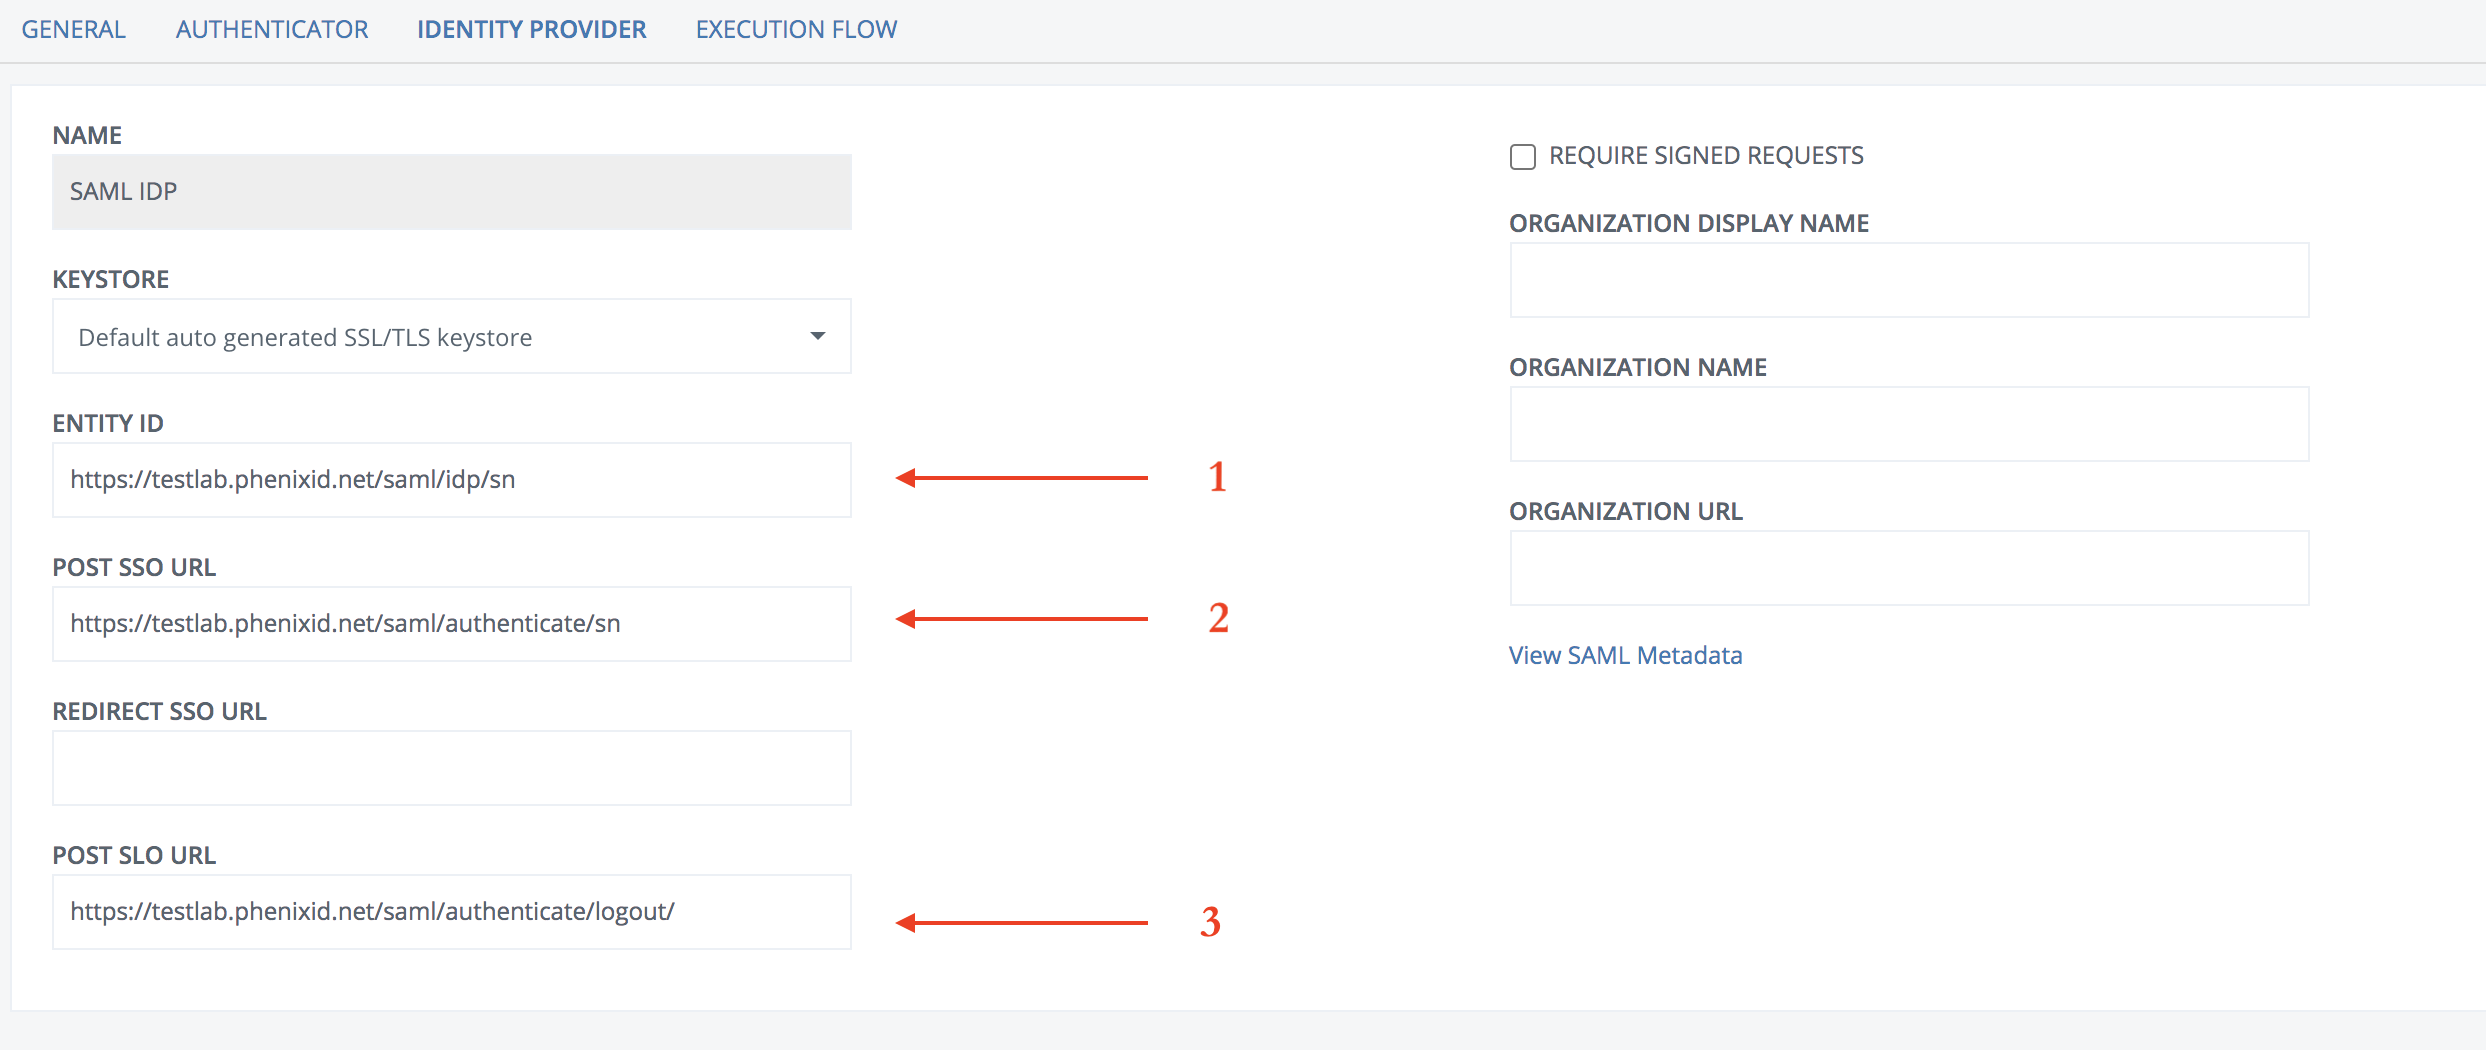
Configure ServiceNow
- Login as a ServiceNow admin to your ServiceNow instance
- In the left-hand menu, select System Applications->All Available Applications->All

- Search for “Integration – Multiple Provider Single Sign-On Installer”
- Click Install and then Activate

The next step of the ServiceNow configuration can be carried out either using a XML file downloaded from ServiceNow PhenixID MFA project (recommended) or manually.
Configure using project XML file
- Download XML file from the PhenixID MFA project on ServiceNow share.
- Select System Update Sets -> Retrieved Update Sets

- Click Import Update Set from XML
- Click Browse and select the downloaded XML file.
- Click Upload
- Select SAML 2 Single sign-on->Properties.

- Click Enable external authentication -> Yes.
- Change YOUR_PHENIXID_IDP_DOMAIN (multiple fields) to the domain name of your PhenixID Authentication Services instance.
- Below Service Provider properties, change the ServiceNow instance domain name to your domain.
- Save
- Select SAML 2 Single Sign-on -> Certificate.
- Click SAML 2.0-PhenixID-Sign
- Open the IDP Signing Certificate file created in previous step above. Copy all of the content.
- Paste the content into the PEM Certificate field.
- Click Update.
Configure manually
Once installed, a new option will appear in the left-hand menu, SAML 2 Single sign-on.
- Select SAML 2 Single sign-on->Properties.
- Change these properties:


- Click Save.
- Select SAML 2 Single Sign-on -> Certificate.
- Click New
- Open the IDP Signing Certificate file created in previous step above. Copy all of the content.
- Paste the content into the PEM Certificate field.
- Enter a name for the certificate, for example SAML 2.0-PhenixID-Sign.

- Click save to create the certificate
Fetch ServiceNow SAML SP Metadata
- Select SAML 2 Single Sign-on -> Metadata.
- Copy all of the metadata content.

- Create a new text file.
- Add the header “<?xml version=”1.0″ encoding=”UTF-8”?> “
- Paste the copied metadata. Save the file as sp_meta_sn.xml.
Example content:<?xml version="1.0" encoding="UTF-8"?> <EntityDescriptor xmlns="urn:oasis:names:tc:SAML:2.0:metadata" entityID="https://dev87883.service-now.com"> <SPSSODescriptor AuthnRequestsSigned="false" WantAssertionsSigned="true" protocolSupportEnumeration="urn:oasis:names:tc:SAML:2.0:protocol"> <SingleLogoutService Binding="urn:oasis:names:tc:SAML:2.0:bindings:HTTP-POST" Location="https://dev87883.service-now.com/navpage.do"/> <NameIDFormat>urn:oasis:names:tc:SAML:1.1:nameid-format:unspecified</NameIDFormat> <AssertionConsumerService isDefault="true" index="0" Binding="urn:oasis:names:tc:SAML:2.0:bindings:HTTP-POST" Location="https://dev87883.service-now.com/navpage.do" /> <AssertionConsumerService isDefault="false" index="1" Binding="urn:oasis:names:tc:SAML:2.0:bindings:HTTP-POST" Location="https://dev87883.service-now.com/consumer.do" /> </SPSSODescriptor> </EntityDescriptor>
Add trust to ServiceNow on PhenixID Authentication Services
- Login to configuration manager
- Open Scenarios->Federation->SAML Metadata upload
- Click the plus sign
- Add ServiceNow SAML SP Metadata by uploading the file (sp_meta_sn.xml) created in previous step.
Login to ServiceNow instance as an admin after MFA activation
Use the URL https://<your_instance_sn>.service-now.com/side_door.do to login with your ServiceNow admin account.
Test
- Browse to your ServiceNow instance domain.
- This should result in a redirect to PhenixID Authentication Server
- Authenticate
- If authentication was successful, a redirect to ServiceNow should occur (with SAML assertion)
- The user should now be logged in.
DISCLAIMER
Information provided in this document is for your information only. PhenixID makes no explicit or implied claims to the validity of this information. Any trademarks referenced in this document are the property of their respective owners.The origin of this information may be internal or external to PhenixID. PhenixID makes all reasonable efforts to verify this information.
PhenixID - support.phenixid.se