Summary
This document will guide you through the steps to enable PDF electronic signing for TrustedDialog (https://www.trusteddialog.se/)
System Requirements
- PhenixID Signing Services 2.6 or higher installed
- TrustedDialog jwt token signing certificate (public part)
Instruction
Configure PhenixID Signing Services
- Configure PhenixID Signing Services for document signing using API, following this guide.
-
- Add the trusted dialog jwt token certificate (PEM format) on disk on the server
- Point to the file in certfilepath. Example:
{ "name": "JWTTokenParserValve", "config": {"access_token": "jwt", "certfilepath": "/opt/phenixid/sign/cert/td_jwt.crt"} }
- Open Configuration Manager->Advanced and configure these specific values for TrustedDialog:
- Modules -> fedsigning -> sign_auth_redirect_url. Verify that the uri starts with /td/.
Example:
“sign_auth_redirect_url”: “/td/…….” - Modules-> prism-> <prism_module_pointing_to_fedsigning> -> base_url. Set to “/td”.
Example:
“base_url”: “/td” - Modules-> prism-> <prism_module_pointing_to_fedsigning> -> auth_redirect_url. Verify that the uri starts with /td/.
Example:
“auth_redirect_url”: “/td/authenticate/…..”, - Authenticators-HTTP-> <PipeAuthenticator for fedsigning flow>. Verify that successURL is /td.
Example:
“successURL”: “/td” - Authenticators-HTTP-> <Authenticator(s) configured for signing procedure. Set successURL to “/td/sign/api/sign”.
Example:
“successURL”: “/td/sign/api/sign” - Pipes-><Pipe for signing, ie the pipe containing PADESSignValve>.
Make sure the signed pdf result is base 64 encoded by applying these changes:
– Change the PADESSignValve pdfTarget parameter to documentNotEncoded.
– Add a new valve after PADESSignValve:{ "name": "PropertyStringBase64EncoderValve", "enabled": "true", "config": { "source": "documentNotEncoded", "dest": "document" }}
– Full example:
{ "name": "PADESSignValve", "enabled": "true", "config": { "keyStoreID": "{{item.keyStoreId}}", "pdfSourceData": "{{item.pdfupdated}}", "pdfTarget": "documentNotEncoded" } }, { "name": "PropertyStringBase64EncoderValve", "enabled": "true", "config": { "source": "documentNotEncoded", "dest": "document" } }, - Pipes->files_auth_01
Remove all values but ItemCreateValve. - Click Stage Changes and Commit Changes.
- Modules -> fedsigning -> sign_auth_redirect_url. Verify that the uri starts with /td/.
- Add HEAD to the list of allowedHttpMethods in the java startup parameters. (More about java params here).
Dispatch flow based on td_role
TDialog will always send a parameter in the JWT called td_role. This parameter flags which kind of user is performing the signing:
- 1 = internal user
- 3 = guest (external) user
This instruction will guide you on how to separate flows for the different types of users, in order to present different authentication options based on the type of user.
- Go to Advanced->Pipes and locate the pipe connected to the primary authentication (=the pipe containing a JWTTokenParserValve).
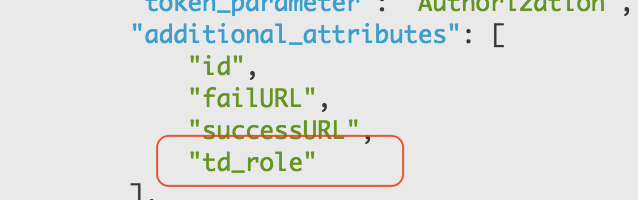
- Add td_role as an additional_attribute:
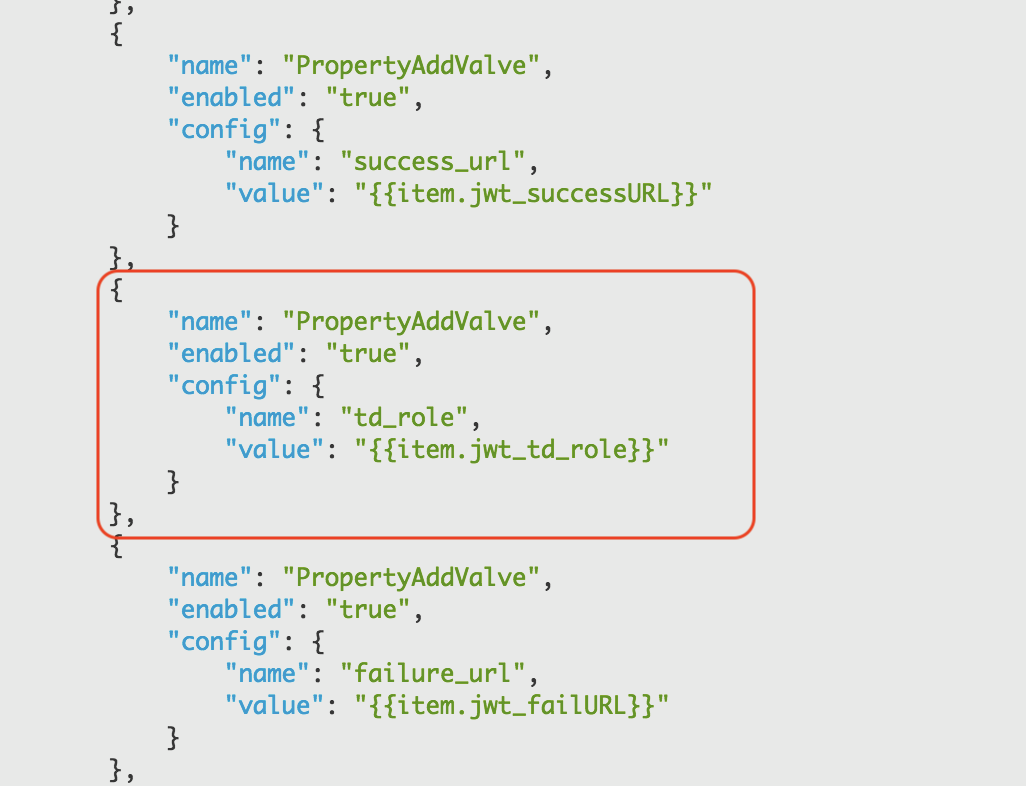
- Add a PropertyAddValve to the same pipe:
- Create two SAML Service Providers in PhenixID Sign using this guide. Set the authenticator ID of the respective service provider to samlsp_internal and samlsp_external.
- Distribute metadata of the SAML SPs to the Identity Provider to establish trust.
Make sure the Identity Provider is configured to present different authentication options for samlsp_internal (internal user authentication options) and samlsp_external (external guest user authentication options). - Go to Advanced->Authentication_HTTP. Add this authenticator:
{ "name": "Dispatch", "id": "td_role_dispatch", "alias": "td_role_dispatch", "configuration": { "idpID": "dummy", "mapping": [ { "authenticator": "samlsp_internal", "expression": "session.properties().getValueOrDefault('td_role','').equals('1')" }, { "authenticator": "samlsp_external", "expression": "session.properties().getValueOrDefault('td_role','').equals('3')" } ] } } - Go to Advanced->Modules. Locate the module with:
“name”: “com.phenixidentity~phenix-prism-fedsigning”,
Change the last part of the sign_auth_redirect_url to td_role_dispatch.
Example:

- Test the flow with an internal and external user.
Configure TrustedDialog
- Distribute PhenixID Signing Services domain (example: https://signing.example.org/) to the TrustedDialog system administrator.
- The TrustedDialog system administrator will now configure TrustedDialog to connect to PhenixID Signing Services.
DISCLAIMER
Information provided in this document is for your information only. PhenixID makes no explicit or implied claims to the validity of this information. Any trademarks referenced in this document are the property of their respective owners.The origin of this information may be internal or external to PhenixID. PhenixID makes all reasonable efforts to verify this information.
PhenixID - support.phenixid.se