Summary
This document will guide you through the steps to enable multi-factor authentication and Single-Sign On for Unit4 Agresso Business World applications.
System Requirements
- PhenixID Authentication Server 2.0 or higher
- Unit4 Agresso Business World installed
- Microsoft ADFS installed
- The end user client (web browser) must be able to reach PhenixID Authentication Services, Unit4 Agresso Business world and ADFS over https (443).
NB! All traffic must be encrypted (https)! Http only is not allowed. - Test user must reside in Unit4 Agresso Business World
Instruction
Overview
This document will guide you through the steps to enable multi-factor authentication and Single-Sign on for Unit4 Agresso Business World applications.
PhenixID Server acting as SAML IdP
- Setup PhenixID Authentication Services as a SAML IdP using one of the Federation scenarios described here. (If the desired authentication method is not provided by a scenario, use the documentation for the SAML authenticator here)
- Use sAMAccountName as Name ID attribute. (If not using AD, please consult PhenixID for configuration assistance).
- Then export your SAML IdP metadata by going to the URL:
https://<YourServerDomainName>/saml/authenticate/<authenticator_alias>?getIDPMeta
and download the metadata to a xml file.
Configure ADFS
Add claims provider
We will add a claimsprovider by adding the SAML metadata. Two rules will be configured for the claimsprovider.
- Start AD FS Management
- Click Trust Relationships/Claims Provider Trusts
- Right click and choose “Add Claims Provider Trust…”
- Choose a method to import your metadata
- Set Display name = “PhenixID IdP” , just click next
- Click next until close
Add issuance rule
- Right-click the newly added Claims Provider
- Select “Edit claims rules”
- Click Add rule
- Template, “Pass Through or Filter an Incoming Claim”
- Set a rule name = “Name ID”
- “Incoming claim type” = Name ID
- “Incoming named ID format” = Unspecified
- Finish
Export metadata from ADFS
- Open a web browser and go to the URL:
https://<adfs_domain>/FederationMetadata/2007-06/FederationMetadata.xml - Save data to file (in this example we will refer to the name adfs_demo_FederationMetadata.xml)
Import metadata to IdP
- Open PhenixID Configuration Manager and login
- Go to Scenarios->Federation
- Click the plus next to SAML Metadata upload
- Enter a display name = “ADFS”
- Upload the file downloaded in previous step. (adfs_demo_FederationMetadata.xml)
- Test the connection between ADFS and PhenixID Authentication Services:
- https://<adfs_domain>/adfs/ls/idpinitiatedsignon.
- Click “Sign in”
- You should now be redirected to PhenixID Authentication Services
- Authenticate
- You should now be redirected back to ADFS
- ADFS should now display “You are signed in” (text may differ depending on ADFS version running).
Unit4 Agresso Business World server configuration
- Login to the Unit4 Agresso Business World server (RDP).
- Open Unit4 Agresso Business World Management Console. Make sure you have the proper admin rights to make configuration changes.
- Go to Computers->My Computer->Unit4 (name may differ)->Backoffice Data Sources->platform->Features->Web applications->Default web site->name of the unit4 web app you would like to protect with strong auth->Authentication.
- Select type = Federated Authentication.
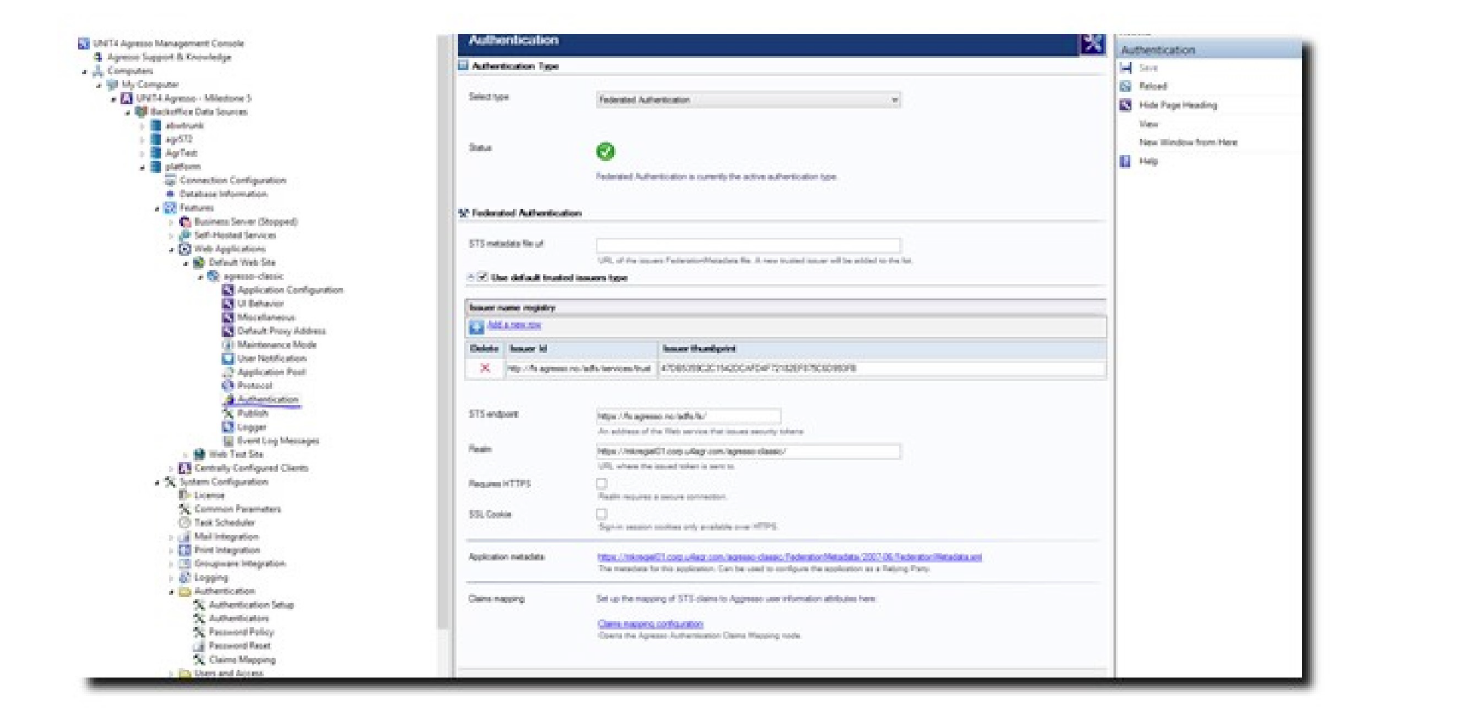
- Enter the following values:
- Issuer Id: <Your ADFS issuer id>
Fetch the id by:- Login to ADFS Server
- Open AD FS Management
- Right click AD FS
- Select Edit federation properties
- Copy the Federation Service Identifier value. (Example: http://adfs.demo.phenixid.net/adfs/services/trust)
- Issuer thumbprint: <The thumbprint of the ADFS token signing certificate>
Fetch the thumbprint by:- Login to ADFS Server
- Open AD FS Management
- Click AD FS-> Service -> Certificates
- Doubleclick the Token-Signing certicate
- Click on details
- Select thumbprint
- Copy the value. (Example: 84ef954f23c301357c13c851d8bf95858e45255d).
Depending on ADFS version the thumbprint may contains spaces (” “). If it contain spaces, remove all spaces.
- STS endpoint: https://<your_adfs_server_domain>/adfs/ls/
Example value: https://adfs.demo.phenixid.net/adfs/ls/ - Realm: https://<your_unit4_agresso_server_domain>/<unit_4_agresso_web_application_name>/
Example value: https://unit4.phenixid.net/BWorld/ - Requires https: Enable
- SSL Cookie: Enable
- Click Save
- Copy the Application Metadata link. This will be used in ADFS steps below.
- Click Claims mapping configuration
- Add a claims mapping:
http://schemas.xmlsoap.org/ws/2005/05/identity/claims/nameidentifier -> User ID
- Issuer Id: <Your ADFS issuer id>
Set up trust between ADFS and RDWeb
- Go to ADFS 2.0 Management
- Click “Relying party trust”
- “Add Relying Party Trust
- Enter the URL to the metadata from Unit4 Agresso Business World. (Application Metadata link fetched above).
(If ADFS can not reach the url, download the metadata to a file and import a file) - Enter display name = Unit4 Agresso Business World Web
- Do NOT Configure MFA
- Permit all users to access this relying party
- Press next and then close
- Add the following to Rules:
Pass Through or Filter an Incoming Claim, enter rule name, Incoming claim type=Name ID, Incoming Name ID format=Unspecified - Then press Finish
Remove organization selector in ADFS
ADFS will by default always present Active Directory as a login option. PhenixID recommends to remove this option for Unit4 Agresso Business World using this configuration:
- Login to ADFS server (RDP)
- Open Powershell (as admin)
- Run this command to always associate the RP (Unit4 Agresso Business World) with PhenixID SAML IdP:
Set-AdfsRelyingPartyTrust -TargetName “Unit4 Agresso Business World Web” -ClaimsProviderName @(“PhenixID IdP”)
Test
- Browse to Unit4 Agresso Business World web application (example: https://unit4.phenixid.net/BWorld/)
- This should result in a redirect to ADFS server
- This should result in a redirect to PhenixID Authentication Server
- Authenticate
- If authentication was successful, a redirect to ADFS should occur (with SAML assertion)
- A redirect to Unit4 Agresso Business World should occur
- The user should now be logged in.
DISCLAIMER
Information provided in this document is for your information only. PhenixID makes no explicit or implied claims to the validity of this information. Any trademarks referenced in this document are the property of their respective owners.The origin of this information may be internal or external to PhenixID. PhenixID makes all reasonable efforts to verify this information.
PhenixID - support.phenixid.se