PhenixID Identity Provisioning Developer Guide
About this guide
This document includes a brief overview of the interfaces and is the developer’s cookbook for creating so called Actions for PhenixID Identity Provisioning version 4.1.2 and later.
PhenixID Identity Provisioning (PIP) exposes two API’s for developers, Action API and a Web Service Listener API.
A link to sample code for Java can be found later in this document.
Note: This document assumes PIP version 4.1.2 or later.
If you’re using 3.4 or older version please use the Developer Guide found here:
http://support.phenixid.se/product-guides/phenixid-automatic-account-manager/nordic-edge-automatic-account-manager-3-4-developer-guide/
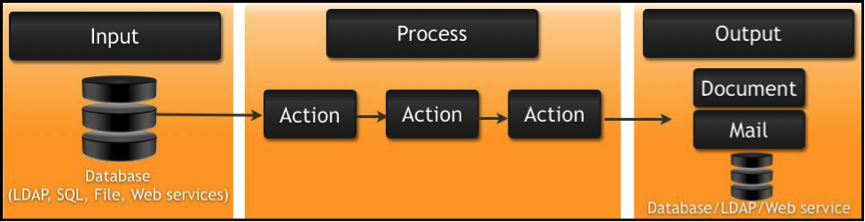
Actions are a part of the process between the input and the output data using Identity Provisioning.
Interfaces
Three interfaces may be used when writing custom code for Identity Provisioning.
- Action API
- Web Service Listener API. Web Service listener which acts like an ordinary Web Service.
- Logging API
The Action API
An Action is a component that either Gets, Modifies or Sets data in one way or another.
In the PIP user interface, Actions can be sorted into the categories Input, Process and Output.
Actions can be simple like for example changing the value of a specific session attribute, or creating a Microsoft Excel file with contents from object and session attributes.
Actions can also be more advanced, for instance synchronizing user objects between two or more data sources.
The Action interface is described below.
A Standard Action
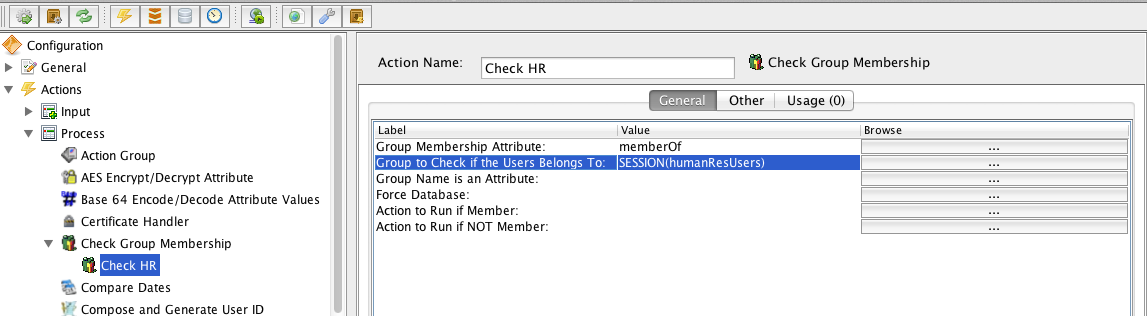
In the user interface, basic configuration allows you to specify parameters and assign values to them.
Many parameters supports SESSION(attributeName) which means that the attribute value will be fetched from an existing attribute in the current session.
There are a number of different configuration options, for example, browsing an LDAP directory or a file system to select a value.
Action parameter GUI:
Setting up a Developer Environment
This chapter describes how to prepare working with the Identity Provisioning API’s in Java. The API’s consists of Java classes and corresponding JAR files.
Integrated Developer Environments (IDE) such as NetBeans, Eclipse or IntelliJ IDEA can be used for developing extensions to the Identity Provisioning.
This document does not assume a specific IDE.
Before using one of the PIP APIs, you need to have an instance of Identity Provisioning version 3.7 or later installed. You also need a basic understanding of the product.
For more information, documentation can be found here:
https://support.phenixid.se/product-guides/phenixid-provisioning/
Prerequisites
- An instance of Identity Provisioning version 3.7 or later.
- Basic knowledge about Identity Provisioning
Java Sample Code
| Package | Notes |
| ProvisioningServiceAPISampleCode.zip | Includes:
|
Installing a New Action in Identity Provisioning
The ProvisioningServiceAPISampleCode.jar is found in ProvisioningServiceAPISampleCode.zip
Import the jar file to Identity Provisioning and study how the Action code samples work.
- Open the Provisioning Configurator
- Select Tools > Action Package Manager
- Click ‘Import from file’ and browse to and select ProvisioningServiceAPISampleCode.jar
- Click OK
- Restart the Provisioning Configurator
Jar File Dependencies
Make sure to include all files with the jar extension in the IDE from PhenixID Identity Provisioning and jar files included in the ProvisioningServiceAPISampleCode.zip:
<install-dir>/ProvisioningServiceAPISampleCode/lib
and
<install-dir>/Provisioning/lib
External Jar File Dependencies
External Jar file dependencies should be placed in the ext directory under the Identity Provisioning root directory.
Example: c:\Program Files\PhenixID\Provisioning\ext
Javadoc
The Javadoc for all classes can be found here:
https://download.phenixid.se/wp/support/prodguide/aam/docs.zip
Action Development
Writing an Action
The most important API calls for Action development are mentioned below.
To test and get the whole picture, have a look at the code samples.
Using Provisioning Service Action Base
- Copy the ActionBaseTemplate.java template from the sample code package to your own project and adapt it to your environment.
| Public Variables | Type | Description |
| version | float | Action version number |
| description | String | Gets the description of this Action. It should return a brief description about the functionality of the Action. |
| type | String | The type will be used in the Identity Provsioning when creating a new instance of this action. NOTE that this value is the identifier of the Action and should therefore be unique and not be modified once it’s released for production. |
| displayName | String | Action name that is displayed in the GUI. |
| iconName | String | package.filename
The icon size should be set to 16×16 pixels. |
| category | Category | Decides in which category the Action should be visible. |
| classNameForLog | String | this.getClass().getName() is defined as default. The name appears in the log entry. |
| extendedCategories | List<String> | Add one or more category names for the extended category view. A set of standard category names are available in the ActionBase, with names starting with EXTENDED_CATEGORY.
If developing customer specific actions it is possible to group them together by using the customer name as the category name. |
Method runAction()
The sample code for writing an Action, is described step-by-step below.
Please have a look at the sample code to get the whole picture.
| Method | Return Type | Description |
| runAction | Boolean | This is the method where the Action takes place. Write your code here. The runAction has its own section, below. |
Get the parameters
String incomingStringToBeManipulated =
action.getParameterValue(0, ""); // Since the default value is blank, the setting is MANDATORY

String sessionAttributeNameForStatus =
action.getParameterValue(1, "status"); // 'status' is the the default value

String sessionAttributeNameForManipulatedResult =
action.getParameterValue(2, "MANIPULATED STRING");
Perform a check of the incoming parameters
if (incomingStringToBeManipulated.trim().isEmpty()) {
    logMessage("The parameter 'A String to be Manipulated' is unset. Please enter a string or SESSION(attribute) to be manipulated. Example: SESSION(givenName)", "runAction", LogLevel.ERROR);
    return Boolean.FALSE;
}
Loop through all session objects included in the search result
for (SessionObject currentSessionObject : sessionObjects) {

            /*
             * Support for SESSION(attributeName) parameters may be added as follows:
             * SESSION(attributeName) parameters are used if a value should be fetched from a session
             * attribute written within the SESSION parentheses, SESSION(attributeName).
             *
             * Example: In the GUI: SESSION(givenName)
             * parsedIncomingParameter = utils.parseForSessionAttributes(action.getParameterValue(0, ""),
             * currentSessionObject, false);
             */

              String parsedIncomingStringToBeManipulated =
              utils.parseForSessionAttributes(incomingStringToBeManipulated,
              currentSessionObject, false);

              // Create a session attribute for the string to be manipulated
              SessionAttribute manipulatedStringSessionAttribute =
              new SessionAttribute();

              String manipulatedString = "";
              boolean success = Boolean.FALSE;

              if (parsedIncomingStringToBeManipulated != null) {

                    if (parsedIncomingStringToBeManipulated.isEmpty()) {
                        logMessage(currentSessionObject.getName() +
                               " has no value in attribute: " +
                               parsedIncomingStringToBeManipulated, "runPlugin",
                        LogLevel.DEBUG);
                    } else {

                       /*Manipulate the incoming data as desired.
                                           In this example the incoming string is reversed.*/
                        StringBuilder stringBuilder =
                               new StringBuilder(parsedIncomingStringToBeManipulated);

                               manipulatedString = stringBuilder.reverse().toString();

                        // Set the session attribute with the manipulated data
                               manipulatedStringSessionAttribute.setValue(
                               manipulatedString);

                               manipulatedStringSessionAttribute.setName(
                               sessionAttributeNameForManipulatedResult);

                        manipulatedStringSessionAttribute.setHasBeenEdited(true);

                        currentSessionObject.addSessionAttribute(
                        manipulatedStringSessionAttribute);

                        success = Boolean.TRUE;
                    }
                } else {
                    logMessage(currentSessionObject.getName() +
                    " is missing attribute: " +
                    parsedIncomingStringToBeManipulated,
                    "runPlugin", LogLevel.ERROR);
                }

                    /*
                            In this example a session status attribute containing a result
                            string is added to the session.
                            SUCCESS or FAILURE is set depending on the result.
                           */
                SessionAttribute saStatus = new SessionAttribute();
                saStatus.setName(sessionAttributeNameForStatus);

                if (success) {
                    saStatus.setValue("SUCCESS");
                } else {
                    saStatus.setValue("FAILURE");
                }

                saStatus.setHasBeenEdited(true);
                currentSessionObject.addSessionAttribute(saStatus);
            }
        } else {
            logMessage("No session objects available.", "runPlugin()",
            LOG_LEVEL_DEBUG);
        }
        return Boolean.TRUE; //Success
Consuming an External Web Service in an Action
There are many different ways of generating web service stubs for Java, for instance JAX-WS and Axis. How to use these are described in this chapter.
Generating Java Stubs with JAX-WS
Web service stub code can be generated outside the IDE using e.g. the SUN Java JDK wsimport tool:
http://download.oracle.com/javase/6/docs/technotes/tools/share/wsimport.html
$> wsimport [options] <wsdl>
Generating Java Stubs with Axis 1.4
Provisioning Service is using Axis 1.4 for Web Service development. This chapter describes how to generate the Java stubs with AXIS and how to consume a web service in the Identity Provisioning Action interface.
There is an example called ActionAPIConsumingAxisWebService in ProvisioningServiceAPISampleCode.zip explaining how to consume a Web Service from an Action.
- Unzip the AAM_Axis_1.4 package to an appropriate location.
From a console window:
Generate the client side stubs:
genClientStubs (WSDL-file or URL)
Example Linux:
./genClientStubs http://www.webservicex.net/ConvertSpeed.asmx?WSDL
Example Windows:
genClientStubs http://www.webservicex.net/ConvertSpeed.asmx?WSDL
Result:

Add the generated package to your Java project
Send Data to Identity Provisioning via Web Service
Identity Provisioning offers a couple of Data Sources which can be configured to get data from an LDAP directory, an SQL database and so on.
There is also an option called Web Service found in the Data Source category. With this option a web service called HandleObjectPort may be used to transfer data to Identity Provisioning from anywhere.
Use of the HandleObjectPort web service is platform independent.
Enable the Identity Provisioning HandleObjectPort Web Service
In the Provisioning Configurator:
- Create a new Data Source and goto General > Data Sources > Web Service
- Select Predefined Web Services and the option Generic – Create/Modify/Delete/Search
- Create a new Policy, name it and select the new Web Service as Data Source
- Start the Identity Provisioning web service listener (green globe button with play icon)
- Browse to the web service,
http://[Identity Provisioning Server Address]:8080/services/HandleObjectPort
(if the service can’t be found, restart Identity Provisioning)
Java Sample Code – HandleObjectPort Web Service
There is an example called SendSessionObjectsToProvisioningService in ProvisioningServiceAPISampleCode.zip explaining how to consume a Web Service published by Identity Provisioning.
.NET Sample Code – HandleObjectPort Web Service
Download AAMSampleCode.zip, .NET sample code for the HandleObjectPort web service.
Generating Client Stubs for the PIP HandleObjectPort Web Service
Since use of the HandleObjectPort web service is platform independent, Visual Studio may be used when generating client stubs for .NET applications.
JAX-WS, Axis or any other web service client generator can be used for Java applications. How to accomplish this is described in chapter 4.3.
RESTful Configuration API
In Identity Provisioning version 3.5, the Configuration API is enabled in the Options menu in Provisioning Configurator.
The configuration port is protected by SSL key exchange (2-way SSL) and by HTTP Basic Authentication.
The RESTful API is built upon the Jersey 2.x framework.
Available Methods
Response is returned in JSON or XML format. On successful PUT or POST, an uid is returned. An object uid has the format “414381ea-47f8-11e1-8706-45a26917d438”.
| URI | Method | Description |
| /actionParameters/{className} | GET | Get all parameters from an Action with key className, example: plugins.v3.AddStaticAttribute |
| /actions/{uid} | GET | Get Action(s) with an uid or all available Actions with * |
| /actions/{uid} | PUT/POST/DELETE | Update, create or delete Action(s) |
| /dataSources/{uid} | GET | Get Data Source(s) with an uid or all available Data Sources with * |
| /dataSources/{uid} | PUT/POST/DELETE | Update, create or delete Data Source(s) |
| /globalParameters/{parameterName} | GET | Get Global Parameter(s) with a parameterName or all available Global Parameters with * |
| /globalParameters/{parameterName} | PUT/POST/DELETE | Update, create or delete Global Parameter(s) |
| /policyExecutionLogs/{transactionNumber} | GET | Get a Policy execution log from a Policy transaction number |
| /policies/{uid} | GET | Get Policies with an uid or all available Policies with * |
| /policies/{uid} | PUT/POST/DELETE | Update, create or delete Policies |
| /schedules/{uid} | GET | Get Schedule(s) with an uid or all available Schedules with * |
| /schedules/{uid} | PUT/POST/DELETE | Update, create or delete Schedule(s |
| /settings | GET | Get all Settings (configuration) |
| /settings | PUT | Update Settings (configuration) |
Error Codes
Actions
| Code | Description |
| 101 | Action not found. |
| 102 | Empty object, nothing to update. |
| 103 | Action is missing uid. |
| 104 | Action not found. |
| 105 | Object is not an Action. |
| 106 | One or more of the mandatory attributes are missing. |
| 107 | The Action is used by another object. |
Data Sources
| Code | Description |
| 201 | Data Source not found. |
| 202 | Empty object, nothing to update. |
| 203 | Data Source is missing uid. |
| 204 | Object is not a Data Source. |
| 205 | One or more of the mandatory attributes are missing. |
| 206 | The Data Source is used by another object. |
| 207 | Could not add Data Source to the configuration. |
Schedules
| Code | Description |
| 301 | Schedule not found. |
| 302 | Empty object, nothing to update. |
| 303 | Schedule is missing uid. |
| 304 | Object is not a Schedule. |
| 305 | One or more of the mandatory attributes are missing. |
| 306 | The Schedule is used by another object. |
| 307 | Could not add Schedule to the configuration. |
Policies
| Code | Description |
| 401 | Policy not found. |
| 402 | Empty object, nothing to update. |
| 403 | Policy is missing uid. |
| 404 | Object is not a Policy. |
| 405 | One or more of the mandatory attributes are missing. |
| 406 | The Policy is used by another object |
| 407 | Could not add Policy to the configuration. |
| 408 | The Policy failed to run. |
Global Parameters
| Code | Description |
| 501 | Global Parameter not found. |
| 502 | Empty object, nothing to update. |
| 503 | One or more of the mandatory attributes are missing. |
| 504 | The Global Parameter already exists. |
| 505 | The Global Parameter is used by another object. |
| 506 | Could not add Global Parameter to the configuration. |
Settings
| Code | Description |
| 601 | Setting not found. |
| 602 | Empty object, nothing to update. |
| 603 | One or more of the mandatory attributes are missing. |
| 604 | Could not add Settings to the configuration. |
Other
| Code | Description |
| 701 | The configuration could not be saved to the config file at the server. |
Sample Code
Java classes included in the ProvisioningServiceAPISampleCode.zip
| Class | Description |
| ConfigurationAPI_ActionParameters | This code sample shows how to get the parameters from an Identity Provisioning Action. The order of the Action parameters in the GUI and in the code can vary. To be sure that you will set the desired parameter value, you shouldfirst get the parameter order and then enter a value for each parameter.See code sample ConfigurationAPI_PolicyActionAndDataSource how to set Action parameters. |
| ConfigurationAPI_Actions | This code sample shows how to get, create, update or delete an instance of an Identity Provisioning Action. Identity Provisioning includes a large number of Actions that can be used to build the logic that shall be applied to the parsed information that the Identity Provisioning processes. These Actions are divided into three categories depending on their type (Input, Process, and Output). |
| ConfigurationAPI_DataSources | This code sample shows how to get, create, update or delete an Identity Provisioning Data Source. An Identity Provisioning Data Source contains configuration/settings which will be used when Identity Provisioning connects to, for instance, an SQL database or an LDAP Directory. |
| ConfigurationAPI_GlobalParameter | This code sample shows how to get, create, update or delete an Identity Provisioning global parameter. A global parameter is a type of variable that can be accessed from any Action/Policy at any time. In run time mode, the value of the parameter is retrieved with the call GLOBAL(parameterName). |
| ConfigurationAPI_Policies | This code sample shows how to get, create, update or delete a Identity Provisioning Policy. An Identity Provisioning Policy executes Actions. A Policy can configured to get input data from a Data Source. It can be triggered manually or be scheduled to run at a specific time/date. |
| ConfigurationAPI_PolicyActionAndDataSource | This code sample creates a Data Source (based on the file datasourcefile.sampleDataSource.csv), an Action (“Replace a Value in Attribute”) and a Policy programmatically. The Data Source and the Action will be added to a Policy (“Sample Policy – Replace Value in Attribute”). After the objects has been created the Policy can be executed from Provisioning Configurator. The Data Source will load two user objects. When the Action “Replace Digits in Phone Number” is executed from the Policy, the user’s first three digits of the phone number will changed from 070 up to 999. FLOW:
|
| ConfigurationAPI_PolicyExecutionLog | This code sample shows how to get all execution logs from a Policy.
An execution log can only be retrieved from a Policy that was created with the REST API. The transaction number is retrieved from the APIConfigResponse class, either on POST or PUT request. |
| ConfigurationAPI_Schedules | This code sample shows how to get, create, update or delete an Identity Provisioning Schedule.
A Schedule can be used when a Policy should start at a certain time, and/or on a specific date. A Schedule can trigger one or more Policies. |
| ConfigurationAPI_Settings | This code sample shows how to get the whole content of the Identity Provisioning settings and how to update the content of the settings.
Settings for Alert, Audit Log, Service Log, SMTP, Web Service listener may be updated. |
Web Service Listener API
Identity Provisioning comes with two included web service listeners that can be used as data source for a policy. Those listeners should cover most customers need of using Identity Provisioning as a web service provider. However, if there are specific needs of how the request or respons should be designed, you may write a custom web service listener.
Generate Stubs for Web Service
Identity Provisioning is using Axis 1.4 for web services, so web service stubs must be generated from a wsdl. Download the attached zip folder, and follow the steps in the readme.txt to generate your files.
PIP_Axis_1.4_webServiceListener.zip
WebServiceHelper
When the stubs for the web service listener have been generated, it is time to fill the methods in the SoapBindingImpl class. To communicate with the PIP policy, there are a helper class called se.nordicedge.misc.WebServiceHelper since PIP 4.2.2.
The main method in WebServiceHelper is runWebServicePolicy. The method takes a vector that must contain the session objects that should be sent to the policy. After the method has run, the vector will contain the resulting session objects from the policy.
To use authentication with the username and password that can be configured in an web service policy, those values should be sent to the method as well. If authentication isn’t desired, use a null value.
The method will return an integer error code, where 0 means no error. For all other errors, it is possible to get an error message for the error code using the method getErrorMessage.
Configuration
To use the web service listener in PIP, place your jar file in the /ext folder of your PIP installation. After restarting PIP, create a web service data source and enter the path to the deploy.wsdd in your package.
Example: /your/package/deploy.wsdd
The rest of the configuration is the same as when using the built in generic web service listener.
Logging API
The logging API consists of a Java interface where system log messages and/or audit messages can be redirected to instead of the standard file logging.
Developing a Class for External Logging
The logging API consists of a Java interface where system log messages and/or audit messages can be redirected to instead of the standard file logging.
An example might be when log-messages with certain severity levels should be directed to a separate destination.
Implement the Logging Interface
- A class that implements the interface se.nordicedge.NELoggingInterface should be created.
- The class file must be packaged in a jar and be placed in the ext directory located under the Identity Provisioning installation directory.
Configuration
Option1: In the Provisioning Configurator.
Click General > Log Settings. Check Use External Logging, select Custom Logger and enter your external logger class name (example se.nordicedge.TestLogger).
Option 2: In the config.aam file, add the following parameter:
ExternalLoggerClassName=LoggerClassName
Note: The Identity Provisioning must be restarted to activate changes.
Description of the Lifecycle and Log Methods in the Interface
The following methods must be overridden:
| Method | Description |
| public Boolean initialize(); | Initialize the logging functions.
This method is called from Identity Provisioning when Identity Provisioning starts Returns: TRUE if the initialization was successful |
| public void close(); | The Identity Provisioning will shut down.
Perform cleanup if necessary, e.g. close database connections. |
| public Boolean getUseOnlyThisLogger(); | If this extension should be the only logging source or if Identity Provisioning will continue to use LOG4J after this extension has been called. Returns: TRUE if this extension will be used exclusively |
| public void debug(String msg); | Log a debug message.
msg: The message to be logged. |
| public void debug(String msg, Throwable e); | Log a debug message.
msg: The message to be logged. e: The throwable object This method overloads the debug(String msg) method: Used when Identity Provisioning encounters a runtime Exception. |
| public void info(String msg); | Log an info message.
msg: The message to be logged. |
| public void info(String msg, Throwable e); | Log an info message.
msg: The message to be logged. e: The throwable object. |
| public void warn(String msg); | Log a warn message.
msg: The message to be logged. |
| public void warn(String msg, Throwable e); | Log a warn message.
msg: The message to be logged. e: The throwable object. |
| public void error(String msg); | Log an error message.
msg: The message to be logged. |
| public void error(String msg, Throwable e); | Log an error message.
msg: The message to be logged. e: The throwable object. |
| public void fatal(String msg); | Log a fatal message.
msg: The message to be logged. |
| public void fatal(String msg, Throwable e); | Log a fatal message.
msg: The message to be logged. e: The throwable object |
Important Note
If calling the default logger for Identity Provisioning (NELogger) from within your extension logger you must get the logger instance from the getLogger() method of the NELogger class.
Example:
se.nordicedge.NELogger.getLogger().error("Your error log message");
Other
Error Handling
Identity Provisioning does not use error codes in the ordinary sense. Alerts can be used if something unpredictable happens. Read more about alerts in the Identity Provisioning Administration Manual.