Fact
- PhenixID Identity Manager (IM) 5.5.0 or later
- PhenixID Identity Provisioning (PIP) 5.2.0 or later
- NOTE: For a better understanding of how PIP and PIP communicate using REST Web Service can be read in PSD1062.
Situation
Identity Governance and Administration (IGA) using PIM and PIP solves the following use case:
- Request and approval of new user accounts
- Request and approval of changes to existing user accounts
- Request and approval of deactivation of user accounts
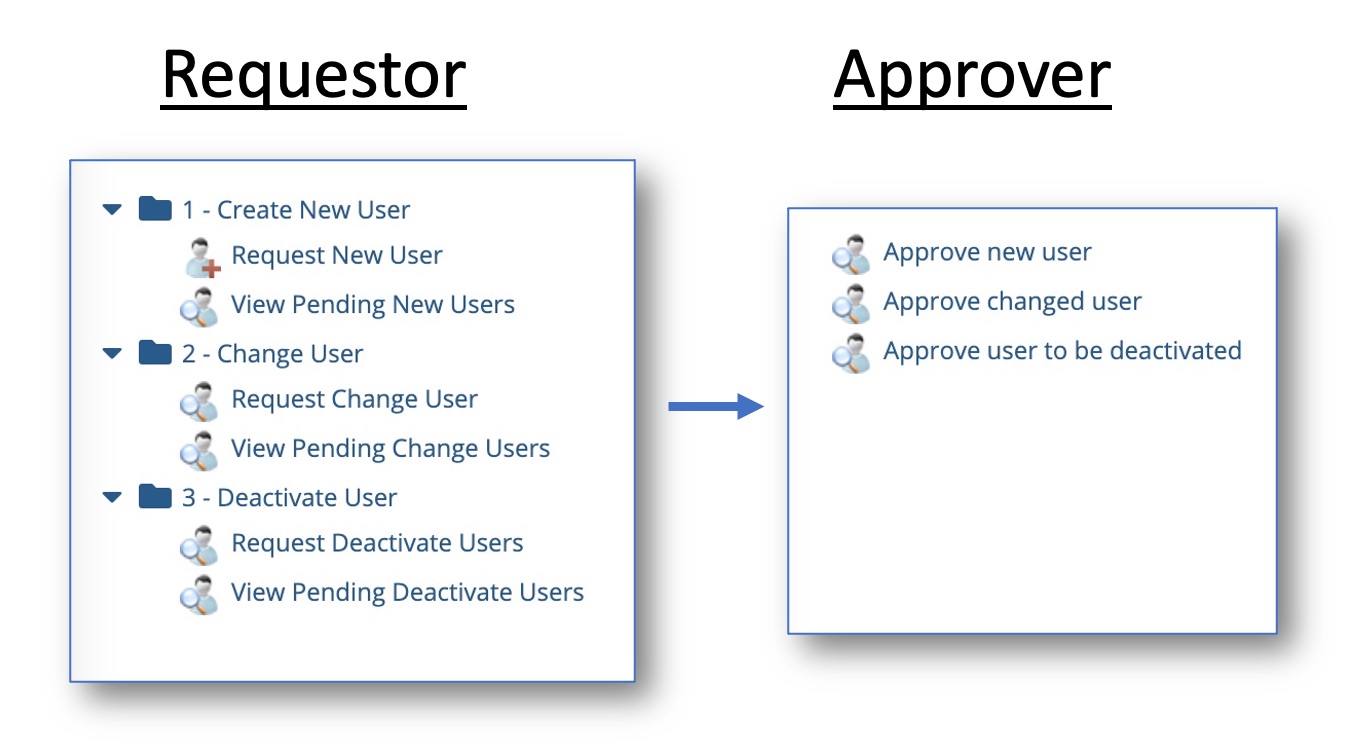
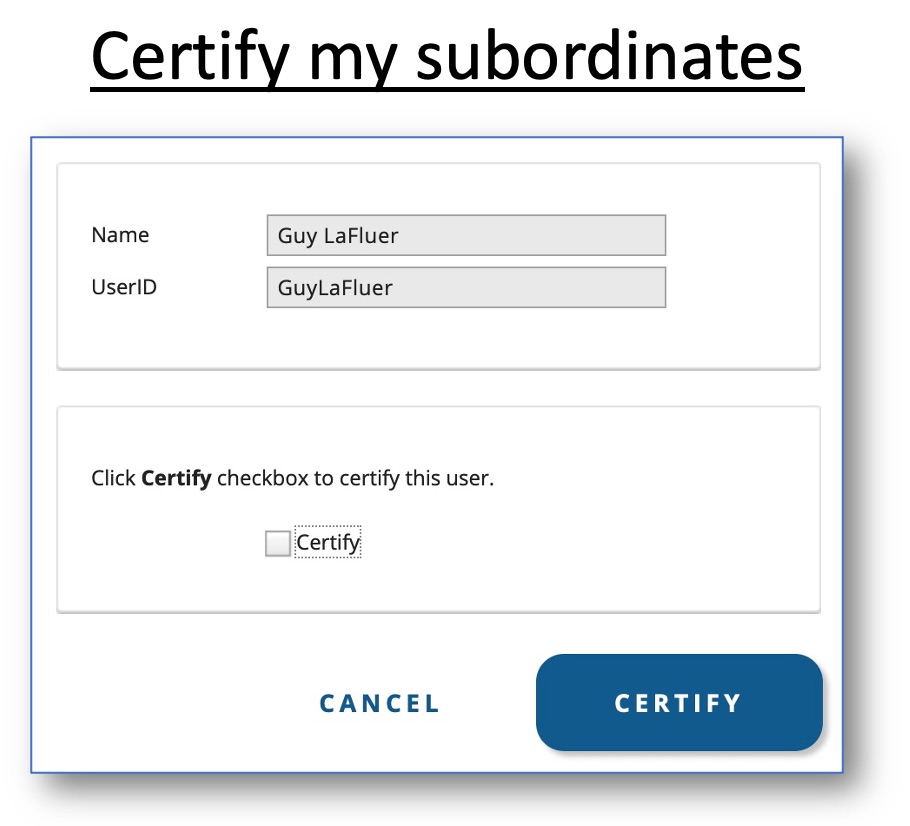
- Certification where manager certifies their subordinate
Configuration
This PSD includes configuration so you can set this up in your own environment. For this PSD we have been using PIM 5.5.0, PIP
- Add a filter to a form/tab so PIM knows that it should NOT write to store. IM should send the data to PIP.
- Add polices/tab parameters how and what data should be sent.
Setup the environment
First you need to download a ZIP file that contains a number of files.
Open the different files and update them to map your environment, e.g change to your Active Directory name.
1. Download and extract RESTEdition.zip
Download the PSD1172 IGAEdition.zip file.
Extract the zip-file.
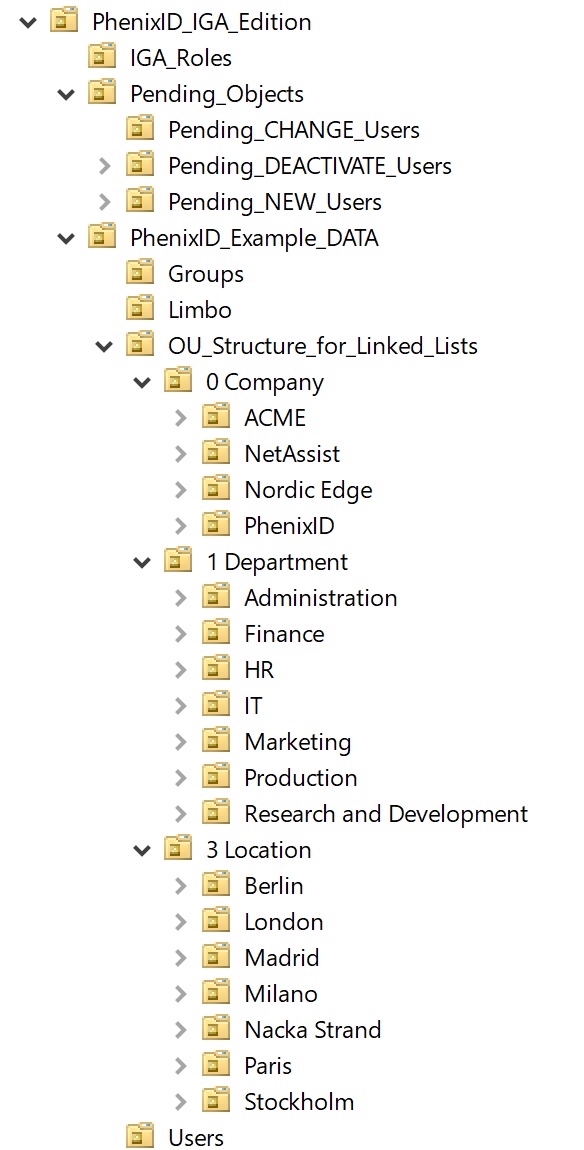
2. Create an example Active Directory structure
In the use case the forms and policies will refer to some OU´s, users and groups. Run the three scripts mentioned below to add the example structure in your environment.
- In the /PSD1172 IGAEdition folder, open folder /ExampleScripts
- Open the two files 1_CreateExampleIGAStructure.bat and 2_Add_BusinessCategory_Examples_to_OUs.ps1.
- Replace the DN DC=company,DC=local and replace it with the DN in your environment.
- Run the two scripts.
- Run 1_CreateExampleIGAStructure.bat in a CMD prompt.
- Run 2_Add_BusinessCategory_Examples_to_OUs.ps1 in an powershell CMD prompt.
- Verify that you have an OU structure created in your Active Directory that look like below.
3. Add example roles to PIM
Add the example PIM role to the role folder of your installation.
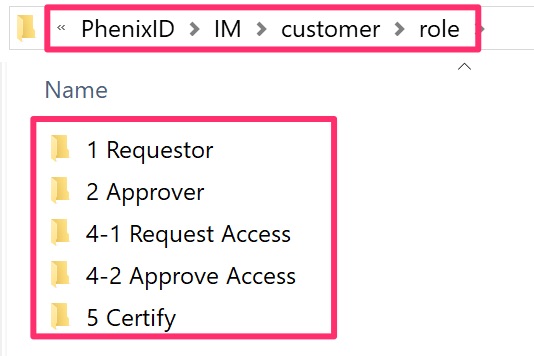
- In the /PSD1172 IGAEdition folder, open folder /PIM_files
- Copy the content in PSD1172 – IGAEdition folder
- Paste the content to drive:\Program Files\PhenixID\IM\customer\role
It should look like picture below. - Use for example Notepad++ and do a search and replace in all files. Look for DC=company,DC=local and replace it with the DN in your environment.
- Restart PIM and login to verify that the role is available
3.1 Add mandatory filter to PIM
One of the forms uses the mandatory filter to make sure users do not miss to add first name for example.
Follow the instructions in PSD1150
4. Add example configuration file to PIP
Import the example policy to your PIP installation.
- Open the Identity Provisioning Configurator
- Click File -> Import Objects
- In the extracted ZIP you downloaded, open /PSD1172 IGAEdition
- folder and then the /PIP_files folder
- Choose PSD1172 – IGA examples.aax
- Click Import Objects
- Verify that Data source LDAP PIM-UC matches your environment and connection works ok.
- Save the PIP configuration
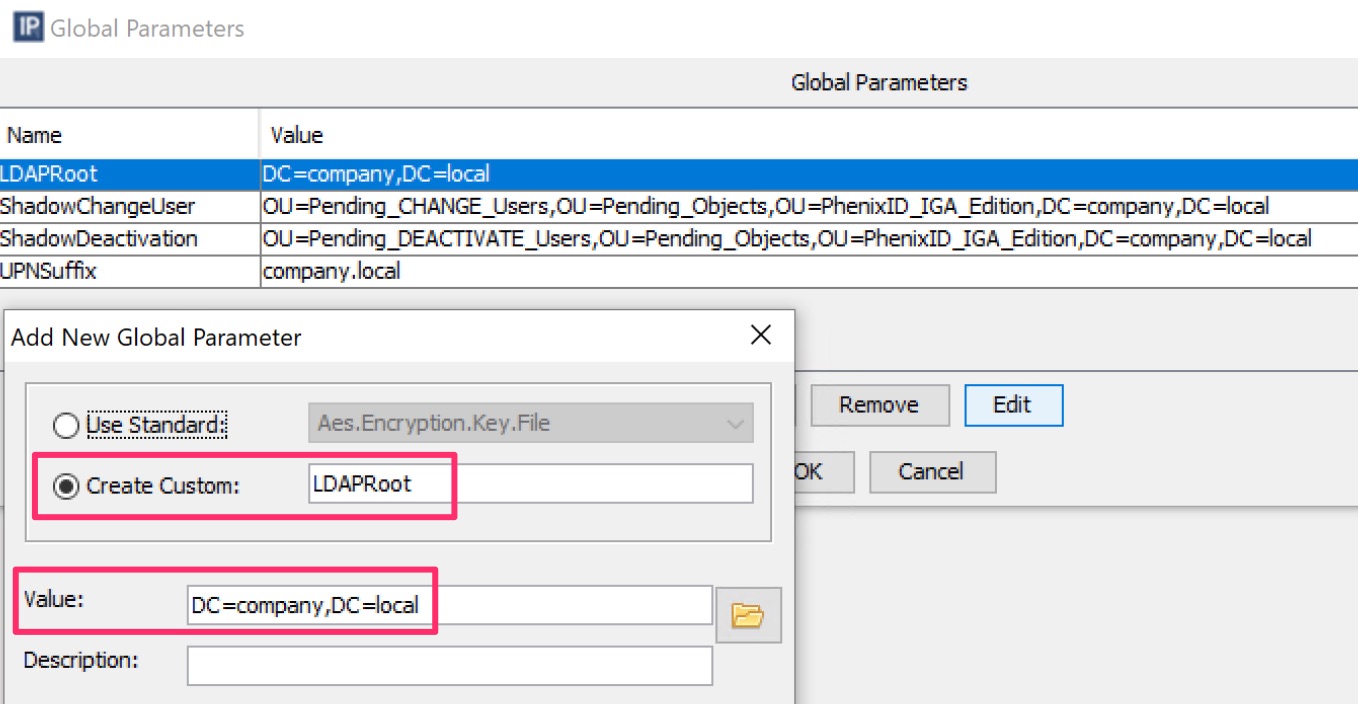
5. Create four global parameters
Create four global parameters that matches your Active Directory. It is used in some of the action.
5.1. Global parameter for LDAP root
- Open the Identity Provisioning Configurator
- Click Tools -> Global Parameters
- Click Add
- Click Create Custom and add LDAPRoot. In value you type the DN for your Active Directory root. It should look something like below.
- Save the PIP configuration
5.2. Global parameter for UPN suffix
- Open the Identity Provisioning Configurator
- Click Tools -> Global Parameters
- Click Add
- Click Create Custom and add UPNSuffix. In value you type the UPN suffix for your Active Directory root. For example example.local.
- Save the PIP configuration
5.3. Global parameter for Shadow OU when Change
- Open the Identity Provisioning Configurator
- Click Tools -> Global Parameters
- Click Add
- Click Create Custom and add ShadowChangeUser. In value you type OU=Pending_CHANGE_Users,OU=Pending_Objects,OU=PhenixID_IGA_Edition,DC=company,DC=local.
Verify the DN so it matches your AD domain. - Save the PIP configuration
5.4. Global parameter for Shadow OU when Deactivate
- Open the Identity Provisioning Configurator
- Click Tools -> Global Parameters
- Click Add
- Click Create Custom and add ShadowDeactivation. In value you type OU=Pending_DEACTIVATE_Users,OU=Pending_Objects,OU=PhenixID_IGA_Edition,DC=company,DC=local.
Verify the DN so it matches your AD domain. - Save the PIP configuration
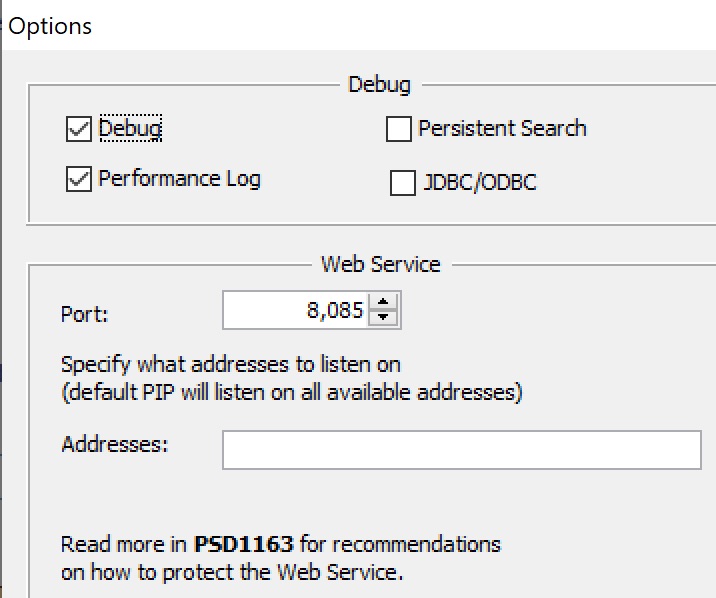
6. Change port to map use cases
PIM will search for PIP on http://127.0.0.1:8085
- Open the Identity Provisioning Configurator
- Click Tools -> Options
- Change port to 8085. It should look something like below.
- Save the PIP configuration
Explanation of the environment
Start PIP
There is three ways to have PIP enabled to start receiving REST requests. Choose one and start testing the use case below.
- Start the PhenixID Provisioning Service service
- Open Identity Provisioning configurator and click the Start or stop Web Service listener.

- Click on one of the policy and click Run Policy and Start!. Now PIP is listening for REST request. You have to click Refresh to view incoming requests. Click the Transaction Number of the request and Select.
I will use the first Use case Use case – CREATE REPORT to explain how what will happen and is expected when testing. All other use cases will work in the same fashion and may only includes some specific notes for that use case.
Test the IGA Edition
Overview
Note that the IGA Edition includes a number of basic PIM and PIP configuration mostly to understand the frame work with IGA. In a real customer case the PIM and PIP configuration will most likely be updated with a lot mor configuration.
Common thread in the configuration
To make it simple to follow I have named the searches and create/edit forms in PIM with the same name as the data sources and policies in PIP.
So, for example.
- In PIM there is a create form called: Request New User
- That form has an endpoint called: request_new_user
- In PIP there is an REST data source called: request_new_user
- In PIP there is a Policy called 1 – REQUEST NEW USER (/request_new_user)
All other froms where some kind of create, change or deactivation is happening has the same naming as above example.
Use case – CREATE USER
Request
PIM collect some data and send to PIP. PIP adds some new attributes and creates a shadow object in the create shadow object OU.
OU=Pending_NEW_Users,OU=Pending_Objects,OU=PhenixID_IGA_Edition,..
Decline
The shadow object is deleted.
Approve
Object will be moved by PIP to the OU: OU=Users,OU=PhenixID_Example_DATA,OU=PhenixID_IGA_Edition,..
Misc
There is a policy called “3 – Activate user if StartDate is reached” that you can run every night for example that will enable the user
Use case – CHANGE USER
Request
PIM collect some data and send to PIP. PIP adds the DN of the changed object in an attribute and then creates a shadow object in the change shadow object OU.
OU=Pending_CHANGE_Users,OU=Pending_Objects,OU=PhenixID_IGA_Edition,..
Decline
The shadow object is deleted.
Approve
Changes will be added to the original account.
Misc
If first name and/or last name is changed there is a policy that will change sAMAccountName, displayName and userPrincipalName .
Use case – DEACTIVATE USER
Request
PIM collect some data and send to PIP. PIP adds the DN of the changed object in an attribute and then creates a shadow object in the change deactivated object OU.
OU=Pending_DEACTIVATE_Users,OU=Pending_Objects,OU=PhenixID_IGA_Edition,..
Decline
The shadow object is deleted.
Approve
Changes will be added to the original account.
Misc
There is a policy called “3 – Move user to Limbo and disable account if accountExpire is reached” that you can run every night for example that will move the user to Limbo OU when account is expired.
Use case – Certify
Time to certify policy
There is a policy called “1 – Notify manager that is time to certify” tjat you can run once a year for example. IT will add the string “NOT CERTIFIED” to attribute comment.
Certify by manager
Managers logs in to PIM and will see all its users. Manager click the checkbox to certify and attribute comment will be added with string containing date and who certified.
Approve
Changes will be added to the original account.
Misc
There is a policy called “3 – Move user to Limbo and disable account if accountExpire is reached” that you can run every night for example that will move the user to Limbo OU when account is expired.
PIM REST Client Edition
We have created a number of example use cases using PIM and PIP in a Windows and Active Directory environment. (if you have another LDAP or using Linux, the example use cases are quite easily to port to other environments)
For more information about PIM REST Client Edition, please read PSD1169
DISCLAIMER
Information provided in this document is for your information only. PhenixID makes no explicit or implied claims to the validity of this information. Any trademarks referenced in this document are the property of their respective owners.The origin of this information may be internal or external to PhenixID. PhenixID makes all reasonable efforts to verify this information.
PhenixID - support.phenixid.se