Summary
This document will guide you through the steps to provide Single-Sign-On to Citrix Netscaler using SAML with PhenixID Authentication Services as SAML IdP. This is useful in these scenarios:
- Authentication for external users
- Provide authentication methods not available over Radius (for example certificates, username and PhenixID OneTouch)
- Citrix Federated Authentication Services. In this scenario, PhenixID Authentication Services works as the SAML IdP.
System Requirements
- PhenixID Authentication Services 2.0 or higher
- Citrix Netscaler 11.0 or higher
Instruction
1. Set up PhenixID Authentication Services as SAML IdP
- Setup PhenixID Authentication Services as a SAML IdP using one of the Federation scenarios described here. (If the desired authentication method is not provided by a scenario, use the documentation for the SAML authenticator here).
- Download the IdP signing certificate to a file as described here.
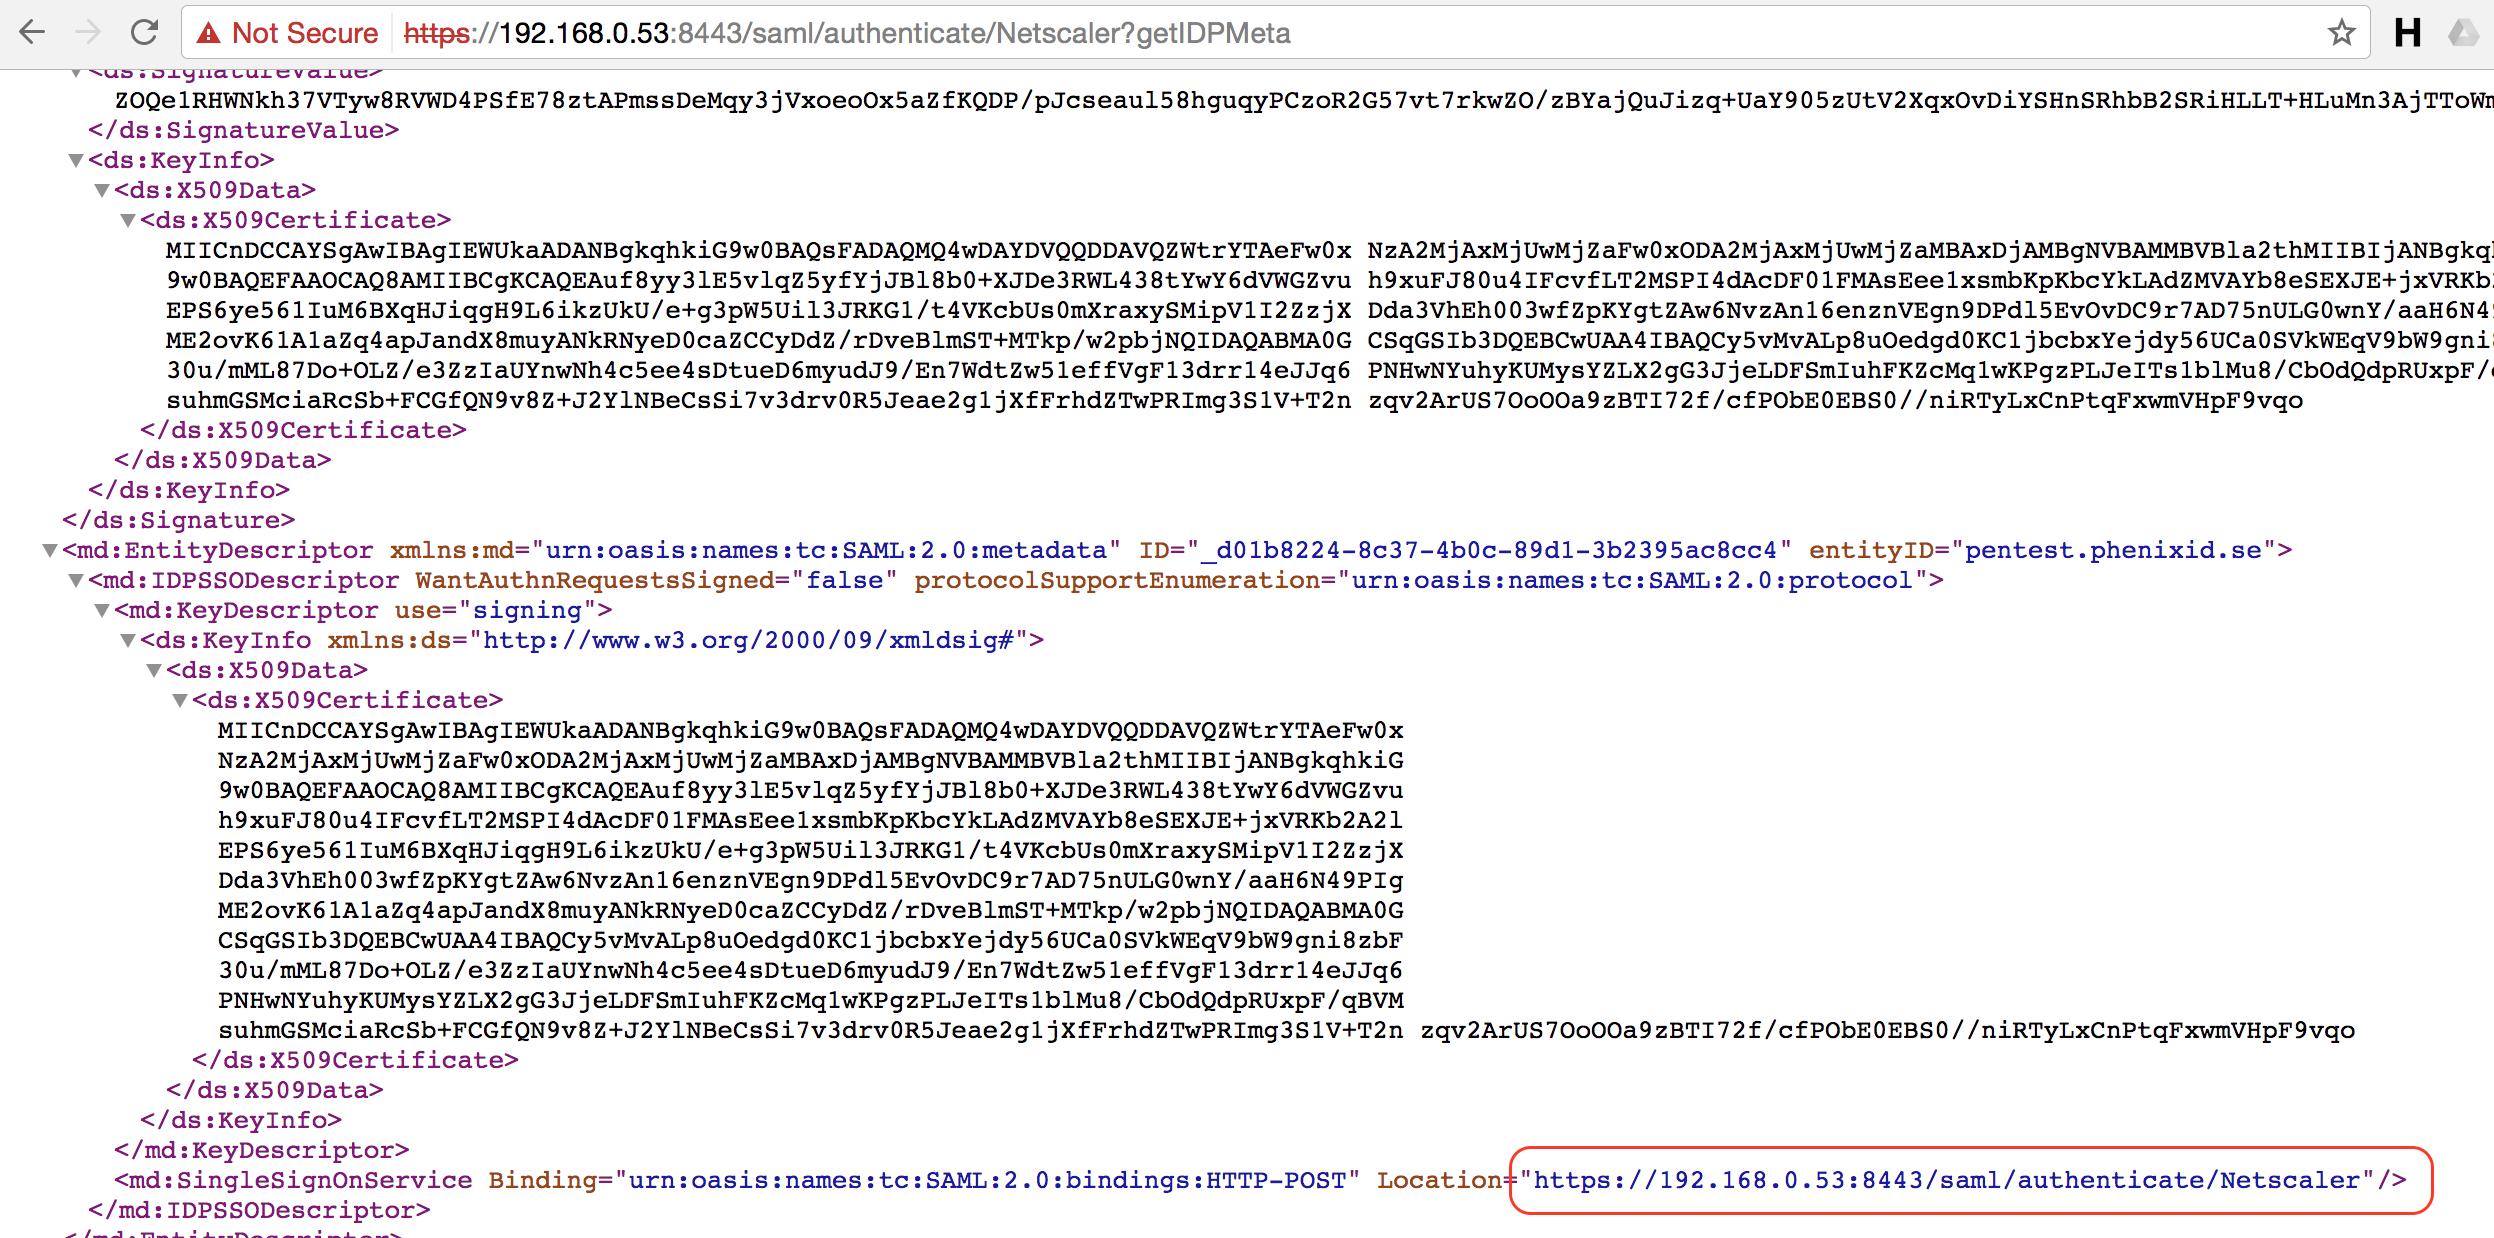
- Open the IdP Metadata and get the value of the SingleSignOnService-Location.
4. If SAML SLO is configured (http://document.phenixid.net/m/69842/l/751485-saml-configure-single-logout-slo), get the SLO Post URL.
2. Configure Netscaler
-
- If there is not currently a Gateway VIP configured, consult this link- http://docs.citrix.com/en-us/netscaler-gateway/10-5/ng-xa-xd-integration-edocs-landing.html.
- Create a SAML authentication policy.
- Bind the SAML policy as the only primary policy to the gateway VIP.Click Continue
- Open Traffic Management -> SSL -> Certificates -> CA Certificates.
- Install the certificate downloaded in step 1.2
- Open Netscaler Gateway -> Policies -> Authentication -> SAML
- Select Servers, then Add
- Set these properties:
- Name = <Friendly name>
- IDP Certificate name = <Select the one installed in step 2.3>
- Redirect URL = <Value from step 1.3>
- Single Logout URL = <Value from step 1.4>
- User Field = Name ID
- Signing Certificate Name = <Select the certificate (keypair) you would like to use as the signing certificate for the Netscaler SAML SP>
- Issuer Name = <Enter the name you would like to use as the entityID for the Netscaler SAML SP. For example: https://mynetscaler/samlsp>
- SAML Binding = POST
- Click More
- Signature algorithm = RSA-SHA256
- Create
- Open Netscaler Gateway -> Policies -> Authentication -> SAML
- Select Policies, then Add
- Set these properties:
- Name = <Friendly name>
- Server = <Select server created in 2.6>
- Expression = ns_true
(<ns_true enables this policy to always be active when bound to a VIP. A more restrictive expression can be created to allow for more control over when this SAML policy is used and should be based on the customers need.>)
- Click OK to Create.
- Open Netscaler Gateway -> Virtual Servers
- Edit the virtual server you would like to bind SAML to
- Scroll down to Authentication
- Unbind any existing policies
- In the Authentication section, click the + sign
- Set these properties
- Choose policy = SAML
- Choose type = Primary
- Click Continue
- In the Policy Binding section, select the policy created in previous step
- Set the priority to 100
- Click Bind
- Click Done
3. Add Netscaler SAML SP Metadata to PhenixID Authentication Services
- Create Netscaler SAML SP Metadata XML file. Use the template data below and replace entityID and AssertionConsumerService URL. Place the text in a file using a text editor and save it as a xml file.
<?xml version="1.0" encoding="UTF-8"?>
<EntityDescriptor entityID="<replace_this_with_value_set_in_step_2.6.7>" xmlns="urn:oasis:names:tc:SAML:2.0:metadata">
<SPSSODescriptor protocolSupportEnumeration="urn:oasis:names:tc:SAML:2.0:protocol">
<NameIDFormat>urn:oasis:names:tc:SAML:1.1:nameid-format:unspecified</NameIDFormat>
<AssertionConsumerService index="1" Binding="urn:oasis:names:tc:SAML:2.0:bindings:HTTP-POST"
Location="<replace_this_with: https://<citrix_netscaler_virtual_server_fqdn>/cgi/samlauth>>"></AssertionConsumerService>
</SPSSODescriptor>
</EntityDescriptor>
- Upload the metadata file using this Federation Scenario.
Test
- Open a web browser
- Browse to Netscaler virtual server host
- You should be redirected to the Idp (PhenixID Authentication Services)
- Authenticate
- You should be redirected back to Netscaler
- You are now logged in to Netscaler.
Troubleshooting
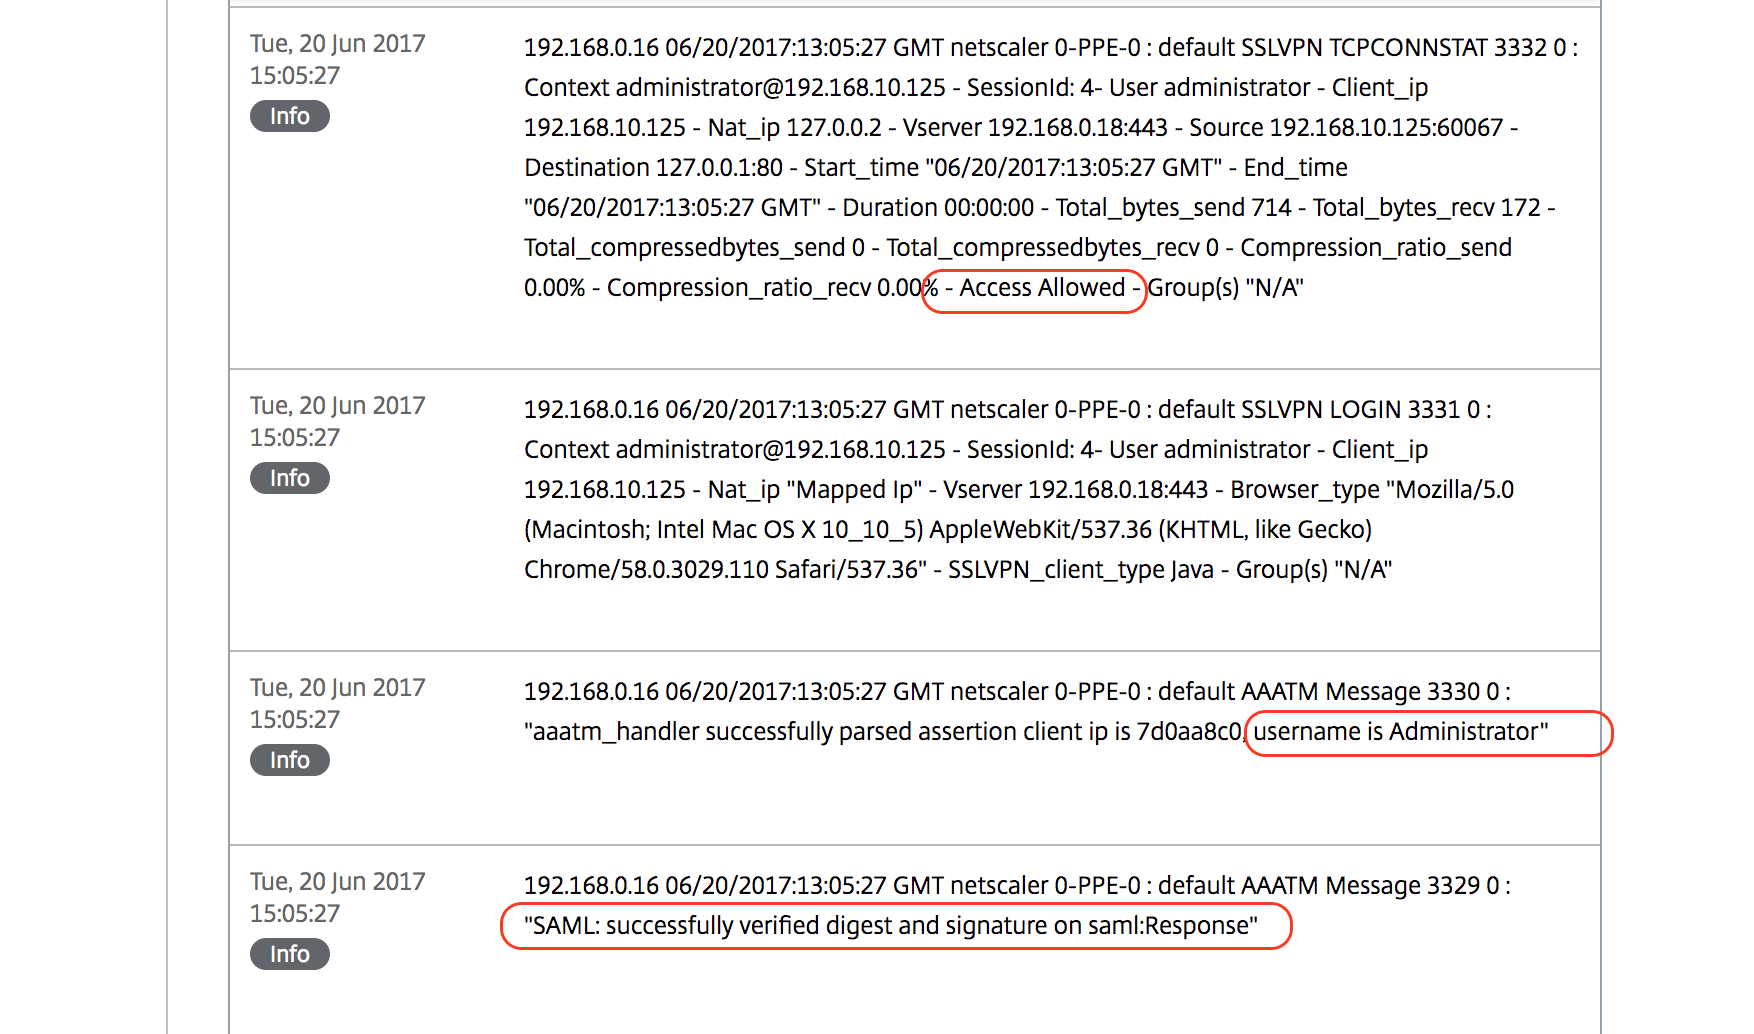
If you are not sure whether you are logged in or not, pls view the Netscaler logs:
- Open Configuration -> Authentication -> Logs
- Under File to the left, select ns.log
- Wait for the system log messages to appear (this might take a while..)
- Scroll down to find the messages that correlates to the authentication attempt.
- Check the error message.
- After a successful authentication, Netscaler will produce a message with this information:
DISCLAIMER
Information provided in this document is for your information only. PhenixID makes no explicit or implied claims to the validity of this information. Any trademarks referenced in this document are the property of their respective owners.The origin of this information may be internal or external to PhenixID. PhenixID makes all reasonable efforts to verify this information.
PhenixID - support.phenixid.se