Summary
This document will guide you through the steps to provide Single-Sign-On to NextCloud/ownCloud using SAML with PhenixID Authentication Services as SAML IdP.
System Requirements
- PhenixID Authentication Services 2.3 or higher
- NextCloud/ownCloud administrator account
- NextCloud/ownCloud SSO plugin enabled
- NextCloud/ownCloud configured to use the Active Directory objectGUID as user identifier.(If you are using another user database provider (any LDAP, SQL etc), pls check what attribute is used as the user identifer in nextCloud/ownCloud. Use that attribute to populate the saml token attribute userid.)
Instruction
1. Set up PhenixID Authentication Services as SAML IdP
- Setup PhenixID Authentication Services as a SAML IdP using one of the Federation scenarios described here. (If the desired authentication method is not provided by a scenario, use the documentation for the SAML authenticator here)
- Open the federation scenario.
- Click Identity Provider
- Deselect “Require signed requests”
- Click Save
- Click on Execution flow
- Modify the LDAPSearch valve to select objectGUID as attribute and binary attribute.

- Add a new valve, PropertyGUIDBinaryToStringValve. Set parameters:
dest=userid
source=objectGUID

- Move the PropertyGUIDBinaryToStringValve valve to be executed after LDAPSearchValve
- Add a new valve, PropertyToUpperValve. Set parameters:
source=userid

- Move the PropertyToUpperValve valve to be executed after PropertyGUIDBinaryToStringValve.
- Click on AssertionProvider. Set parameters:
additionalAttributes=userid

- Click Save
- Click Identity Provider
- Click View SAML Idp Metadata
- Save the metadata as an XML File.
2. Configure NextCloud/ownCloud
- Login with an admin account.
NB! During testing, make sure you don’t logout from the admin session! Testing must be performed in another browser window. - Click SSO & SAML Authentication.
- Please be aware about the text presented on the top of the screen! Make sure to configure an admin user on the idp!
- Below General, enter userid.
- Open the metadata file downloaded in step 1.16.
- Locate these values:
– entityID
– SingleSignOnService->Binding=urn:oasis:names:tc:SAML:2.0:bindings:HTTP-POST->Location
– IDPSSODescriptor->KeyDescriptor use=signing->KeyInfo->X509Data->X509Certificate - Below Identity Provider data, enter the values fetched in the previous step.
– The entityID of the SAML Identity Provider
– The SingleSignOnService location URL
– The X509 certificate - Below Security Settings, select “Indicates a requirement for the <samlp:Response>…… elements received by this SP to be signed”
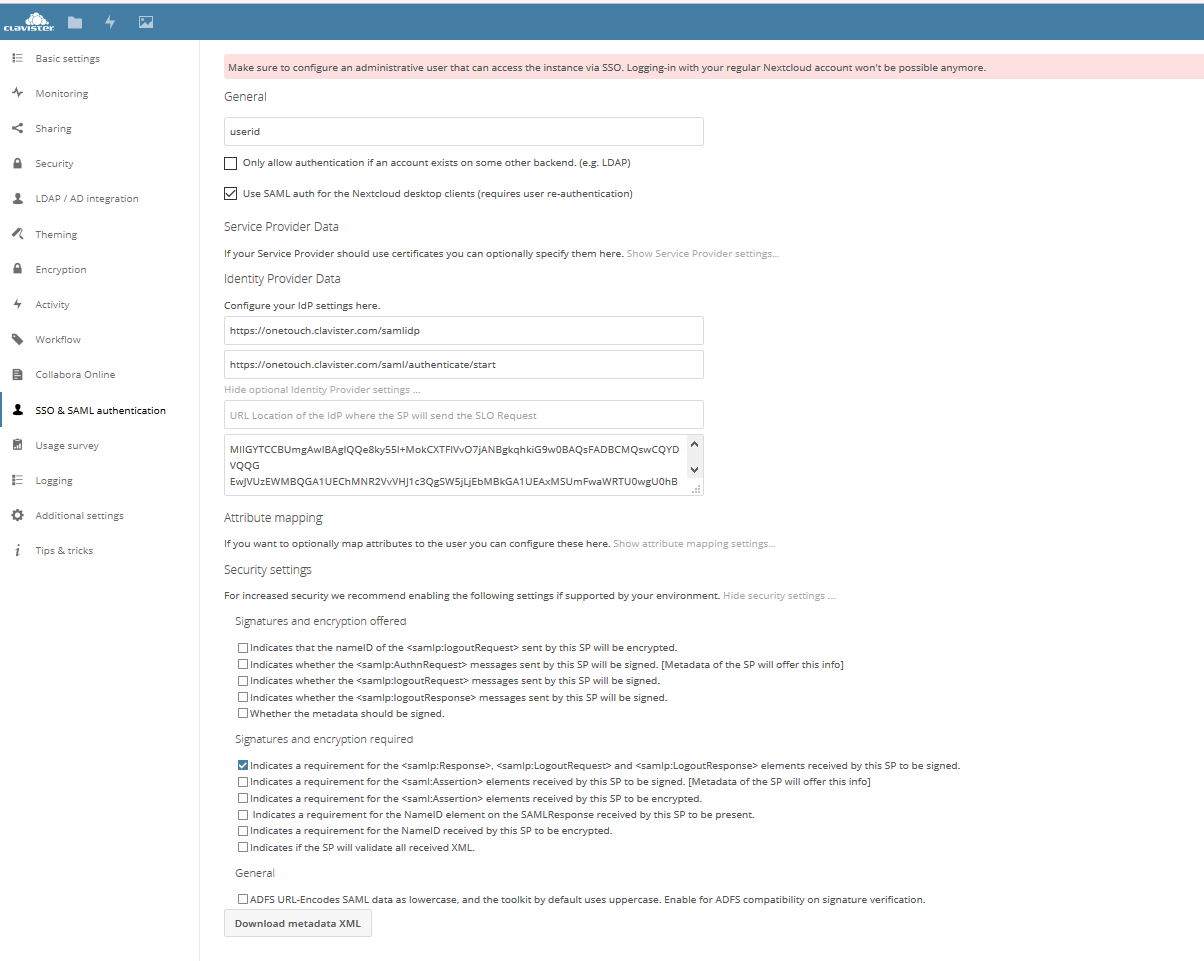
- Click Download metadata xml. Save the file as nextcloud.xml.
3. Add NextCloud/ownCloud Metadata to PhenixID Authentication Services
- Upload the metadata file from 2.7 using this Federation Scenario.
Test
- Open a web browser
- Browse to the NextCloud/ownCloud trigger URL
- You should be redirected to the IdP (PhenixID Authentication Services)
- Authenticate
- You should be redirected back to NextCloud/ownCloud
- You can now access NextCloud/ownCloud.
Troubleshooting
Use the SAML Tracer addon for Firefox to debug and trace the SAML messages.
DISCLAIMER
Information provided in this document is for your information only. PhenixID makes no explicit or implied claims to the validity of this information. Any trademarks referenced in this document are the property of their respective owners.The origin of this information may be internal or external to PhenixID. PhenixID makes all reasonable efforts to verify this information.
PhenixID - support.phenixid.se