Summary
This document will guide you through the steps to enable multi-factor authentication and Single-Sign On for the analytics solution Open Distro Kibana for Elasticsearch (https://opendistro.github.io/for-elasticsearch-docs/ ) using SAML2.
System Requirements
- PhenixID Authentication Server 3.0 or higher
- Access to machines running Open Distro Kibana for Elasticsearch
- With administrative rights
- Security plugin installed on Kibana and Elasticsearch
Instruction
Overview
This document will guide you through the steps to enable multi-factor authentication and Single-Sign on for Open Distro Kibana for Elasticsearch.
PhenixID Authentication Services acting as SAML IdP
- Login to Configuration Manager.
- Setup PhenixID Authentication Services as a SAML IdP using one of the Federation scenarios described here. (If the desired authentication method is not provided by a scenario, use the documentation for the SAML authenticator here)
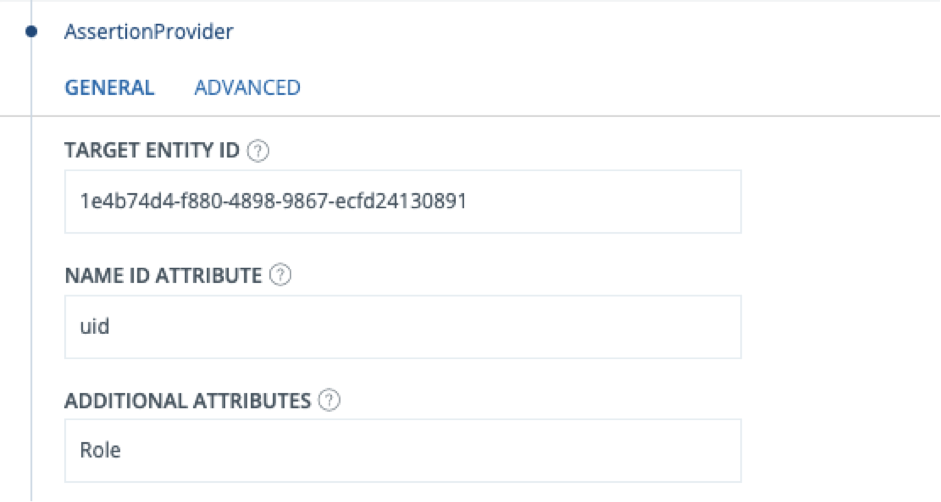
- Fetch the userID value (corresponding to the Open Distro userID) from the user store configured.
- Use userID as Name ID attribute.
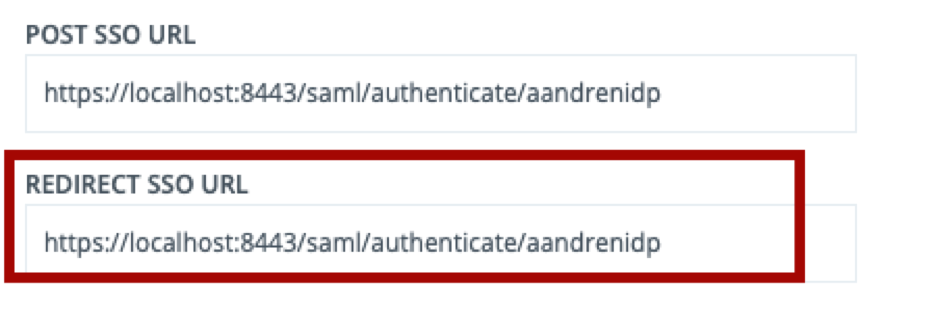
- Click Identity Provider.
- Since current version of open distro only supports SAML redirect bind, add the same value to the redirect url as the post url.
- Click on the Execution flow tab.
- Open distro requires a Role attribute in the assertion mapping to an existing role value in the configuration. The image shows a static value added as role, “admin”.
“admin” is a default role in open Distro and grants the highest level of access. Make sure the role value used corresponds to the Open distro configuration.
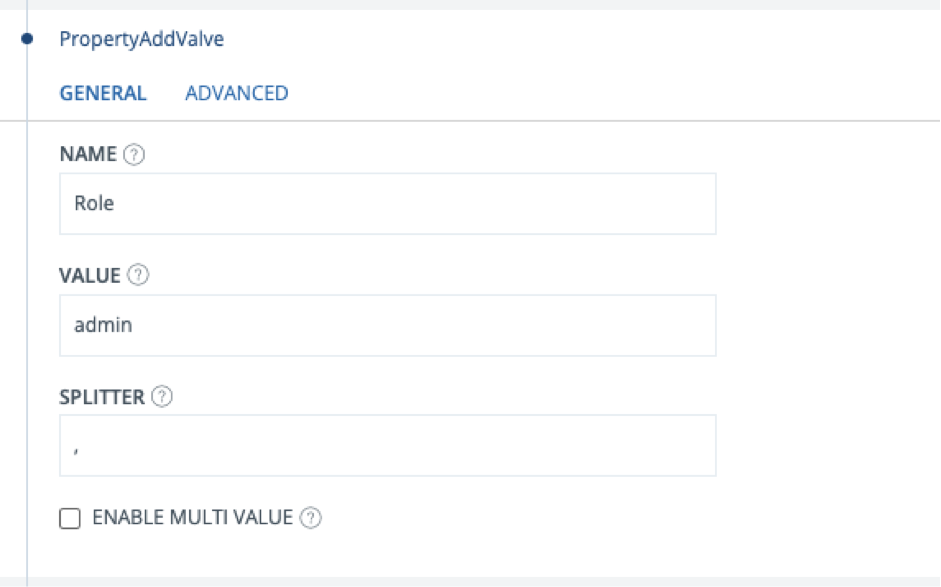
- Add the role property as an attribute in the assertion.
- Save.
- Click General->View SAML Metadata.
- Save the displayed SAML IdP metadata to a file (idp_meta.xml).
Configure Open Distro
Elasticsearch
- Place the idp_meta.xml file on the Open Distro machine, in a folder accessible by the Open Distro service.
- Locate the config.yml file for Elasticsearch, most probably in /usr/share/elasticsearch/plugins/opendistro_security/securityconfig
- Add a section to config.yml providing SAML configuration:
saml_auth:order: 0
description: “SAML provider”
http_enabled: true
transport_enabled: false
http_authenticator:
type: saml
challenge: true
config:
idp:
metadata_file: /usr/share/elasticsearch/plugins/opendistro_security/securityconfig/idp_metadata.xml
entity_id: phenixid
sp:
entity_id: opendistro
forceAuthn: true
kibana_url: <path_to_the_kibana_url>
roles_key: Role
exchange_key: <random_min_32_char>
authentication_backend:
type: noop
Change these values:
– idp->entity_id (phenixid in above example) to the entityID of the IdP. (Open idp_meta.xml to find the correct value)
– idp->metadata file path. Change to match your environment
– kibana_url. Change to match your environment.
– exchange_key. Generate a random string with at least 32 chars. Set the value here.*Note that YML format is required. It is a good practice using a yml validator when editing the file.
Additional settings can be found here.
- Save the file.
Kibana
- Locate the kibana.yml on the kibana machine. Probably found at /etc/kibana/kibana.yml.
- Add/update ensuring entries in the file:
opendistro_security.auth.type: “saml”server.xsrf.whitelist: [“/_opendistro/_security/saml/acs”, “/opendistro_security/saml/logout”,”/_opendistro/_security/saml/acs/idpinitiated”]
- Save the file.
Add trust to Open Distro on PhenixID Authentication Services
- Open Distro SAML Service Provider metadata must be created manually.
- Create a new text file and name it opendistro_saml_sp.xml.
- Paste this template xml into the file:
<?xml version="1.0" encoding="UTF-8"?> <md:EntityDescriptor xmlns:md="urn:oasis:names:tc:SAML:2.0:metadata" entityID="opendistro"> <md:SPSSODescriptor AuthnRequestsSigned="false" WantAssertionsSigned="true" protocolSupportEnumeration="urn:oasis:names:tc:SAML:2.0:protocol"> <md:NameIDFormat>urn:oasis:names:tc:SAML:1.1:nameid-format:unspecified</md:NameIDFormat> <md:AssertionConsumerService Binding="urn:oasis:names:tc:SAML:2.0:bindings:HTTP-POST" Location="<kibana_endpoint>/_opendistro/_security/saml/acs" index="1" /> </md:SPSSODescriptor> </md:EntityDescriptor>
- Change <kibana_endpoint> to suite your environment.
- Save the file
- Login to configuration manager
- Open Scenarios->Federation->SAML Metadata upload
- Click the plus sign
- Add Open Distro SAML SP Metadata by uploading opendistro_saml_sp.xml.
Enable the Open Distro SAML configuration
Neither Kibana nor Elasticsearch will reload configuration automatically. It requires a manual trigger.
Kibana
Kibana only requires restart of the service.
Elasticsearch
Elasticsearch requires the execution of the securityadmin.sh. See documentation here.
Example:
/usr/share/elasticsearch/plugins/opendistro_security/tools/securityadmin.sh -cd /usr/share/elasticsearch/plugins/opendistro_security/securityconfig -cacert /etc/elasticsearch/root-ca.pem -cert /etc/elasticsearch/kirk.pem -key /etc/elasticsearch/kirk-key.pem
Test
- Browse to the Open Distro / Kibana URL.
- This should result in a redirect to PhenixID Authentication Server
- Authenticate
- If authentication was successful, a redirect to Open Distro should occur (with a SAML assertion)
- The user should now be logged in.
DISCLAIMER
Information provided in this document is for your information only. PhenixID makes no explicit or implied claims to the validity of this information. Any trademarks referenced in this document are the property of their respective owners.The origin of this information may be internal or external to PhenixID. PhenixID makes all reasonable efforts to verify this information.
PhenixID - support.phenixid.se