Fact
- PhenixID Identity Provisioning (PIP) 5.2.0 or later
- NOTE: PIP 5.1.2 and earlier included an older version of the Web Service.
- The new Web Service that ships with PIP 5.2.0 is based on REST. The previous Web Service included in PIP (still supported and available) was SOAP based.
- We recommend all customer to use (move to) the new REST Web Service since it includes more features than the previous one and will be the service we will continue to develop.
Overview
Some features that are include in the PIP REST Web Service :
- Multi-threaded support. PIP REST Web Service can receive multiple requests at the same time.
- If you like PIP to immediately give a response to a client that it has successfully received the request, that is now possible. PIP will not wait for the policy to finish. This could be useful if the client do not have time or care for the policy to finish.
- More authentication options. Use Certificate-based or Basic authentication.
- Different PIP policies can use different REST WS data sources. You can per data source define different paths.
- PhenixID Identity Manager (PIM) – From version PIM 5.5.0 there are a Web Service client available for the new PIP REST Web Service.
For more information, please read, PSD1162
Configuration
Overview
The basics to configure and enable PIP REST Web Services are:
- Add a HTTP PORT for the PIP REST Web Service to listen on.
- Specify port number
- Add a REST Web Service DATA SOURCE
- Add a name for the data source
- Add a unique path that will be added to the PIP REST Web Service URL
- Create a POLICY and add the data source to the policy
- Add the action you like to use with the policy
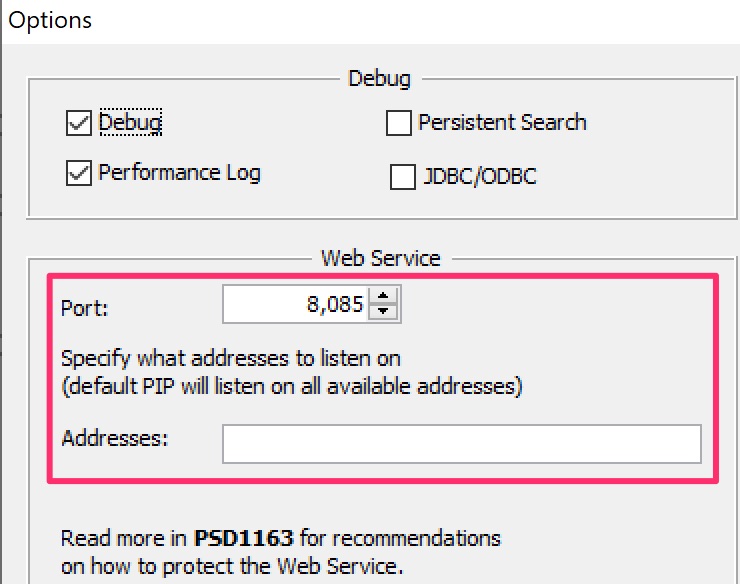
1. Specify HTTP port
- Click Tools -> Options
- In the Web Service Listener frame, specify the HTTP port the PIP REST Web Service should listen on
The URL of the PIP REST Web Service will be
http://PIP_SERVER_NAME:PORT/rest/path (path will be explained in next bullet). - You can also add what ip-addresses that the REST service should listen on
- Click OK

2. Add REST Web Service data source
- Expand General -> Data Sources
- Click Web Services
- Add Name for this data source
- Click radio button REST Web Service
- Depending on how the associated policy is configured, the path has different meanings.
- If the policy is configured for automatic parsing (implicit before PIP 6.4.0)
- Add a Path for the data source
- The path value may NOT include any spaces or /.
- The path will be added to REST Web Service URL. If path is set to certify_user the full path generated will be http://PIP_SERVER_NAME:PORT/rest/certify_user
- Add a Path for the data source
- If the policy is configured for manual parsing (introduced in PIP 6.4.0)
- Add a Path for the data source
- The path may contain slashes
- The path will be added to REST Web Service URL. If path is set to foo/bar the full path generated will be http://PIP_SERVER_NAME:PORT/foo/bar
- Add a Path for the data source
- If the policy is configured for automatic parsing (implicit before PIP 6.4.0)
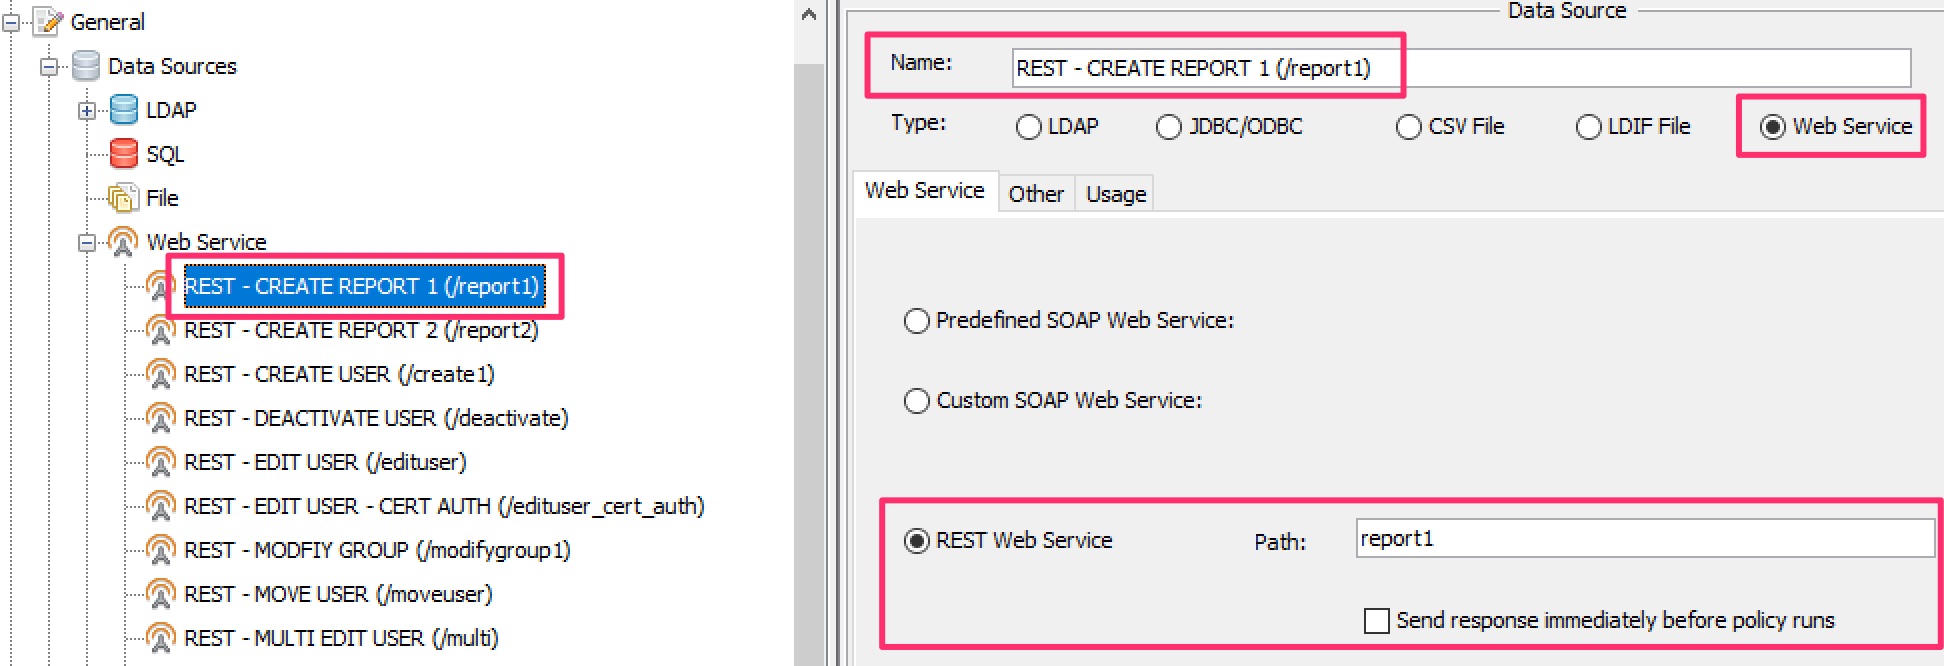
Explanation of Send respons immediately before policy runs
- NOT CHECKED. PIP REST Web Service will give a response back to the client when policy is finished. The response will be 200 (OK).
- CHECKED. PIP REST Web Service will give a response back as soon as the policy have created the session object(s). But it will not wait for the action(s) in the policy to finish. The response will be 202 (Accepted)
- NOTE! Before the request reach a data source, PIP REST Web Service will check two things:
- If no path is available the response to client is 404 (Not Found)
- If an error occurs the response to client is 500 (Internal Server Error)
NOTE: If you like you can now create more REST data sources with different paths.
Note: Every path MUST be unique.
For example:
http://PIP_SERVER_NAME:PORT/rest/test2
http://PIP_SERVER_NAME:PORT/rest/test3
http://PIP_SERVER_NAME:PORT/rest/test4
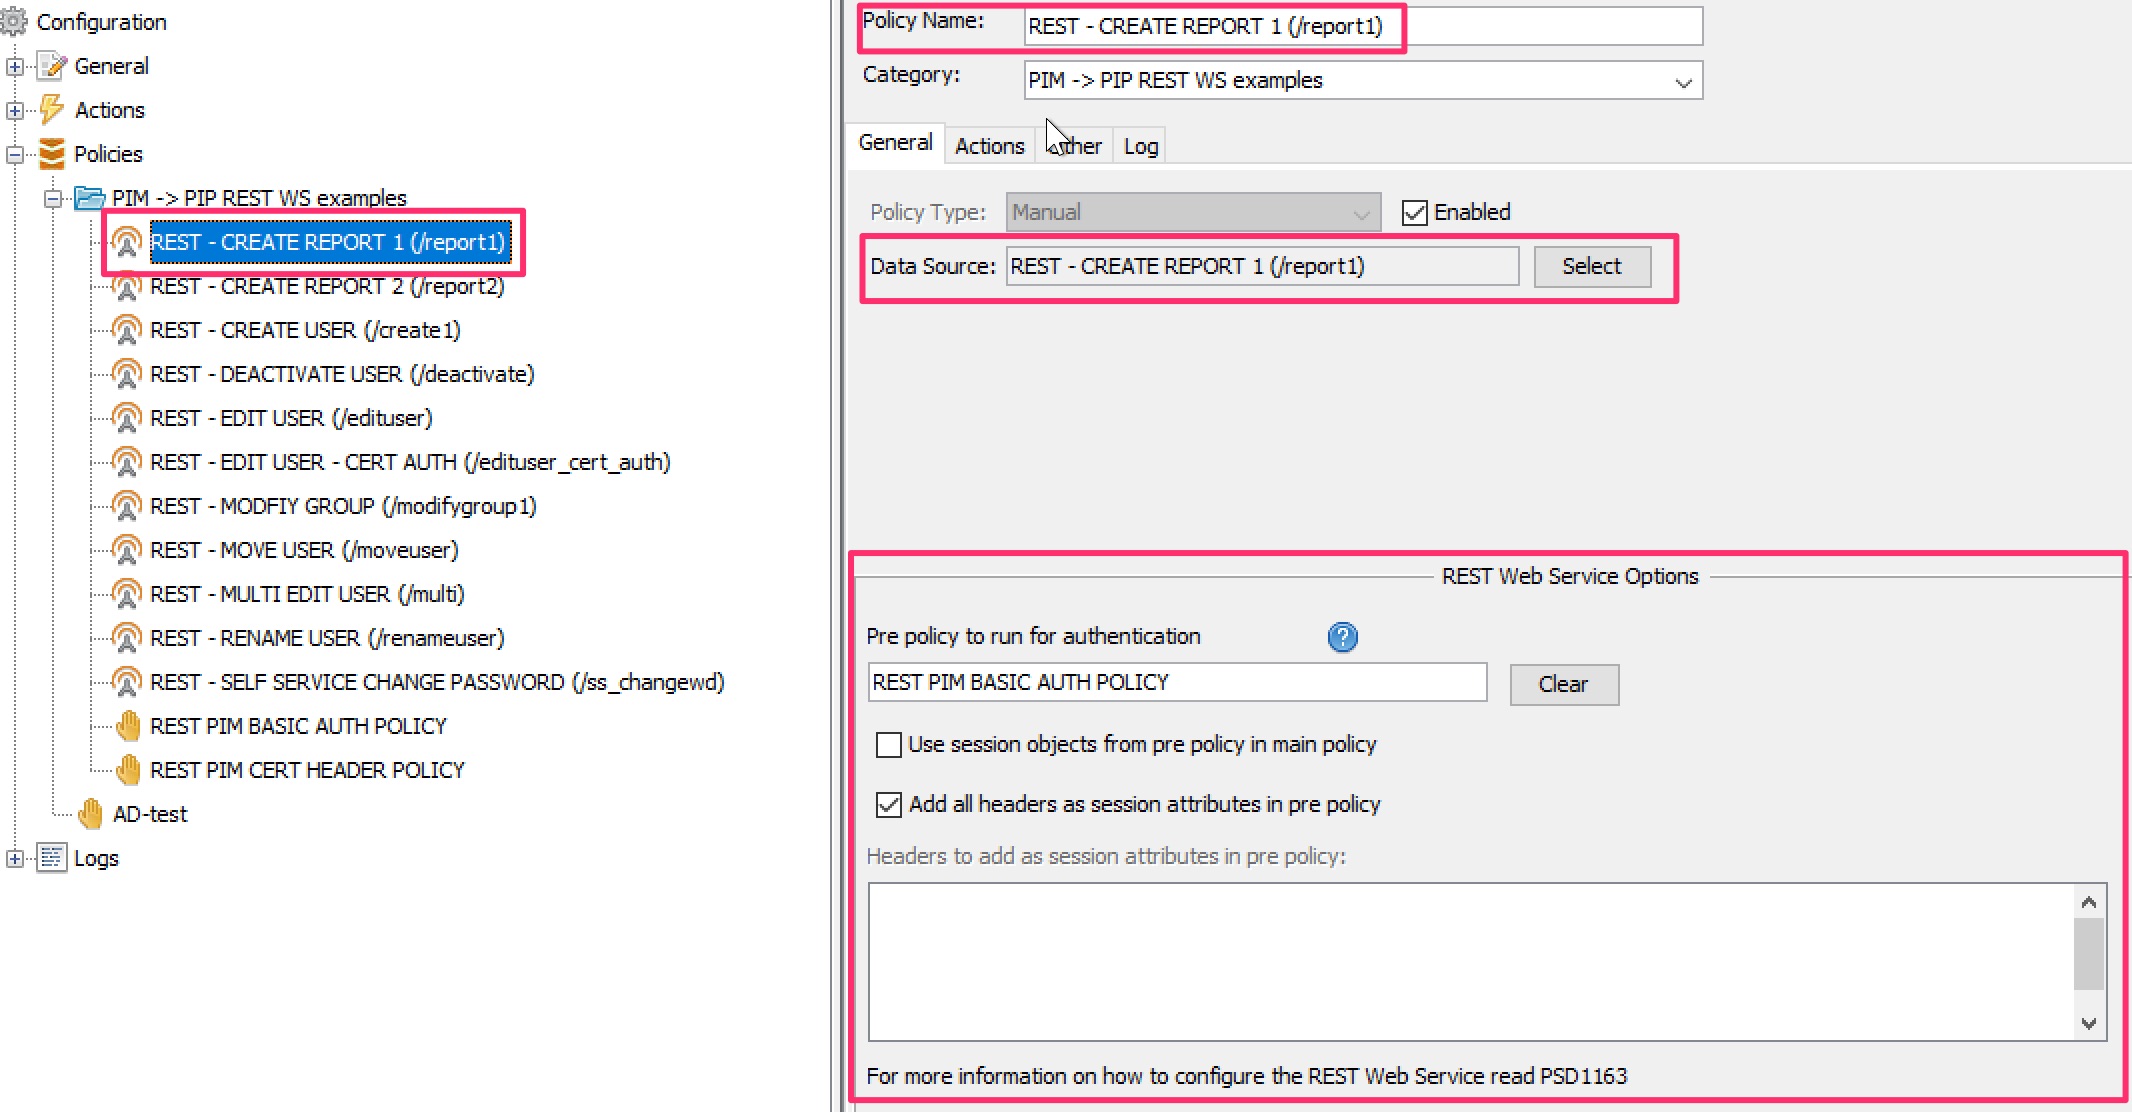
3. Create a policy and add data source
- Click Policies
- Give the policy a name
- Click Select in Data Source:
- Select the Data Source created in previous section and click OK
- In REST Web Service Options you can now add one or more Headers to be used as session attributes or added from a pre authentication policy.
- Click Actions tab and start adding actions to your policy.
In the screenshot below, it shows what it looks like in version before PIP 6.4.0:

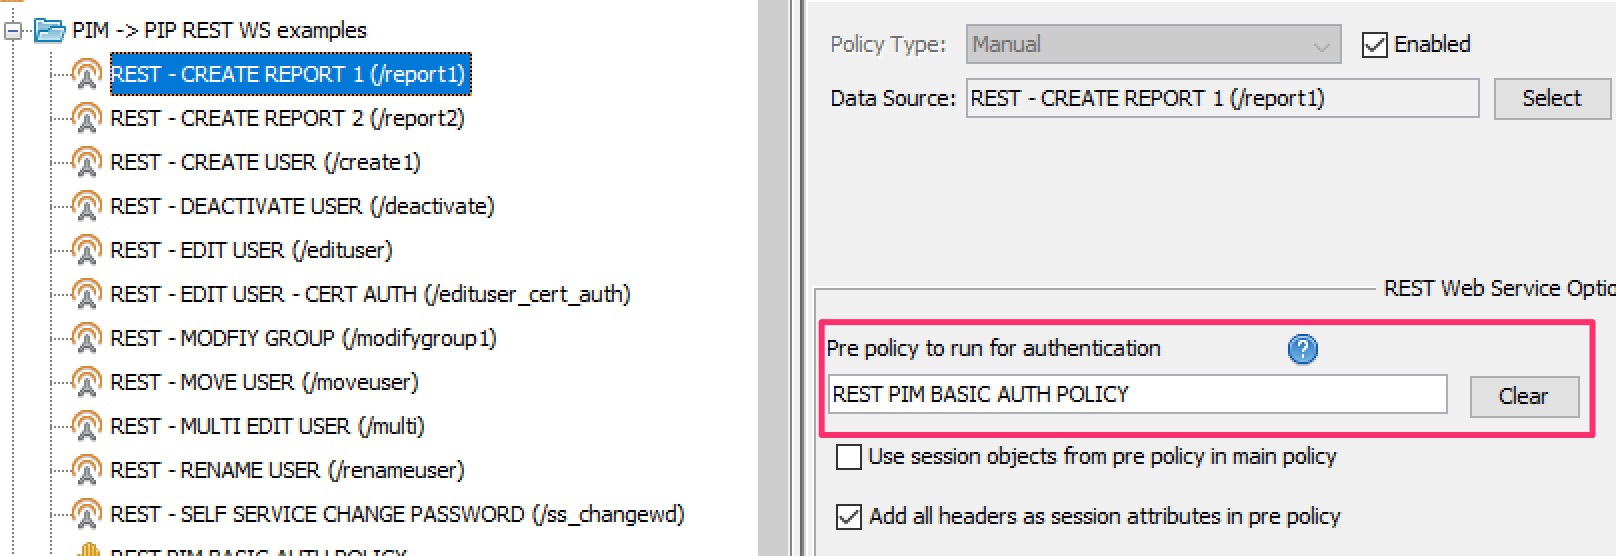
Pre Policy
A pre policy can be used to separate the authentication from the main policy. The pre policy can also be used in multiple web service policys, to use the same authentication for multiple endpoints.
The pre policy must add a session attribute named pipCode with a value 0-499 for a successful authentication or 500 or above for an unsuccessful authentication. If the pipCode is 500 or above, the main policy will not run. Instead, the web service will return a 500 (Internal Server Error) to the client, with the pipCode and optional value from session attribute named pipMessage. The pipCode and pipMessage attributes will only be read from the first session object, even though the request might contain multiple objects.
What response code will PIP return when using pre policy?
When data is received to the policy from the data source the data will be send to the pre policy. In the pre policy you need to set values for the PIPCode. For example, if no error occurs you set a value of 0-499, for example 22, and for an error something outside 0-499, for example 550.
- If the pre policy fails the policy will stop and the main policy will not run.
PIP will return two responses to the client:
HTTP response code = 500
PIPCode = The value for error you specified in the pre policy, in above example 550). - If no error occurs the main policy will run and the PIPCode value is from the start 22 since that was added in the pre policy.
If all actions are successfully or if any action fails the responses from PIP to the client will be:
HTTP response code = 200
PIPCode = Whatever the last value you have specified in the policy for PIPCode. In our example the value will be 22 if not changed.
Note1: The PIPCode is only a “soft” code that PIP does not care for but that can be used for the PIP client to act differently depending of value.
Note2: You must add a pipCode to the pre policy.
If you do not add a pipCode to the pre policy the pre policy will always be considered an error and the main policy will not run.
Manual parsing
If a REST policy has been configured no not use the automatic parsing (manual parsing was introduced with PIP 6.4.0 – for older versions, it’s always automatic parsing), the following can be configured on the policy for the REST web service:
- An optional pre-policy – same behavior as for automatic parsing
- An optional post-policy
- Given that neither the pre-policy nor the regular policy failed hard, the post-policy will be executed in order to construct a response message
- Whether the session objects from the pre-policy will be forwarded to the policy or not
- If the pre-policy modifies the session objects in order to perform the authentication and authorization, but these modifications are unwanted, it’s possible to ignore the changes
- What HTTP method(s) that the policy supports
- By default, all HTTP methods are allowed
Request flow
A request flows like this:
- It’s received
- According to the content-type of the HTTP header, the body is treated as binary or textual data
- One session object with multiple attributes containing meta data about the request, the HTTP headers and the payload is created
- Pre-policy, if configured
- The pre-policy is executed
- the pipCode is evaluated (see above) – the regular policy is executed if the pipCode is “OK” (see above)
- If the session objects from the pre-policy should be used by the regular policy, they are copied for further usage
- The regular policy
- Executed unless the pre-policy has set a failing pipCode
- If the datasource has been configured to return immediately, this is executed asynchronously, and is not waited for before continuing to the next step
- Post-policy, if configured
- Responsible for making sure that the first session object contains the necessary attributes for constructing a HTTP response
- A HTTP response is constructued from the attributes in the first session object, and is then returned to the client
Session attributes
HTTP Request
When a request is received, one session object will be created, with the following session attributes:
http.request.protocol– the protocol, ex. “HTTP/1.1”http.request.method– the method, ex. “POST” or “GET”http.request.localEndpoint.address,http.request.localEndpoint.port– the local address and port that the request was received onhttp.request.remoteEndpoint.address,http.request.remoteEndpoint.port– the remote address and port that the request was sent fromhttp.request.scheme– the scheme, ex. “http” or “https”http.request.path– the path of the servlet, ie. what’s configuredhttp.request.pathInfo– any additional path info, ex. if “/foo/bar” is the configured path, but “foo/bar/1/2” is being accessed, the path info is “/1/2”http.request.queryStringRaw– The raw querystring, unparsedhttp.request.queryString.[KEY_NAME]– The parsed querystring, key – value(s) – this can be a multivaluehttp.request.headers.[KEY_NAME]– The HTTP headers, key – value(s) – this can be a multivaluehttp.request.body– The HTTP body- If the received content-type contains information about the charset being used, PIP will attempt to parse the received data using the provided charset
HTTP Response
When PIP has finished the execution of the policy/policies (depending on whether pre- and/or post-policies have been configured), it will evaluate the first session object and it’s session attributes in order to create a HTTP response and return it to the calling client. It will look at the following session attributes:
http.response.statusCode– The HTTP status code to returnhttp.response.headers.[KEY_NAME]– The HTTP headers to return, key – valuehttp.response.body– The response body – might be either string or binaryhttp.response.isBinary– Whether the response body should be treated as a string or as binary data- If it’s string (text), it will be encoded according to the charset of the content-type header (if set)
If no content-type header is set, it will be set to “text/plain” for textual responses and “application/octet-stream” for binary responses. For textual responses, unless charset is set, it will be set to utf-8.
HTTP status codes, PIP codes and PIP messages
This is mainly targeted towards the automatic parsing in REST policies (which is implicit in versions before PIP 6.4.0 – the ability to configure manual parsing was introduced in PIP 6.4.0, with full control of how the request and response are being formatted)
Overview
When PIP has received a request from a client and/or when PIP has in a policy gone through all the policies, PIP will send a response back to the
client. The response is for the client to know if the request was successful or not.
With the PIP REST Web Service there are three types of information that can be send in the response:
- HTTP Response status codes
- PIP codes
- PIP messages
All three types of information is something the client can act on.
HTTP Response status codes
PIP uses some of the available HTTP Response status codes.
The code PIP uses and can send to client are:
- 200 Ok – When a policy is successfully executed this response code will be sent.
- 202 Accepted – If you on the data source has selected that a response should be sent before the request is passed on to the policy. The check box in the data source is Send response immediately before policy runs.
- 404 Not Found – If the client tries to connect with path that does not exist as a data source this response code will be sent.
- 500 Internal Server Error – Any error that happens, for example a policy does not work, then this response will be sent.
PIP codes and PIP messages
In the body of the HTTP Response code a PIP administrator can add a PIP code and a PIP message. For example, if the REST client has an UI the response sent back to client can include a message that will be shown for the end user in the UI.
Configuring PIP codes and PIP messages
When do I use PIP codes and PIP messages?
When a PIP policy is completed it is considered as a success or as an error.
If all action in a policy has finished as expected and the policy is done then the HTTP Response code will be 200, if something has occurred that was not successfully with the policy then HTTP Response code will be 500 will be sent. As an action you can in the policy add PIP codes, pipCode, that will be sent with the HTTP Response code.
With the PIP code you can also add a message, pipMessage, to be send along. The pip message can be used as a method to transfer custom message to a web service client, such as PhenixID Identity Manager. For example a REST client might consist of an end-user UI where you like to prompt the end-user with a message.
What PIP code number should I use?
You can use any number as a PIP code number as long as the PIP client knows what that number is so it can act on it. However, there are some recommendations to follow.
Selecting a number if Success
Success means that the policy is finished and all action has run successfully.
A policy that completes with a pip code between 0 and 499 will be considered a successful policy. So for PIP code you can use and number between 0 to 499.
Selecting a number if Error
A policy that completes with pip code 500 and above will be considered a failing policy. So for PIP code you can use and number above 500.
Default pipCode
In PIP, the value for pipCode will be set to 0 if the attribute is missing.
NOTE: The default behaviour does not apply to the pre-policy which MUST be configured with a successful pipCode if the policy is successful.
Integration guidelines for REST clients
This is mainly targeted towards the automatic parsing in REST policies (which is implicit in versions before PIP 6.4.0 – the ability to configure manual parsing was introduced in PIP 6.4.0, with full control of how the request and response are being formatted)
Overview
This section describes integration guidelines when REST clients like to send a request or receive a response to or from the PIP REST Web Service.
Syntax overview
The format PIP expects when receiving requests from a client is JSON.
The format PIP uses when sending responses ti client is JSON.
Content-Type: application/json
The syntax of the PIP JSON structure is:
- OBJECTS. A request or a response must include at least one object. Objects is an array so it can contain several objects, for example users.
- OBJECT NAME. Every object has a name, for example:
“name”: “cn=user1,dc=company,dc=local”
- OBJECT NAME. Every object has a name, for example:
- ATTRIBUTES. Every object includes an array called attributes. Attributes are for example on a user object givenName, sn, mobile.
- ATTRIBUTE NAME. Every attribute has a name, for example:
“name”: “mobileNumber” - ATTRIBUTE VALUES. Every attribute can contain one or more values. For example:
“values”: [ “+46123123123″,”+4645454545″,”+466767676” ]
- ATTRIBUTE NAME. Every attribute has a name, for example:
Example of an Request
Below is an example of how the syntax that PIP REST Web Service is expected to receive could look like.
POST /rest/my_configured_path HTTP/1.1
Host: my_pip_server:port
Authorization: Basic dGVzdDpwYXNzd29yZGQ=
Content-Type: application/json

{
    "objects": [
        {
            "name": "cn=user1,dc=company,dc=local",
            "attributes": [
                {
                    "name": "mobileNumber",
                    "values": [
                        "+46123123123"
                    ]
                },
                {
                    "name": "eMailAddressess",
                    "values": [
                        "user1@company.local",
                        "user1@company.com"
                    ]
                }
            ]
        }
    ]
}
Example of an Response
Below is an example of a response from PIP REST Web Service to a REST client could look like. PIP will send all object in the policy to the REST client.
The syntax of a response looks like the request. It can also include:
- pipCode. The pipCode is decide and configured in PIP by you and must be able for the client to handle.
- pipMessage
{
    "pipCode": 0,
    "pipMessage": "Custom Message",
    "objects": [
        {
            "name": "cn=user1,dc=company,dc=local",
            "attributes": [
                {
                    "name": "mobileNumber",
                    "values": [
                        "+46123123123"
                    ]
                },
                {
                    "name": "eMailAddressess",
                    "values": [
                        "user1@company.local",
                        "user1@company.com"
                    ]
                },
                {
                    "name": "pipMessage",
                    "values": [
                        "Custom Message"
                    ]
                },
                {
                    "name": "pipCode",
                    "values": [
                        "0"
                    ]
                }
            ]
        }
    ]
}
Protecting the REST Web Service
Overview
To make sure that data sent to PIP REST Web Service is encrypted and from the correct and a trusted client there are some things to consider depending on your environment. There are some things you can do in PIP and some things by using external services.
Protecting PIP using product features
The web service will be deployed on the configured port on ALL server interfaces. This can be configured. Tools – Options and Addresses.
1. Specifying addresses to listen
The PIP REST Web Service should only be reachable by the actual REST Web Service client, for example PhenixID Identity Manager. This can be configured by specifying what ip-address to bind/listen on.
- Open Identity Provisioning Configurator
- Click Tools – Options
- Add one or more addresses in the Addresses input box. Separate using comma.
2. Using Basic Authentication
The pre policy can be used to validate username and password.
3. Validating headers or body
The pre policy can be used to validate the incoming headers or body
4. Transport Layer Security (TLS) (5.2.1)
With TLS added to PIP, the http traffic between the REST client and PIP will be encrypted.
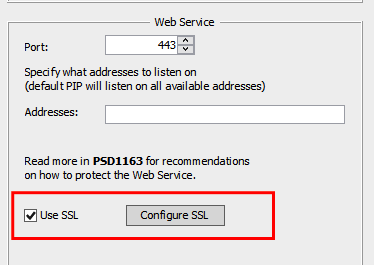
PIP supports keystores in jks, p12 and pfx format.
A self signed certificate can be generated in PIP configurator, if no other certificate is availible.
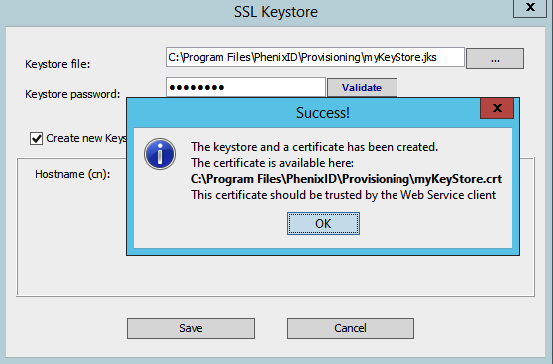
Click the Validate button to display certificate information and to verify the provided password.
Protecting PIP using external services
If the REST client and PIP REST server is not installed on the same server and/or they have some un-secure networks between them you might consider using a reverse proxy, TLS and mutual authentication.
1. Reverse Proxy
- The reverse proxy should be configured to use HTTPS.
- The reverse proxy can be configured for Basic Authentication.
2. Transport Layer Security (TLS)
With TLS added to the Reverse Proxy the http traffic between the REST client and the reverse proxy will be encrypted.
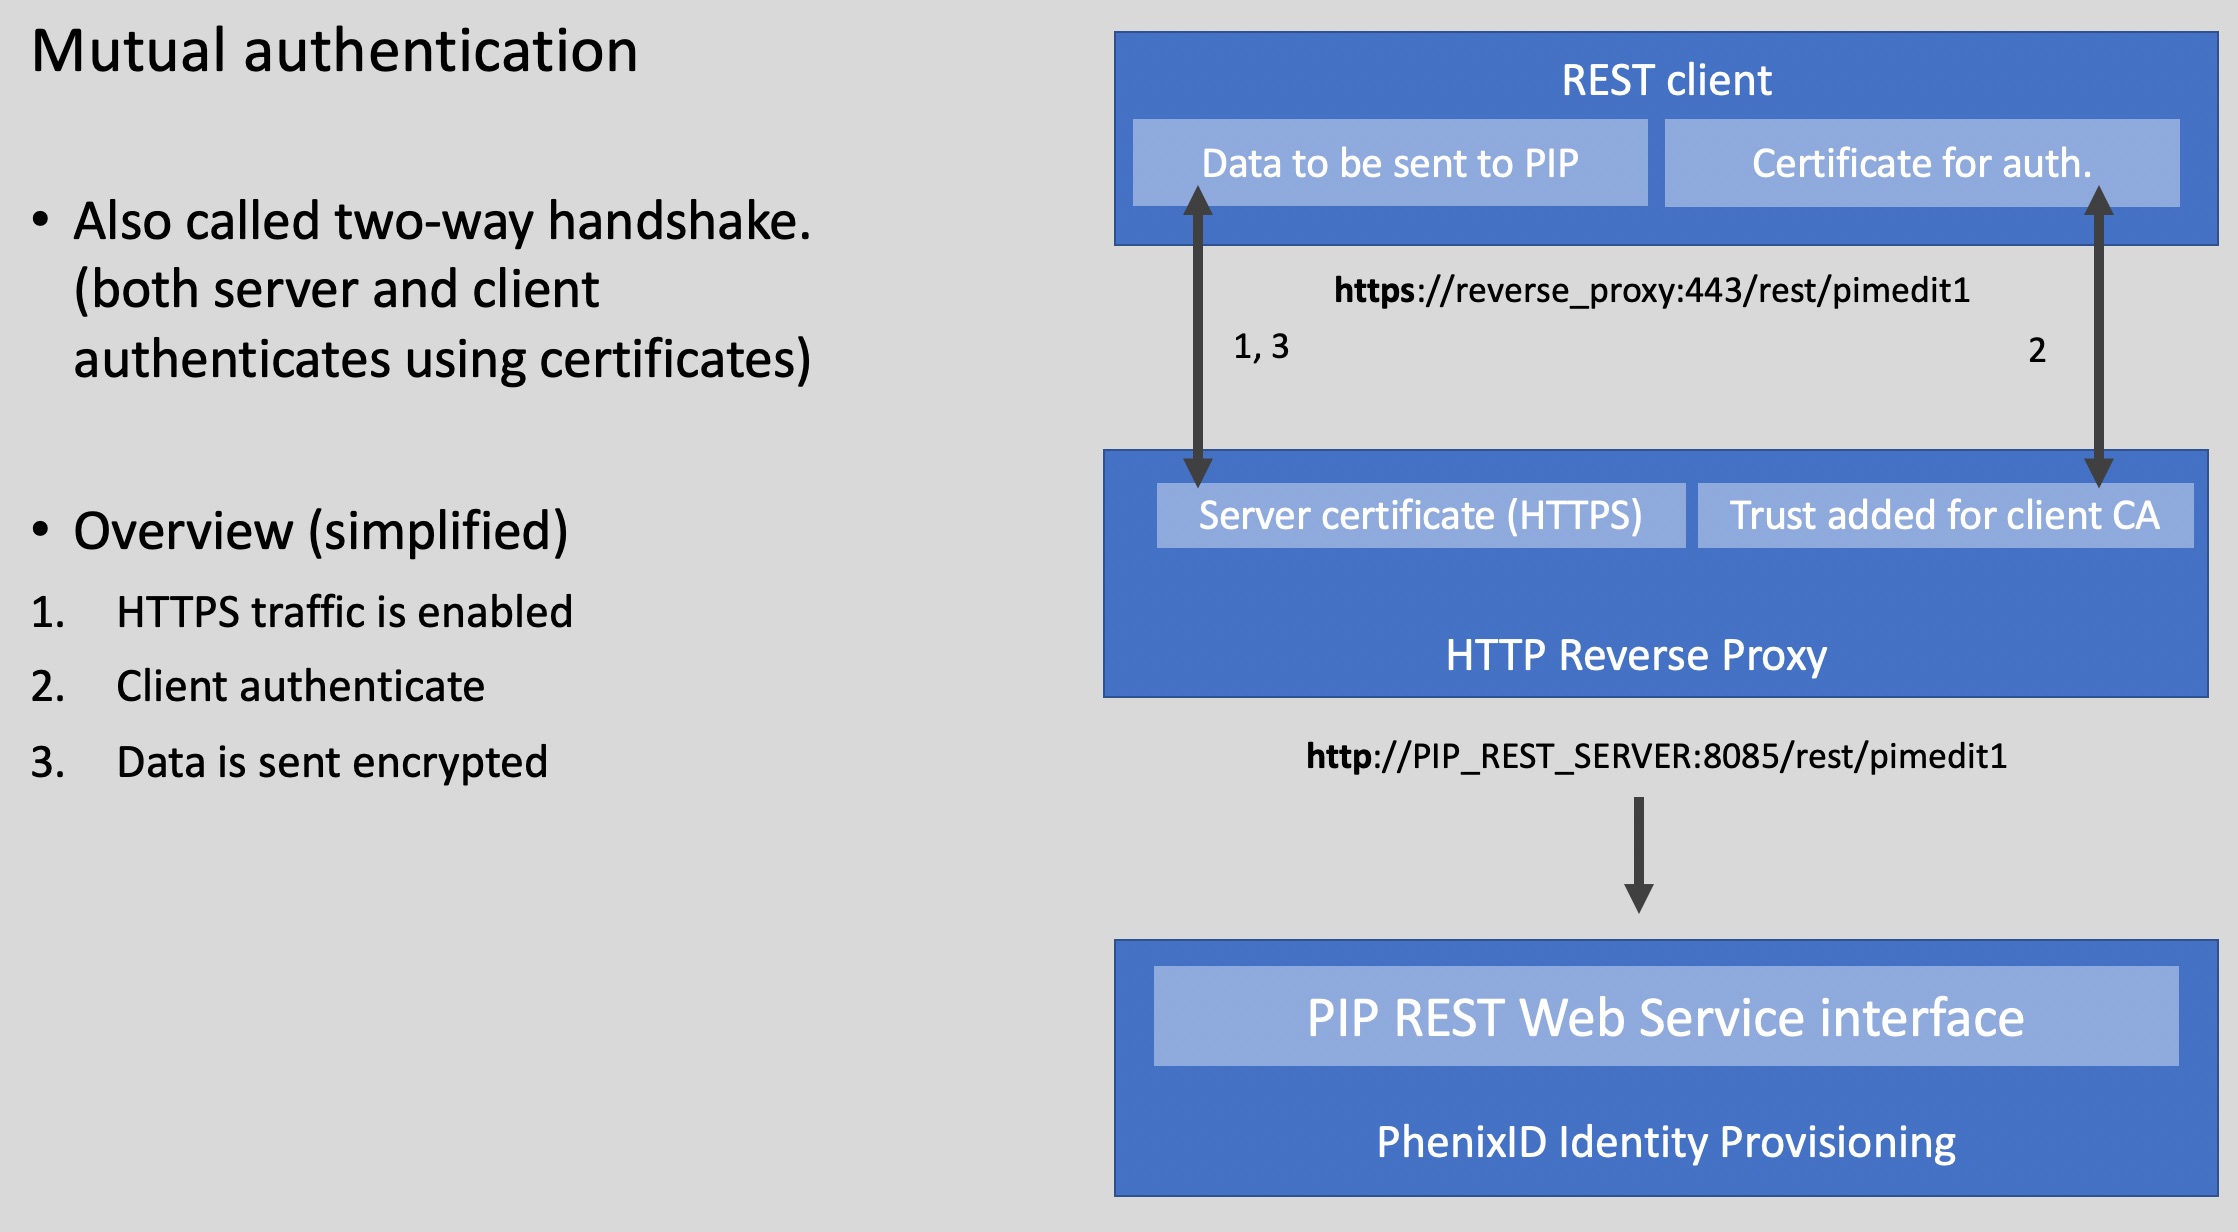
3. Mutual authentication
Using mutual authentication forces both REST client and Reverse Proxy to authenticate. This gives both an encrypted channel and good understanding that the client is who it really claims to be.
See picture below for mutual authentication with TLS.
DISCLAIMER
Information provided in this document is for your information only. PhenixID makes no explicit or implied claims to the validity of this information. Any trademarks referenced in this document are the property of their respective owners.The origin of this information may be internal or external to PhenixID. PhenixID makes all reasonable efforts to verify this information.
PhenixID - support.phenixid.se