Summary
This document will guide you through the steps to enable multi-factor authentication and Single-Sign On for Apache Guacamole (HTML5-based Remote Desktop and SSH) using PhenixID Authentication Services.
Overview
User experience
This video showcases the user experience. Please note that the MyApps portal can be protected with any sign-in method support by PhenixID Authentication Services.
Architecture
Components

The solution involves several components:
- Nginx (external open source software)
Provides http proxy functionality.- PhenixID Nginx plugin
Scripts and config needed to provide acccess control and sso
- PhenixID Nginx plugin
- PhenixID Authentication Services
Provider the app portal (Myapps) and the sign-in method(s). Controls the end user authenticated session.
- Apache Guacamole (external open source software, available as Docker container)
Provides the functionality of displaying RDP/SSH session(s) in the web browser.
- PhenixID Guaca plugin (available as Docker container)
Provides a callback to verify access control and to fetch RDP / SSH data from PhenixID Authentication Services
- PhenixID Guaca plugin (available as Docker container)
- Windows server
Target RDP server. Can also be a windows client. - Linux server
Target SSH server.
Sequence flow

- End user points browser to PhenixID Authentication Services (PAS) MyApps application (myapps).
The http requests from the browser to PAS passes through Nginx HTTP reverse proxy. - PhenixID Authentication Services request user authentication.
- The user authenticates (please note that depending on the sign-in method, this might include multiple requests from the browser to PhenixID Authentication Services. This can also be a federated (external) sign-in).
The http requests from the browser to PAS passes through Nginx HTTP reverse proxy. - The PAS Myapps portal generates link(s) to the Windows/Linux machines. These links are dynamic for security reasons.
- The user clicks on the Windows machine link.
- Nginx PhenixID plugin performs backend callback to verify user access to requested resource (=is the session authenticated?)
- If authenticated, PAS will redirect the browser to 8.
- Browser is redirected to Apache Guacamole.
The http requests from the browser to Apache Guacamole passes through Nginx HTTP reverse proxy. - Apache Guacamole PhenixID plugin performs a backend callback to PAS for two reasons:
1. Verify user access
2. Fetch Windows machine info (ip, port, username [OPTIONAL], password [OPTIONAL], device mappings [OPTONAL] etc) to be able to connect to the Windows machine - Apache Guacamole calls out to the Windows machine.
- RDP interface to the WIndows machine is displayed to the end user through the web browser.
The same sequence flow is used for Linux (ssh) machine access.
System Requirements
- Linux server with 2 CPUs and =>8GB RAM
- Internet access from the server (at least during the installation / setup)
- PhenixID Authentication Services installation media (4.0.2 or higher)
Instruction
Overview
This document will guide you through the steps to enable multi-factor authentication and Single-Sign on for Apache Guacamole RDP/SSH using PhenixID Authentication Services.
The installation instruction below is based on a Linux Ubuntu OS where PAS, Nginx, Docker (Guacamole, PhenixID Guaca plugin) are all installed on the same machine.
Please adjust your configuration if you run another Linux distribution and/or run the components on different machines.
PhenixID Authentication Services
Installation
- Install PhenixID Authentication Services in /opt/phenixid/server/ using these commands:
sudo apt update
sudo apt install fonts-dejavu fontconfig
chmod +x phxid_server_linux_x64_4_0_2.sh
sudo ./phxid_server_linux_x64_4_0_2.sh - Open the file /opt/phenixid/server//bin/start-PhenixID.sh
- Change the com.phenixidentity.operatingPlattform parameter to appliance:
JAVA_OPTS=”${JAVA_OPTS} -Dcom.phenixidentity.operatingPlattform=appliance” - Save the file
- Start the server
- (On PAS 4.0.2, you must patch the system after starting by following this procedure:
- Stop the server
- Download https://files.phenixid.se/s/iWkMtjTYFdqSfYW/download and unzip it in the /opt/phenixid/server/mods/*pipes*/ folder
- Verify that the file /opt/phenixid/server/mods/*pipes*/com/phenixidentity/pipes/valves/jwt/VerifyJWTTokenValve.class was replaced
- Start the server
Configuration
Setup the sign-in method(s)
Authentication to MyApps is based on federation (SAML).
- Login to Configuration Manager.
- Setup PhenixID Authentication Services as a SAML IdP using one of the Federation scenarios described here. (If the desired authentication method is not provided by a scenario, use the documentation for the SAML authenticator here)
(If the sign-in methods are hosted on an external SAML Identity Provider, import the SAML Identity Provider metadata to establish trust).
Setup MyApps
- Login to Configuration Manager.
- Use Scenarios->Applications->Myapps to configure MyApps.
- Select which IdP MyApps should use for authentication.
- (If the sign-in methods are hosted on an external SAML Identity Provider, export the SAML Service Provider metadata for Myapps and send to SAML Identity Provider admin to establish trust).
- Go to Myapps->Application list
- Click Add valve
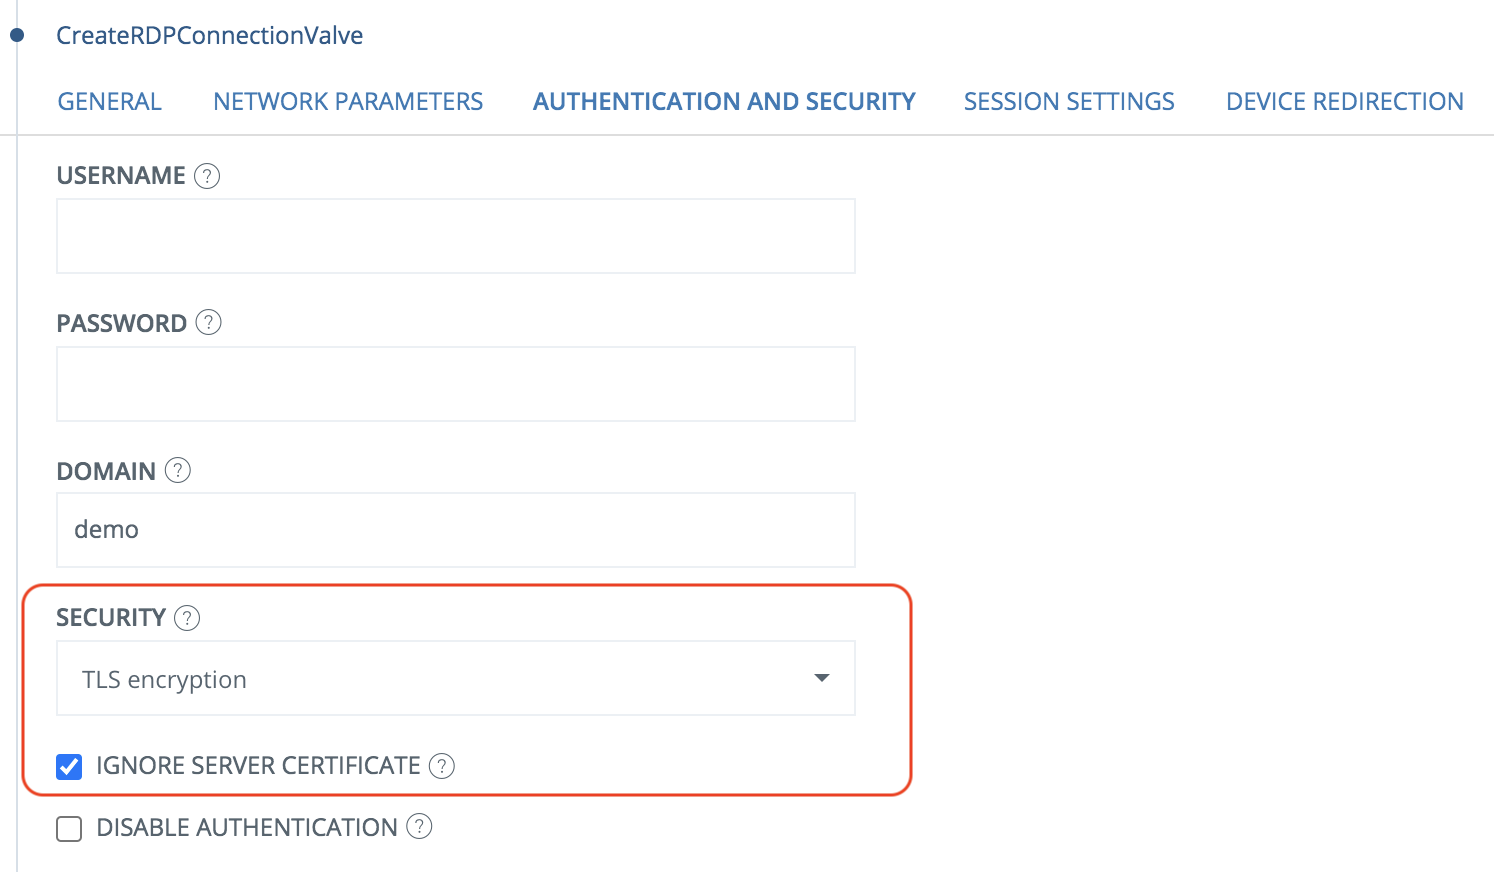
- Add CreateRDPConnectionValve or CreateSSHConnectionValve.
- Add necessary parameters to the config.
(For RDP, the default windows server/client setting requires TLS security. Make sure to configure the CreateRDPConnectionValve accordingly:
Full Single Sign-On
To achieve full single sign-on to RDP / SSH, the username and password must be propagated to Guacamole and further on to the remote machine(s) (this is the only option to achieve full SSO).
Things to consider:
Based on the environment and use cases, there are different options to achieve full SSO:
- Scenario 1: If the end user does not need to know the password (for example, external federated users):
- After successful authentication, PAS will randomize a password value.
- PAS sets the password on the user object in the user directory (normally MS Active Directory).
- PAS stores the userid and password on the user session (server-side, in RAM only)
- See below
- Scenario 2: If the end user knows the password already and needs to use it for other sign-in’s:
- The sign-in procedure must include entering the password
- PAS fetches the entered password
- PAS stores the userid and password on the user session (server-side, in RAM only)
- See below
4. When the user clicks on a RDP/SSH link and gets to the Apache Guacamole server, the PhenixID plugin will pull the info (such as username and password) from PAS and propagate it to the backend RDP/SSH server. (NB! No user credentials are passed through the browser, backend only)
NB! Handle with care!
Make sure the session properties are not written to logs etc (that will expose the user password). For scenario 2, re-using an entered password is NOT recommended by PhenixID, although feasible.
For scenario 2, PhenixID recommends passing the userID only to avoid forcing the user to re-enter the userID. However, the password needs to be re-entered.
This configuration instruction will fetch the userID and pass it on to the RDP/SSH server.
- Login to Configuration Manager.
- Go to Scenarios->Applications->Myapps
- Click Applications
- Expand Myapps applications list pipe
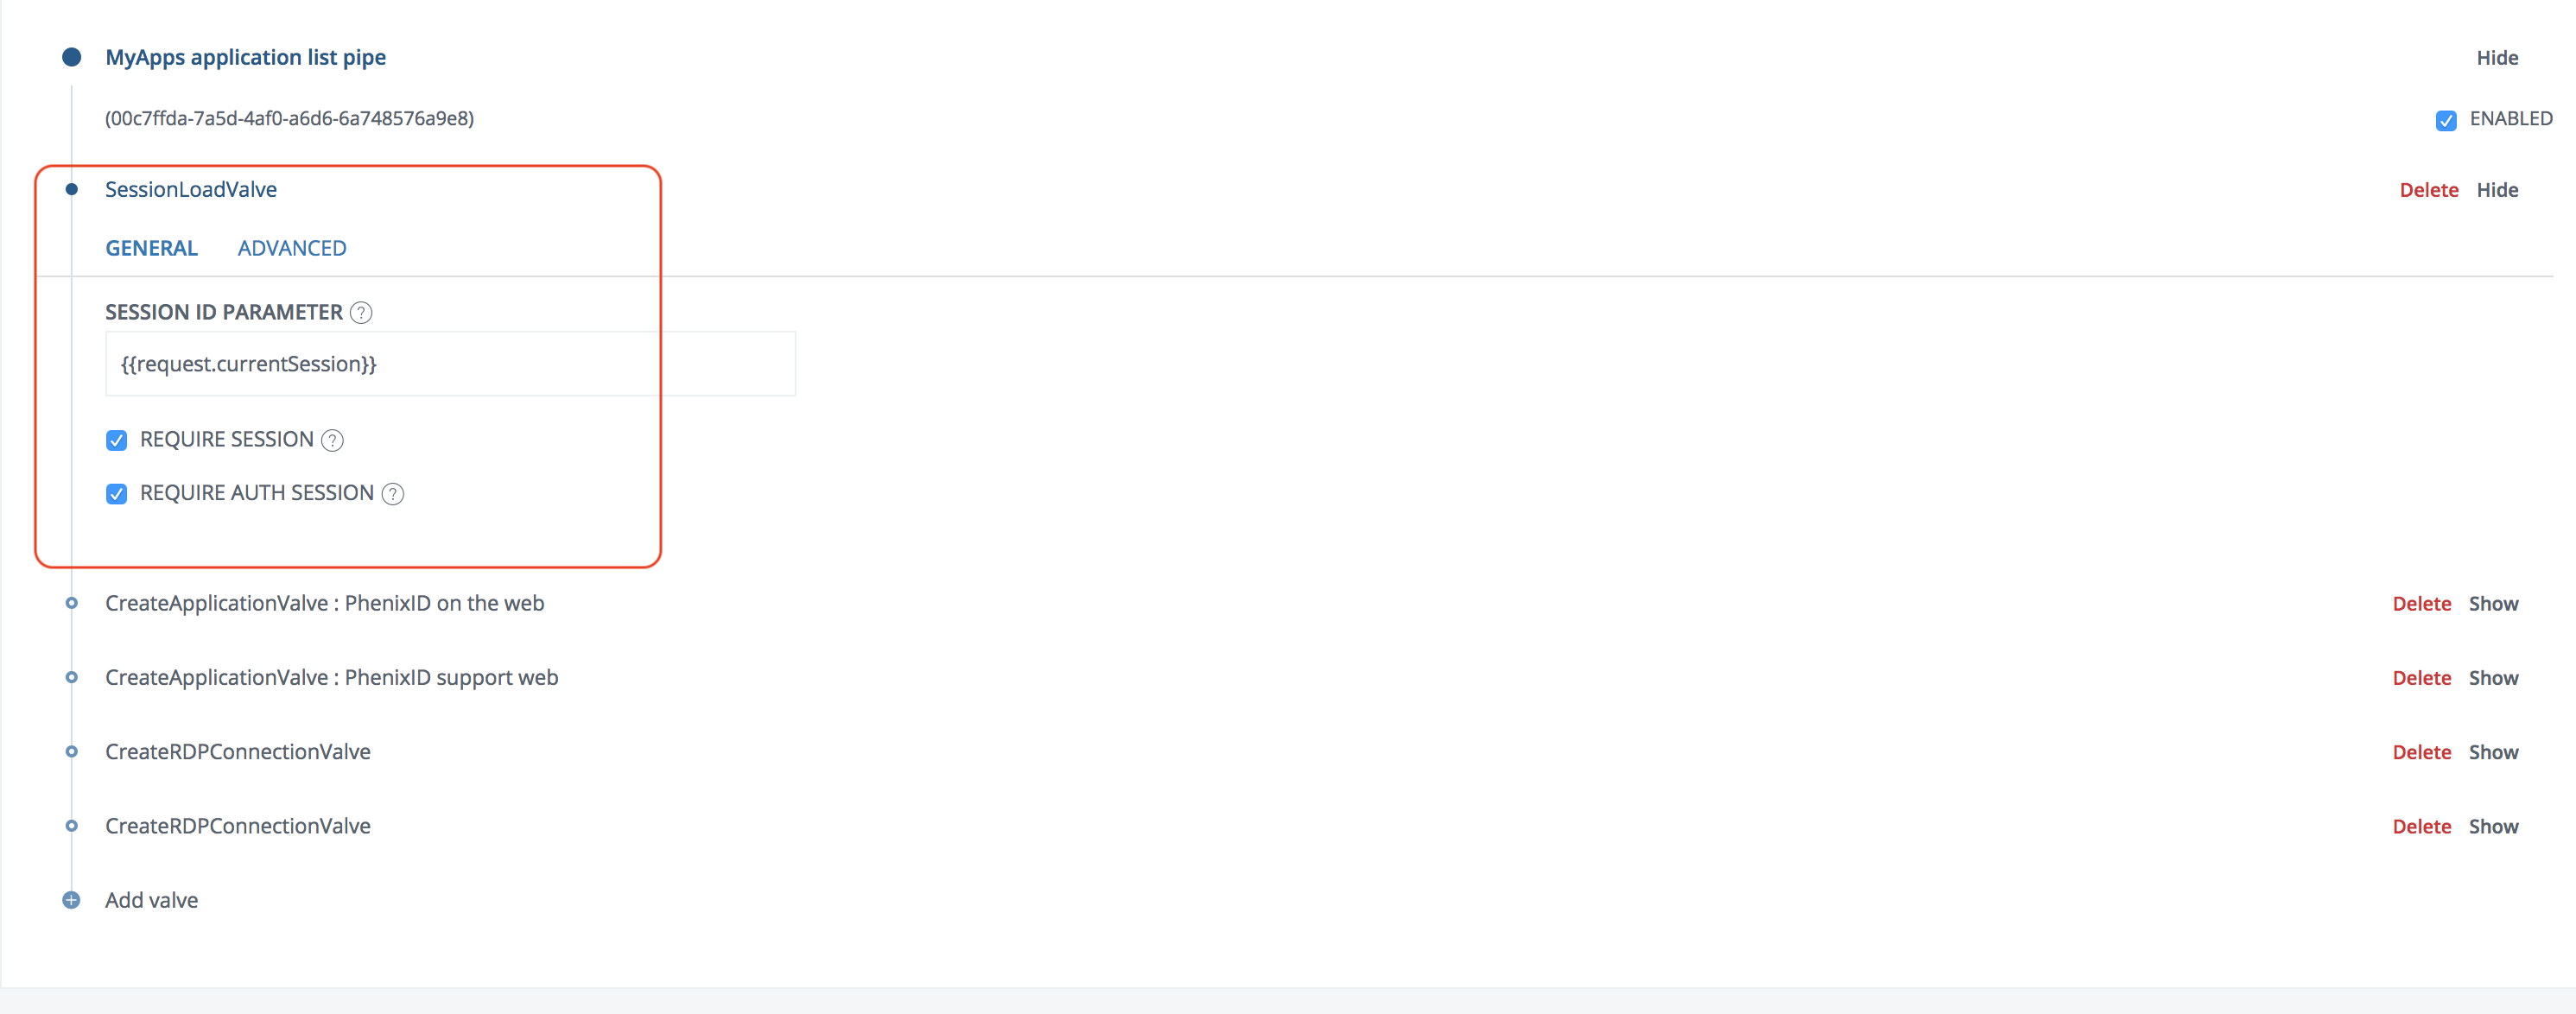
- Click Add valve
- Write “SessionLoadValve”
- Add params and move the valve to the top of the pipe according to the image:
- Expand the CreateRDP* or CreateSSH* valve
- Below Authentication and Security, enter this in the username field:
{{session.user_id}}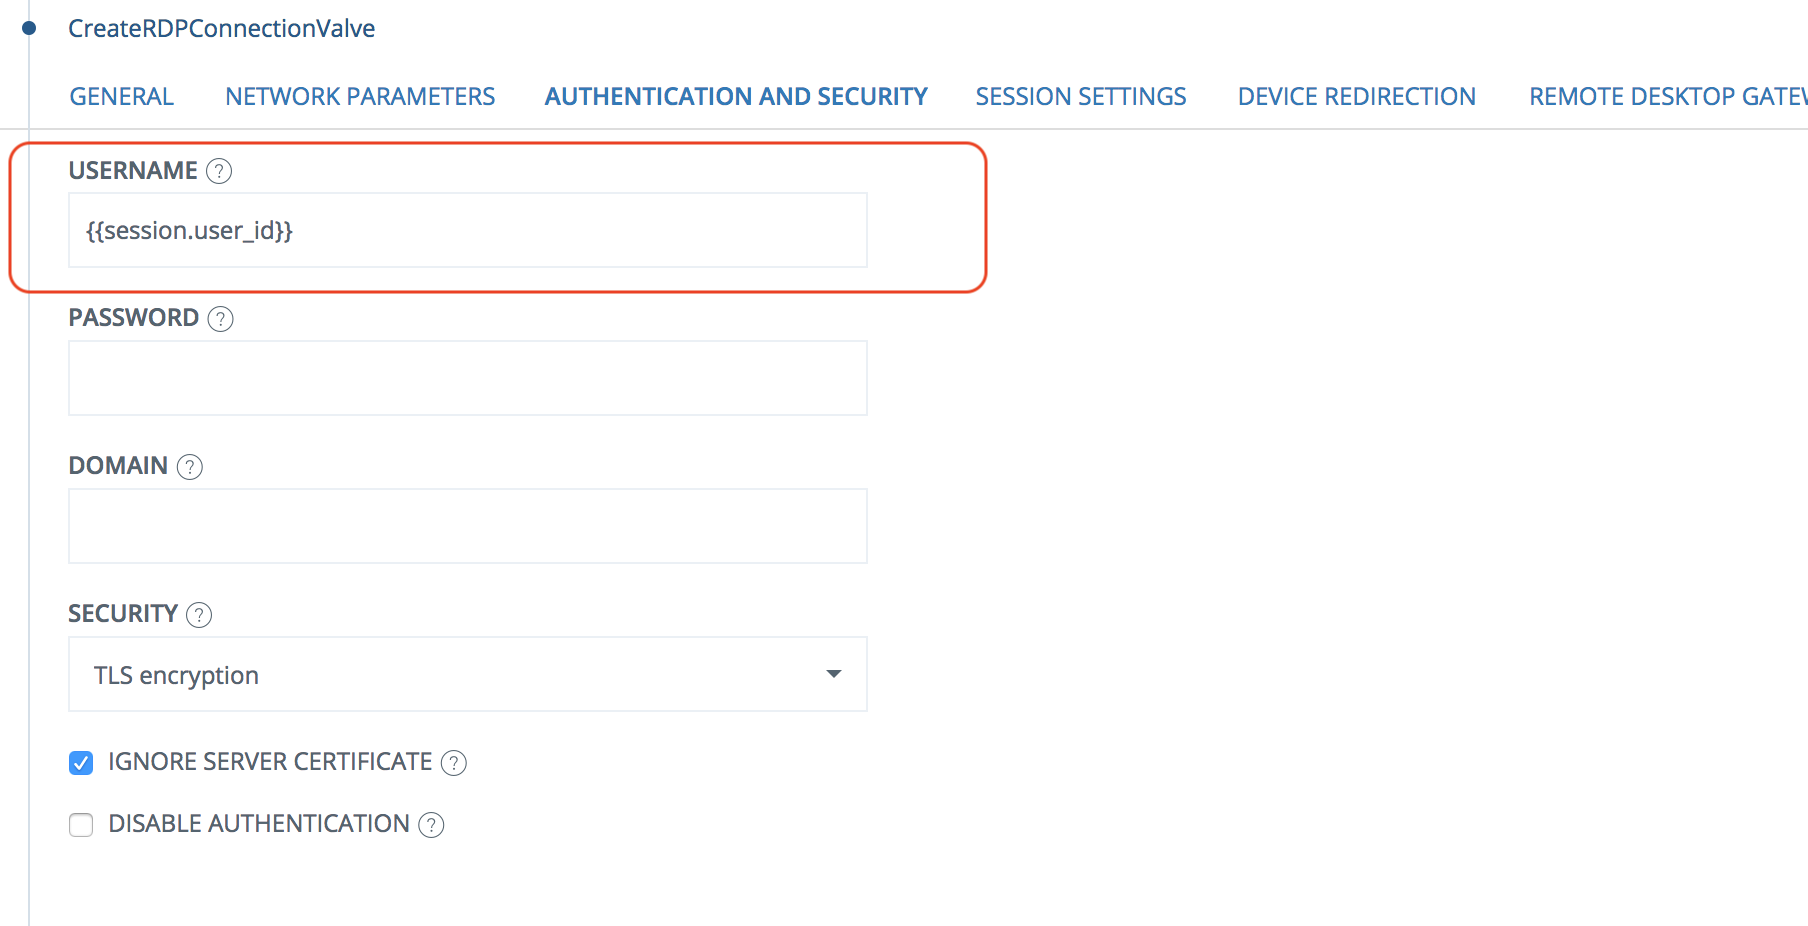
- Save
- Click Advanced
- Click the pen to the right of Pipe Valves
- Add this configuration:
{
“name”: “ItemCreateValve”,
“alias”: “item_session_holder”,
“enabled”: “true”,
“config”: {
“dest_id”: “session_holder”
},
“id”: “item_session_holder”
},
{
“name”: “ItemRemoveValve”,
“alias”: “item_session_holder_remove”,
“enabled”: “true”,
“config”: {
“item_include_expr”: “item.getId().equals(‘session_holder’)”
},
“id”: “item_session_holder_remove”
},
{
“name”: “PropertyAddValve”,
“alias”: “property_session_holder”,
“enabled”: “true”,
“config”: {
“name”: “currentSession”,
“value”: “{{request.session_id}}”
},
“id”: “property_session_holder”,
} - Click Stage Commit and Commit changes
- Click the pen to the right of Pipes
- Locate the pipe with alias = myappsLookUpPipe
- In the valve_refs section, add item_session_holder as 2nd in the list, property_session_holder as 3rd in the list and item_session_holder_remove as 5th in the list.
Example:
{
.
“name”: “MyApps application lookup pipe”,
“alias”: “myappsLookUpPipe”,
“enabled”: “true”,
.
“config”: {
“valve_refs”: “68068931-2d35-4de1-90d7-6aa29eea61f0,item_session_holder,property_session_holder,ca4d8e10-7fcb-4d11-98db-4c6c2740e5eb,item_session_holder_remove,2ef87fe9-5cdc-4c0f-8007-a97727c0123f,804486e7-3e58-4020-b735-df4d563163a2,f888e8cc-23d4-425d-bd6f-4883b7dae421,c9b8c11e-45b5-4f1b-865e-1d3a4dd50f3e,053b4fd7-ab2a-4a90-8d0b-4c997f30e272,9311d4d9-23f7-48af-b0e6-d6e7e9e16d98”
},
.
} - Click Stage Commit and Commit changes
Nginx with PhenixID plugin
Installation
- Connect to the server via SSH
- Execute these commands to install Nginx
sudo apt install curl gnupg2 ca-certificates lsb-release
echo “deb http://nginx.org/packages/ubuntu `lsb_release -cs` nginx” | sudo tee /etc/apt/sources.list.d/nginx.list
curl -fsSL https://nginx.org/keys/nginx_signing.key | sudo apt-key add –
sudo apt-key fingerprint ABF5BD827BD9BF62
sudo apt update
sudo apt install nginx
sudo apt-get install nginx-module-njs
Configuration
SSL
- Setup SSL for https using these commands:
- sudo mkdir /etc/nginx/ssl
- openssl req -x509 -nodes -days 730 -newkey rsa:2048 -keyout /etc/nginx/ssl/helios.key -out /etc/nginx/ssl/helios.crt -subj “/CN=myapps.phenixid.se”
Change myapps.phenixid.se to your domain. - cd /etc/nginx/conf.d
- Download helios.conf file from https://files.phenixid.se/s/cLBWMJxnKoDT82Q/download
wget https://files.phenixid.se/s/cLBWMJxnKoDT82Q/download - mv download helios.conf
Proxy configuration
- cd /etc/nginx/
- sudo mkdir locations.d
- cd locations.d
- Download tar from https://files.phenixid.se/s/cGWDzcRK5PArQfj/download
wget https://files.phenixid.se/s/cGWDzcRK5PArQfj/download - mv download locations.conf.tar
- tar -xvf locations.conf.tar
- (If Nginx is running on another machine than PAS, modify the IP-adress value in pas.conf and sso.conf)
Modules and PhenixID plugin
- cd /etc/nginx/
- vi /nginx.conf
- Add this line to the top of the file:
include /etc/nginx/modules.d/*.conf; - Save the file
- mkdir modules.d
- cd modules.d
- Create file ngx_http_js_module.conf
vi ngx_http_js_module.conf - Add this line to the file:
load_module modules/ngx_http_js_module.so; - Save the file
- sudo mkdir /etc/nginx/scripts
- cd /etc/nginx/scripts
- Download file from https://files.phenixid.se/s/GFy5dsfZ8jg83Gd/download.
wget https://files.phenixid.se/s/GFy5dsfZ8jg83Gd/download - mv download sso.js
- Restart nginx service.
sudo service nginx restart
Apache guacamole with PhenixID plugin
Installation and configuration
Apacha Guacamole and the PhenixID plugin are installed as Docker containers.
- Connect to the server via SSH
- Install Docker with these commands
sudo apt install docker.io
sudo apt install docker-compose - cd ~
- mkdir docker
- cd docker
- Download docker-compose.yml from https://files.phenixid.se/s/jJMF5y43cw2BgoZ/download
wget https://files.phenixid.se/s/jJMF5y43cw2BgoZ/download - mv download docker-compose.yml
- If PAS is running on another machine, edit the PAS_URL value in the docker-compose.yml file. Change the IP.
- Start the docker containers.
docker-compose up -d - Stop the docker containers.
docker-compose down - cd /opt/phenixid/etc/services
- Download tar-file from https://files.phenixid.se/s/ta5QCJdqC5NJ8zP/download
wget https://files.phenixid.se/s/ta5QCJdqC5NJ8zP/download - mv download guaca_phx_conf.tar
- tar -xvf guaca_phx_conf.tar
- If PAS is running on another machine, change the IP-adress in the file /opt/phenixid/etc/services/rdc/guacamole.
- Start the docker containers.
docker-compose up -d - Verify that the containers are running via the command:
docker psThe output presented should look like this:
CONTAINER ID IMAGE COMMAND CREATED STATUS PORTS NAMES
cb3031cb44f7 phenixid/remote-client:0.4 “/opt/guacamole/bin/…” 2 days ago Up 2 days docker_remoteclient_1
7437661e5efd guacamole/guacd “/usr/local/guacamol…” 2 days ago Up 2 days (healthy) docker_guacd_1
Test
- Browse to your PAS MyApps application
- Authenticate
- Click on the link to the RDP or SSH instance
- The RDP / SSH session should be presented in the browser.
Apache Guacamole – known issues
- Windows 2016 server or Windows 10 client:
https://mangolassi.it/topic/17846/make-windows-10-server-2016-rdp-work-with-guacamole
Troubleshooting
Re-testing
Make sure to logout from Guacamole, logout from PAS and restart the browser before testing again.
Configuration changes
Changing Nginx or Guacamole configuration requires restart of service.
No response when addressing Myapps
- Check the nginx configuration and logs (/var/logs/nginx/)
- Check the PAS configuration (ports) and log (/opt/phenixid/server/logs/server.log)
Unable to login to MyApps
- Check the federation setup between MyApps and the SAML Identity Provider.
- Check the PAS log (/opt/phenixid/server/logs/server.log)
Unable to connect to RDP/SSH server
- Check the system.out output by issuing this command:
docker attach docker_guacd_1 - Try to connect again
DISCLAIMER
Information provided in this document is for your information only. PhenixID makes no explicit or implied claims to the validity of this information. Any trademarks referenced in this document are the property of their respective owners.The origin of this information may be internal or external to PhenixID. PhenixID makes all reasonable efforts to verify this information.
PhenixID - support.phenixid.se