Summary
This document will describe how to use PhenixID Authentication Services as the OAuth authorization server for consumption of the Cambio Open Services APIs.
This document will also guide you through the steps to configure PhenixID Authentication Services for this use case.
Background
Cambio Open Services offers a number of APIs. These APIs are protected by OAuth. An api consumer must append a OAuth JWT access_token to the API to be granted access. The OAuth JWT access_token must be issued by a trusted OAuth Authorization server, such as PhenixID Authentication Services.
In this scenario, the OAuth Authorization code flow and the OAuth Client Credentials flow may be used. Both flows are described below.
For detailed info about the COS APIs specifications, please contact Cambio.
To learn about OAuth, please attend the PhenixID master class (https://www.phenixid.se/product-training/oauth-oidc/) or visit online resources, such as https://darutk.medium.com/the-simplest-guide-to-oauth-2-0-8c71bd9a15bb.
Overview and flow
Based on the requirements of the calling application (the client), one of these two OAuth flows must be used:
- Authorization code flow. This flows includes the end user and the application (client).
- Client credentials flow. This flows includes the the application (client) only.
Authorization code flow
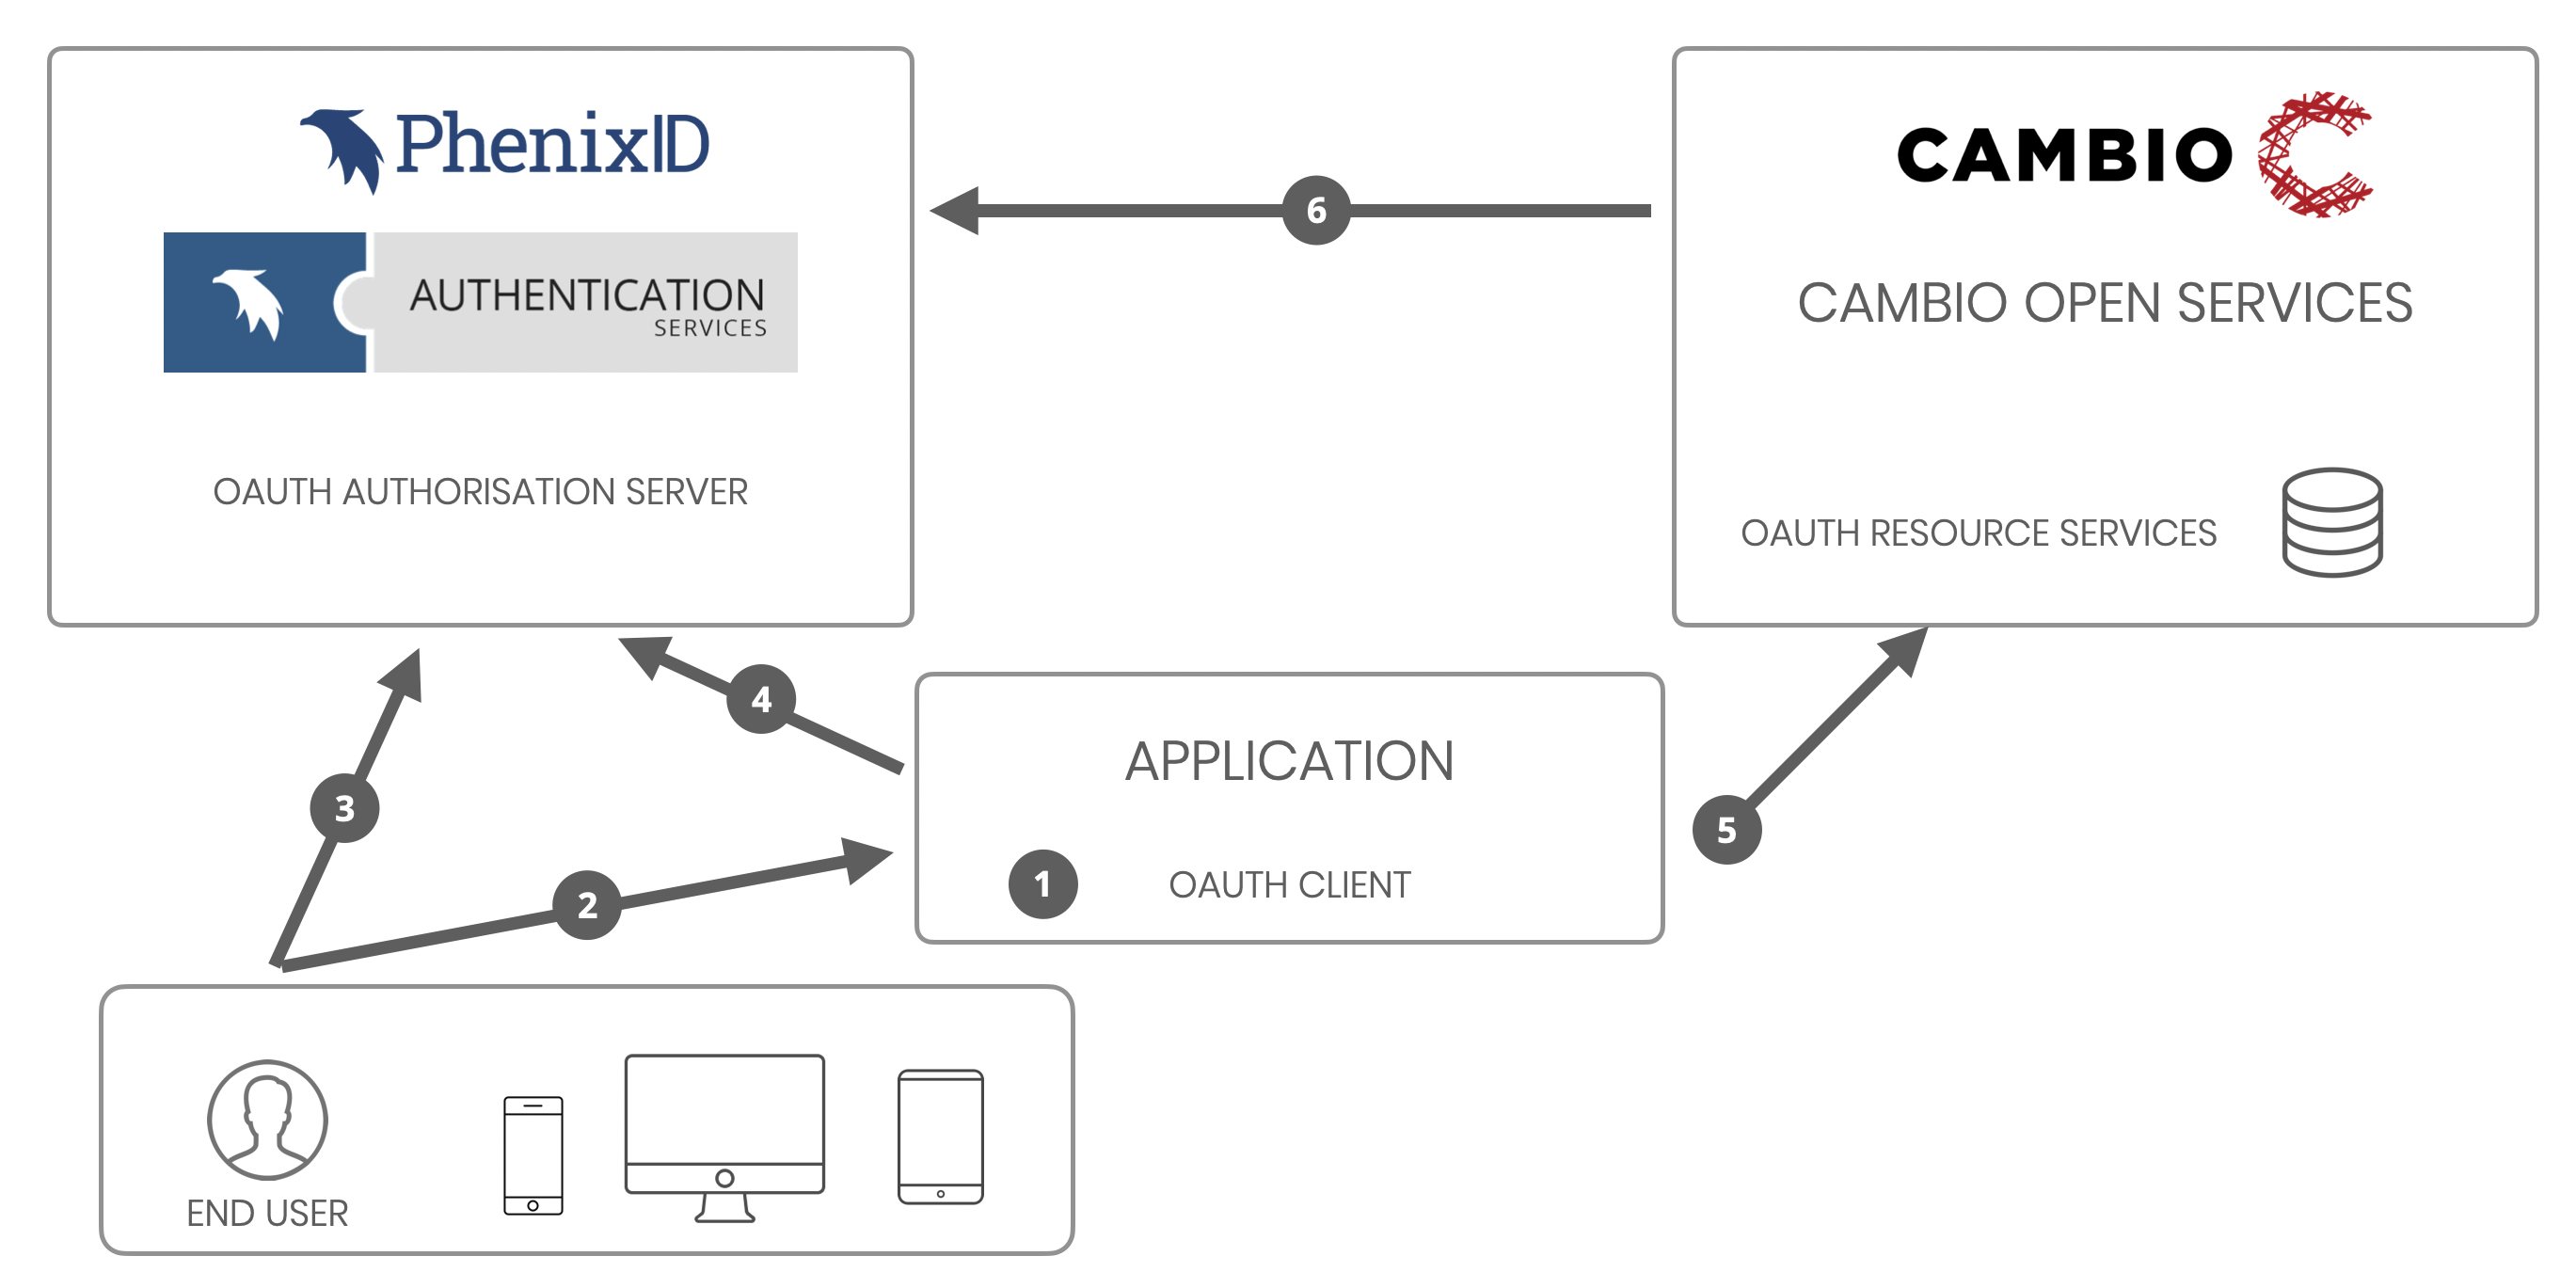
- The user, logged in to the application, triggers an action that should call the COS API.
- The application (client) redirects the user browser to the authorization server (PhenixID Authentication Services)
- PhenixID Authentication Services authenticates the user (can be single sign-on if the user previously authenticated), produce a code and redirects the browser back to application (with code appended)
- The application fetch the code and send the code to the PhenixID Authentication Services token endpoint. PhenixID Authentication Services will produce a JWT access token and respond with the JWT access token to the application.
- The application will append the JWT token to the API request.
- COS will verify the JWT signature by fetching the Discovery data (including signing cert) from PhenixID Authentication Services. COS will also validate access claims in the JWT token to make sure the request is allowed.
If OK, the API will be executed and a response will be returned back to the application.
Client credentials flow
- Something triggers an action in the application, that should call the COS API.
- The application (client) sends client_id and client_secret to the PhenixID Authentication Services token endpoint, requesting an access token. PhenixID Authentication Services will produce a JWT access token and respond with the JWT access token to the application.
- The application will append the JWT token to the API request.
- COS will verify the JWT signature by fetching the Discovery data (including signing cert) from PhenixID Authentication Services. COS will also validate access claims in the JWT token to make sure the request is allowed.
If OK, the API will be executed and a response will be returned back to the application.
System requirements
- PhenixID Authentication Services 4.0 or higher
- Network access:
- Application -> PhenixID Authentication Services, port 443
- COS -> PhenixID Authentication Services, port 443
- Certificate trust
- If PhenixID Authentication Services endpoints (https) are protected with certificate issued from a non-globally-trusted CA, the CA must be added to the application truststore and the COS truststore.
Instruction
Configure PhenixID Authentication Services
Add client / RP
- Login to Configuration Manager
- Scenarios->OIDC
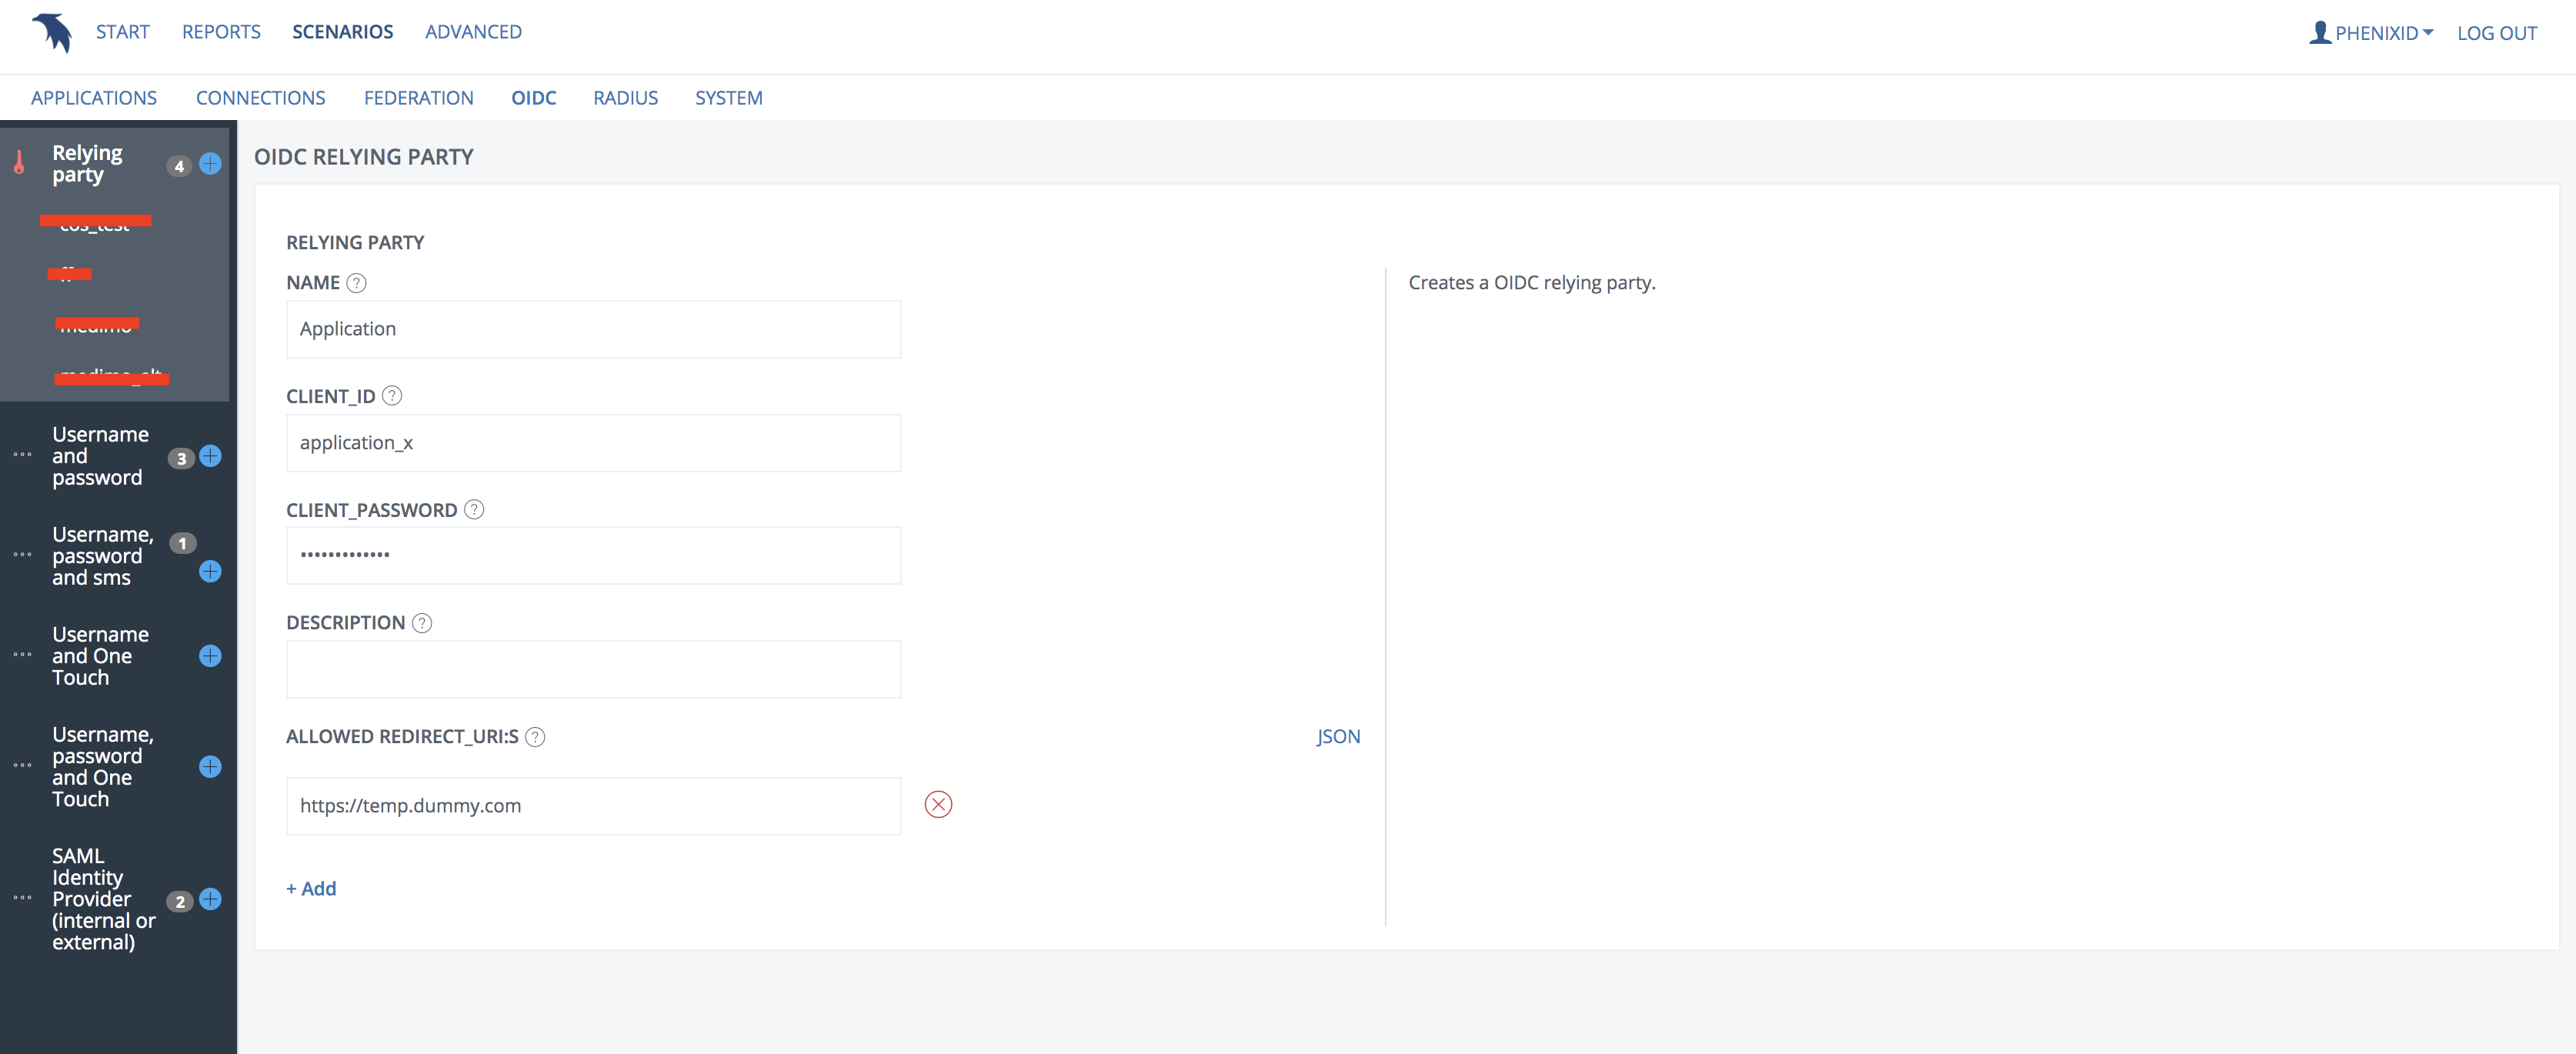
- Add a new Relying Party.
Set client_id and client_secret.
Set a dummy url for the allowed redirect uri:s. This will be changed in later step.
Add OIDC / OAuth provider
- Login to Configuration Manager
- Scenarios->OIDC
- Add a new provider by clicking selecting the desired authentication method or, if a SAML Identity Provider already is setup, select SAML Identity Provider
- Add a name and description
- Select Authorization Code Flow
- Set a tenant ID (any string, must be unique on the server)
- Continue. Set values according to the scenario instructions.
- Select the RP created in previous step as allowed RP.

- Continue. Set values according to the scenario instructions.
- Click create
Fetch data to be sent to the application owner/developer
- Login to Configuration Manager
- Scenarios->OIDC
- Click on the previously created provider
- Click View OP Discovery
- Copy the URL of the discovery services
- Fetch the client_id and client_secret from the previously added Relying party
Exchange data with application owner/developer
Send this data to the application owner/developer:
- Discovery URL
- client_id
- client_secret
[Authorization code flow] Request the redirect uri(s) from the application owner/developer.
[Authorization code flow] Add allowed redirect uri:s
- Login to Configuration Manager
- Scenarios->OIDC
- Click on the previously added Relying Party
- Remove the allowed uri (dummy value)
- Add allowed redirect uri(s), retrieved from the application owner/developer.
Modify the Execution flow
[Authorization code flow]
- Login to Configuration Manager
- Scenarios->OIDC
- Click on the previously added provider
- Click Execution Flow
- Expand Token endpoint
- Remove UUIDCreateValve and SessionClearAllAliasValve by clicking Delete.

- Add a PropertyRenameValve with these values:
source = id_token
destination = access_tokenMove the valve to just below GenerateJWTTokenVavle.

- Click Save
[Client credentials flow]
Follow the instructions here.
Modify the GenerateJWTTokenVavle to suite the COS requirements
The resulting JWT token should include a header and a payload with these claims.
JWT claims
Header:
{
“alg”: “RS256”,
“typ”: “JWT”,
“kid”: “<key_id_value>”
}
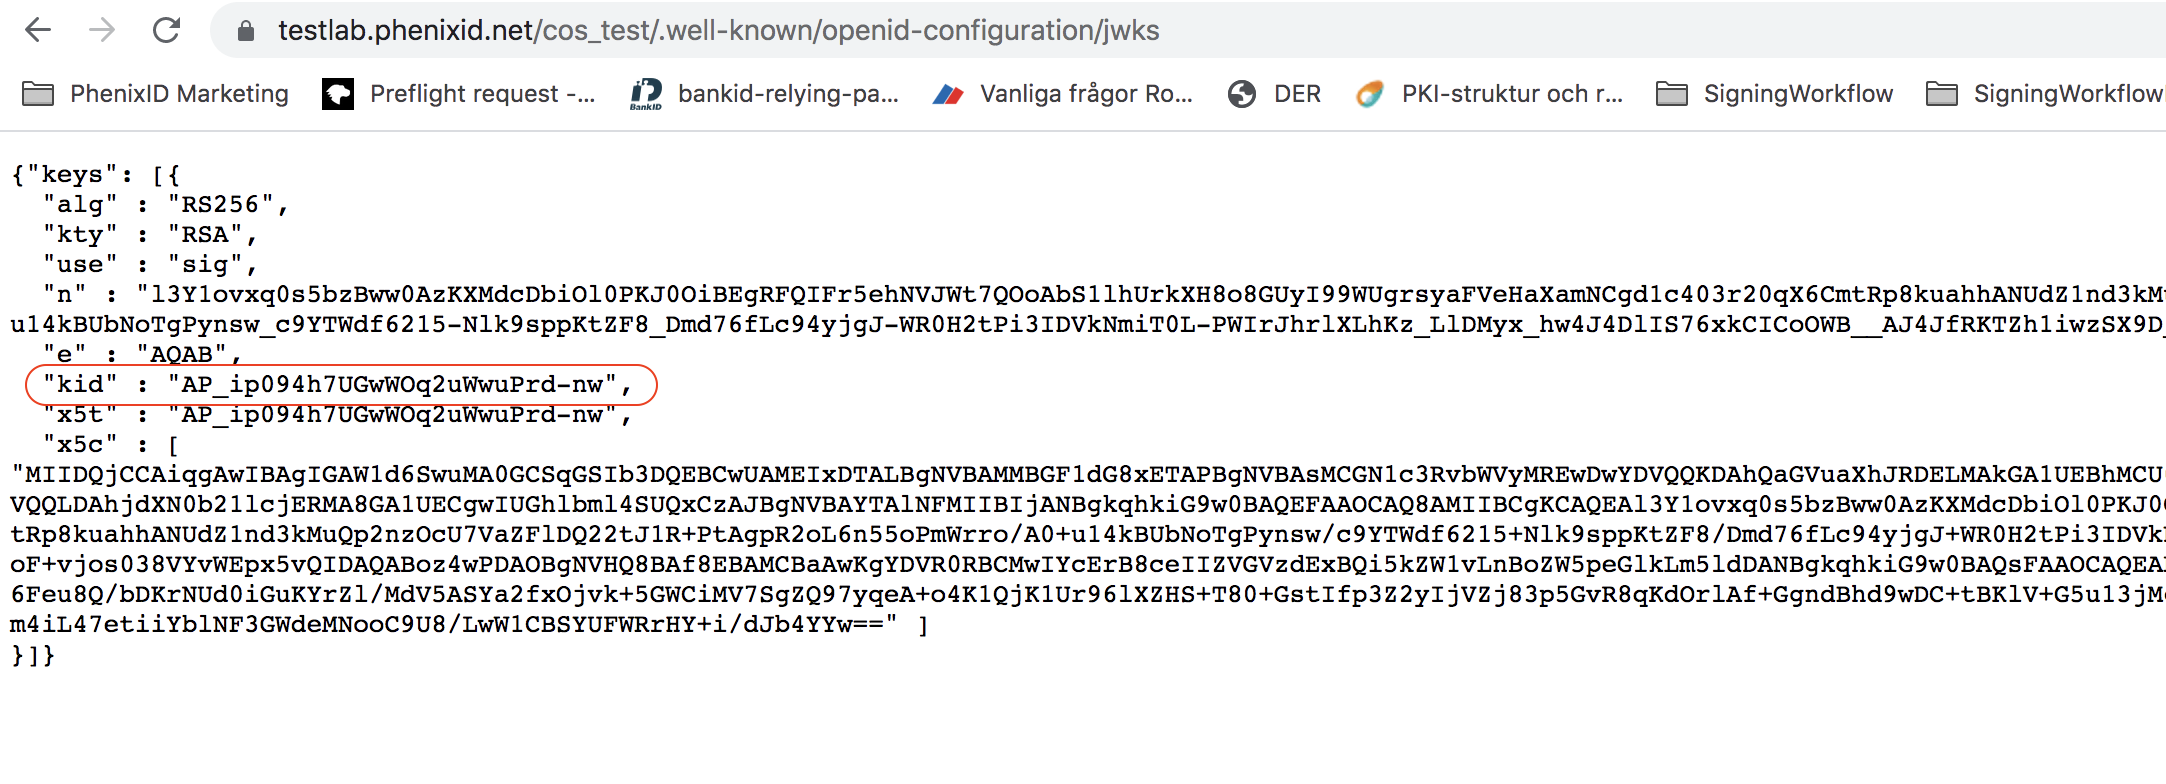
kid = The key ID used to sign the token. Must be the same value as the discovery jwks kid value.
Payload:
{
“sub”: “<user_id or unique id>”,
“iat”: time_stamp,
“nbf”: time_stamp,
“exp”: time_stamp,
“jti”: “<id>”,
“aud”: “<client_id>”,
“iss”: “<the issuing authorization server>”,
“amr”: “<user authentication method>”,
“auth_time”: 0,
“scope”: “<api_1_access_role> <api_2_access_role>”,
“session_state”: “<session_id>”
}
sub = [Authorization code flow] The userID of the user that authenticated, [Client Credentials flow] Unique ID
iat, nbf, exp = Timestamps, will be automatically generated by PhenixID Authentication Services
jti = JWT ID, will be automatically generated by PhenixID
aud = The audience of the token. Will be set to client_id of the requesting client
iss = The issuer of the token (the PhenixID Authentication Services provider issuer name)
amr = [Authorization code flow] The authentication method used by the user that authenticated, [Client Credentials flow] Exclude the attribute.
session_state = session id value, will be automatically generated by PhenixID
realm_access = Defining the permissions to be able to consume the different apis. The roles array must contain value(s) corresponding to each API scope (contact Cambio for the correct values).
JWT claims example
Header:
{
“alg”: “RS256”,
“typ”: “JWT”,
“kid”: “AP_ip094h7UGwWOq2uWwuPrd-nw”
}
Payload:
{
"sub": "andbjo",
"iat": 1621255184,
"nbf": 1621255184,
"exp": 1652812110,
"jti": "cb6573a1-08a9-4bb5-ab02-ce40b1e521ac",
"aud": "application_x",
"iss": "https://testlab.phenixid.net/tenant88",
"amr": "pwd",
"auth_time": 0,
"scope": "user/*-read user/*-write user/*.read user/*.write",
"session_state": "558beedb-b804-4ffd-97fe-8fd3bfdbce7e"
}
Configure the GenerateJWTTokenVavle
- Login to Configuration Manager
- Scenarios->OIDC
- Click on the previously added provider
- Click Execution Flow
- Expand Token endpoint
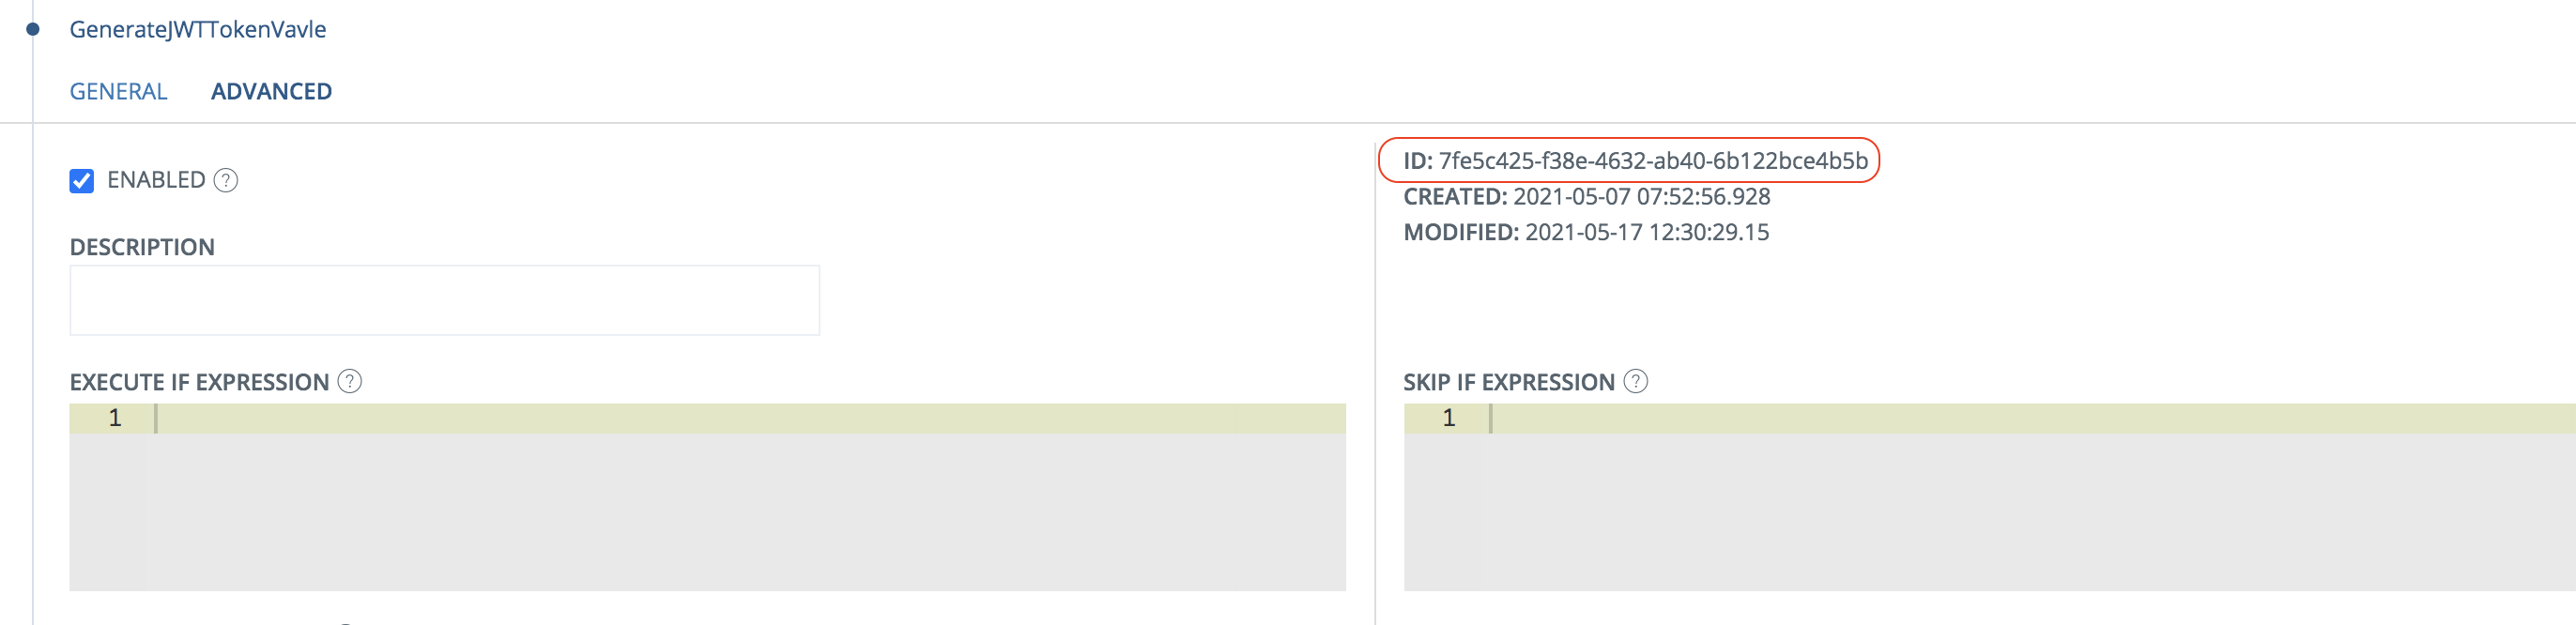
- Expand GenerateJWTTokenVavle
- Click Advanced
- Copy the ID value and paste it into a text editor
- Collapse the valve
- Click General
- Click View OP Discovery
- Copy the jwks_uri value and open that url in another browser tab
- Copy the row with the kid claim and paste it into a text editor.
- Login to Configuration Manager
- Advanced
- Click on the pen to the right of Pipe valves
- Search for the ID copied in previous step
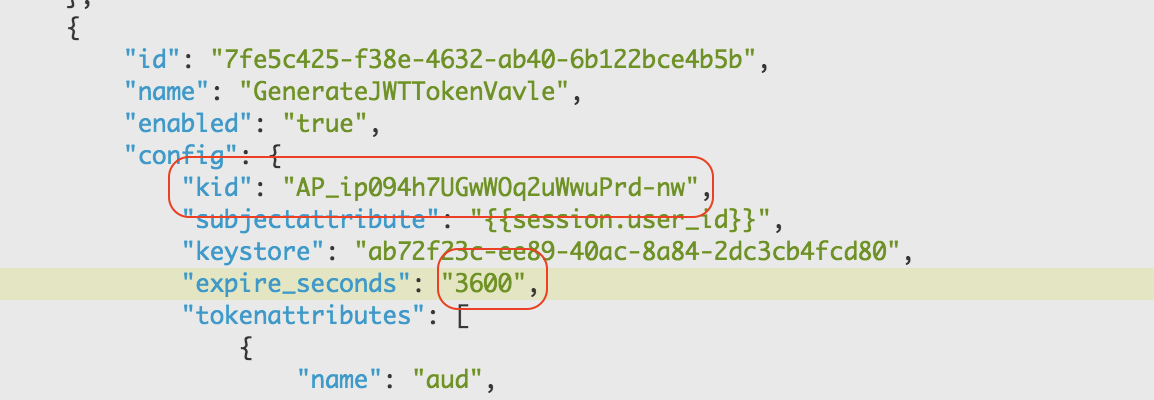
- Add the previously copied kid claim to the config.
- Change expire_seconds to 3600.
- In the tokenattributes section, remove these array elements (the whole object, including name and value) where name equals:
- nonce
- family_name
- given_name
- Add these objects to the tokenattributes array.
{
“name”: “auth_time”,
“value”: “0”,
“type”: “int”
},
{
“name”: “scope”,
“value”: “user/*-read user/*-write user/*.read user/*.write”
},
{
“name”: “session_state”,
“value”: “{{session.id}}”
}
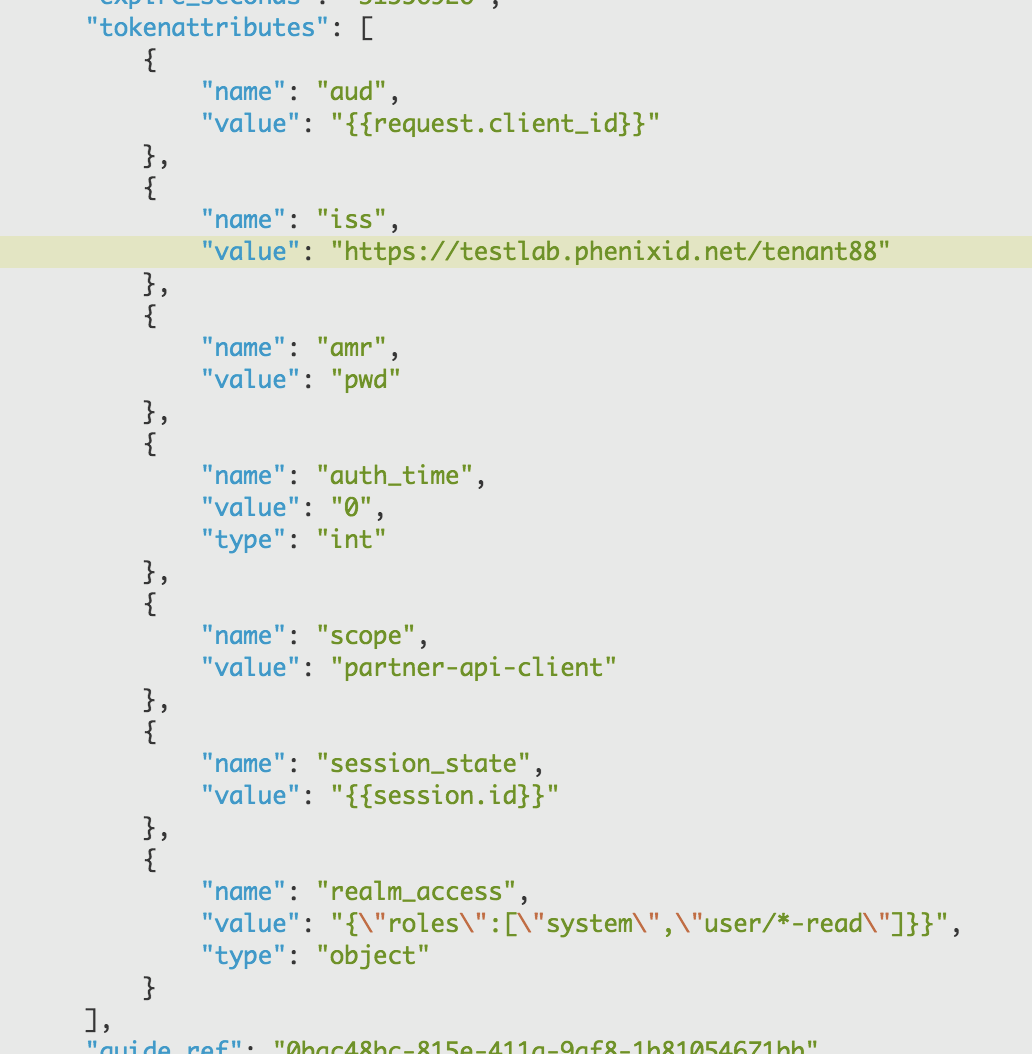
NB! In the example above, the realm_access->roles values are hardcoded. These values should be set based on group membership or equally, fetched in previous valve of the execution flow. Please consult your PhenixID Authentication Services administrator for additional guidance.
- Click Stage Changes and Commit changes
COS -> PhenixID Authentication Services trust explained
COS will use one of the claims in the JWT token called iss (issuer). This value can be used to construct the discovery URL where data can be fetched to verify the token (signature).
By using this approach, no manual configuration / trust needs to be setup on the COS side.
Test
Testing can be performed from the application itself (preferably) or by using a web browser and a API request tool such as Postman.
This scenario describes how to test it manually.
(NB! This test only involves how to retrieve the access token. It does not test the access token against COS API.)
[Authorization code flow]
- Construct a start URL based on the discovery data, the client_id and the redirect URI. (Example: https://document.phenixid.net/m/90910/l/1138961-openidconnect-authorization-code-flow-integration-guide-for-developers#configuration)
- Browse to the URL
- Authenticate
- Fetch the code parameter on the redirect response
- Use the code and send it to the token endpoint (https://document.phenixid.net/m/90910/l/1138961-openidconnect-authorization-code-flow-integration-guide-for-developers#configuration_1)
- Fetch the access_token response parameter
- Decode the token and verify that the claims have been populated correctly.
[Client Credentials flow]
- Open an API request tool, such as Postman
- Send client_id, client_secret and grant_type to the token endpoint. (https://document.phenixid.net/m/90910/l/1503230-oauth-client-credentials-flow-integration-guide-for-developers)
- Fetch the access_token response parameter
- Decode the token and verify that the claims have been populated correctly
DISCLAIMER
Information provided in this document is for your information only. PhenixID makes no explicit or implied claims to the validity of this information. Any trademarks referenced in this document are the property of their respective owners.The origin of this information may be internal or external to PhenixID. PhenixID makes all reasonable efforts to verify this information.
PhenixID - support.phenixid.se