Identity Manager Administrator Guide
About this guide
This guide describes Identity Manager and are intended for a technical administrator.
Terminology
|
Term |
Description |
|
PIP/AAM |
PhenixID Provisioning Service / |
|
Authentication |
Authentication is the process of determining whether someone or something is who or what they declare to be. |
|
Authorization |
Authorization is the process of deciding if someone or something has permission to access or use resources that have been permitted to them. |
|
IM/PIM |
PhenixID Identity Manager |
|
JDBC |
Java Database Connectivity (JDBC) is an application program interface (API) specification for connecting programs written in Java to the data in popular databases. |
|
LDAP |
LDAP (Lightweight Directory Access Protocol) is a software protocol for enabling anyone to locate organizations, individuals, and other resources such as files and devices in a network, whether on the public Internet or on a corporate intranet. LDAP is a “lightweight” (smaller amount of code) version of Directory Access Protocol (DAP). |
|
ODBC |
Open Database Connectivity (ODBC) is an open standard application programming interface (API) for accessing a database. |
|
MFA / OTP / OPT Server |
PhenixID Multi-Factor Authentication |
|
Pocket Pass |
PhenixID HOTP client following OATH standard from rfc 4226 which is changing a mobile device (Cellular phone or PC) into a security token device. |
|
Web Service |
The W3C defines a “web service” as a software system designed to support interoperable machine-to-machine interaction over a network. It has an interface described in a machine-processable format (specifically Web Services Description Language WSDL). |
Overview
Managing digital identities is a core function of most businesses and PhenixID Identity Manager offers a flexible, and in many cases unique, solution to manage identity information across multiple LDAP and SQL User Stores.
PhenixID Identity Manager is a powerful technical and organizational solution for timely, accurate, uniform and easy Directory management. It eliminates the risks from managing Directory Services objects with scripts or complex manual procedures using multiple tools.
Identity Manager includes capabilities for automated provisioning and de-provisioning of user accounts, approval workflows, managing passwords and user data throughout an organization’s directories and databases.
PhenixID Identity Manager administrators define Roles, Policies, Forms and Predefined Searches within Identity Manager, to replace scripts and manual procedures, so that data management can be securely delegated across an organization.
Deployment of Identity Manager is uncomplicated and the need for training minimal. The solution integrates into existing infrastructures and there are no hidden extra costs or expensive investments to make.
The PhenixID Identity Manager is a Role-based security Web portal dedicated to Directory Services management and some of its features are:
- Delegated administration
- Secure self-administration
- Centralized policy management
- Management of identity information from all IT-Systems
- Easy, powerful and flexible system
- Customizable user interface
- Leverages existing infrastructure and resources
- Rapid deployment
Its capabilities—workflows, roles, attestation, self-service, reporting and auditing—helps automate the processes involved in provisioning users and managing passwords, two of the most difficult and time-consuming duties of an IT organization.
Workflow
Access to resources might be restricted and require approval from one or more individuals, Identity Manager provides workflow capabilities to ensure that corporate provisioning processes are used and enforced.
Roles and Attestation
Users often require access to resources based upon their role in an organization.
Roles and their assignments are created in Identity Manager according to organizational needs and when a user is assigned to a role, Identity Manager will provision the user with access to the resources associated with the role.
If a user is assigned multiple roles, he or she receives access to the resources associated with all of them.
Identity Manager may validate the correctness of role assignments through an attestation process.
Using this process, responsible individuals within an organization can certify the data associated with roles is valid.
Self-Service
With Identity Manager, Administrators can delegate duties to the people who should be responsible for them.
For example, individual users can:
- Manage their own personal data in the corporate directory, change a cell phone number in one place and IM will update all related systems.
- Change their passwords, set up a hint for forgotten passwords and choose challenge questions and responses for forgotten passwords.
- Request access to resources such as databases, applications and directories via a list of resources available to assigned role(s).
In addition to self-service for individual users, Identity Manager can provide self-service administration for organizational functions (Management, Help Desk, …) responsible for assisting, monitoring, and approving user requests.
Reporting & Auditing
In Identity Manager, reports are called Pre-defined searches and are the results from LDAP queries. Reports can be saved as PDF and Excel format.
Modifications performed on objects as well as the modifiers identity may be saved into a database for Auditing purpose.
Password management
Many organizations would like to reduce the cost of User inactivity due to their password management, as well as to be able to verify the identity of individuals contacting ServiceDesk.
Identity Manager does not synchronize passwords between User Stores but will update multiple stores from a source.
PhenixID Identity Manager may be integrated with the PhenixID Automatic Account Manager (AAM)/PhenixID Provisioning Service application to offer User provisioning and password synchronization between different types of User repositories.
Password Management with Identity Manager alone can for example be offered as follows:
- User Self administration via the PhenixID Password Self Service (PSS).
- Centralized password administration via a classic ServiceDesk organization.
- Password administration delegated to organizational functions like Office managers for example.
This guide is intended for PhenixID Identity Manager administrators, it is meant to demonstrate the abilities and features from this product. To do so, the Microsoft Active Directory service will be used throughout this document when a directory service or database is necessary.
Documentation intended for IM developers can be found in the Developers Manual.
Concept
Many enterprises use a centralized model of access control. For large organizations, this model scales poorly and IT teams become burdened with menial role-change requests.
These requests — often made when hire, lay off or role-change occurring in an organization — can be time consuming and may suffer from weak security practices.
Delegated administration refers to a decentralized model of role or group management.
In this model, the application or process owner creates, manages and delegates the management of Roles.
A centralized IT team may only operates the services of directory, meta-directory, Web administration interface and its related components.
Allowing the application or business process owner to create, manage and delegate groups supports a much more scalable approach to the administration of access rights.
In a metadirectory environment, these roles or groups can also be “pushed” or synchronized to other platforms.
For example, groups can be updated or synchronized with native operating systems, such as Microsoft Windows, to be on an access control list protecting a folder or file.
With a metadirectory distributing groups, a central directory may be used as a centralized repository of groups.
As a Role-based Security management application, the PhenixID Identity Manager has the following capabilities:
- Decentralized management via organizational groups (Roles) and Self-Administration
- Categorization or segmentation of Users by characteristics, not by enumeration
- Grouping of Users for e-mail, subscription and access control
- Reduce work process regarding maintenance of groups and associated objects
- Reproduce groups and user accounts on multiple platforms and into disparate environments
Within an organization roles are created for various job functions. Permission to perform certain operations are assigned to specific roles.
Members of staff, or other system users, are assigned particular roles and through those role assignments acquire the permissions to perform particular functions.
Since users are not assigned permissions directly, but only acquire them through their role(s), management of individual user rights becomes a matter of assigning appropriate roles to Users.
This simplifies common operations, such as creating a user or changing a user’s department.
IM Configurator vs IM Web
The PhenixID Identity Manager consists of two applications, IM Web and IM Configurator.
The IM core components are shared by both Configurator and Web Edition, while the rendering components are different between them.
Sharing the core components ensures that core code and custom code apply to both clients.
Core components functions:
- Manage connections to directories and other data sources
- Manage authentication and sessions
- Manage and enforce rules & regulation stored in xml format in Directory or Files
IM Configurator
IM Configurator is the PhenixID Identity Manager configuration tool and is used by IM administrators to create and manage forms and predefined searches. It also used as an LDAP tool to browse and search LDAP objects.
IM Configurator is also includes a Designer tools, Tab Designer, to create and manage Forms, create rules to retrieve information from data stores as well as for the GUI Look and Feel.
IM Web
IM Web is accessed via a URL from a Web Browser and is used by Delegate Administrators and Users to perform the tasks corresponding to the Roles they have been associated with.
IM Web supports delegated administration as follows:
- Administration capabilities can be restricted to portions of the LDAP directory.
- Administration capabilities can be restricted to a portion of Users.
- Administration capabilities can be restricted to a portion of the LDAP objects attributes.
LDAP compliant attributes can be connected with external logic and filters which can be triggered when viewing or modifying their content.
IM Web Architecture
IM Web is a JAVA servlet running on Apache Tomcat.
Database connectivity (LDAP, SQL, …) is done from the engine where the JAVA servlet was installed.
A Proxy User may be used when connecting to Directory Services. IM Web will authenticate Users according to the security policies corresponding to their Roles, but when operations are performed into the directories, the ACL rights from the proxy user account are used.
This is to avoid setting ACL rights to administrators and user accounts, Identity Manager is acting as the security layer and control access rights.
Usage of a proxy account can be turned off.
Administrators and users connect to IM Web using a web browser.
Roles, Policies and Forms
This section is meant to describe how the three IM key components are working together.
- Role
- Policy
- Forms
POLICY
Accessing Directory services – Security vs. Flexibility
A general function from an LDAP directory service is to manage an Access Control List (ACL), also known as Access Control Information (ACI).
An ACL is a method used to provide a granular protection of objects and their attributes.
Rules, or permissions, can be set in the ACL in order to control the operations permitted on a protected object and record the name of users and groups who are permitted to perform those operations.
Setting up these rules, across the Directory Services from an organization, may be a challenge even for the most experienced administrators.
For example, different vendors have different methods for setting rules in an ACL and not all vendors expose their directory’s ACL to LDAP.
An ACL is a “security shell” protecting a directory service and does not offer much flexibility to manage directory objects, and if delegation of ACL’s is required the task becomes more complicated.
Therefore, setting up “fine-grained rules” usually is a challenge and require a considerable amount of time and resources to be accomplished.
The PhenixID Identity Manager approach is to offer organizations a more flexible way to administer their directory services without compromising security.
By setting IM Policies, Users Access rights and responsibilities can be delegated and controlled efficiently without tampering with Directory ACLs.
IM Policies can be stored in an Identity Manager configuration file, an LDAP compliant directory or a mixture of both.
Both IM Configurator and Web Edition have their own configuration file DSEditor.properties.
IM Policies stored in a Directory Service always supersede same policies loaded from DSEditor.properties.
During the installation of the PhenixID Identity Manager default DSEditor.properties files are created for IM Configurator and IM Web.
User Policy Evaluation
IM Web Policies can be assigned to different types of directory services objects and Identity Manager will read and evaluate policies in the following order:
- From main IM configuration file (DSEditor.properties)
- From role IM configuration file (DSEditor.properties)
For more information on storing IM configuration files in file system, please read PSD1036
Identity Manager Access Control Model
User access rights to a directory object are evaluated according to the following picture:
1. Directory ACL
The Directory service native access control for the IM proxy user object.
When user objects or IM proxy user does not have the necessary native rights to access information from other object or their attributes then this information will not be displayed or be editable.
2. Identity Manager Policies
Policies such as BaseDN, SEARCH_FILTER, LOAD_TABS, and DISABLE_DELETE_OPTION, etc. will control users access rights to the directory service information.
3. Tab/Form
A restriction filter applied to a Form with the Tab Designer can be configured to exclude objects and attributes from Directory view.
For example, Directory service objects with attribute value = CEO may not be seen or modified.
ROLE
The PhenixID Identity Manager (IM) is a Role-based Security system and if it is possible to apply policies directly to user accounts it is not recommended.
However, It may be necessary to do so to fine tune Access Rights from the Proxy User account IM has been configured to use and for some IM Administrator accounts.
Roles usually correspond to group objects created in the Databases IM is connected to.
A user account can be member of one or more roles. If a user is member of more than one role the user needs to choose what role to login as. This is done using the role selector.
Persons may be assigned different organisational roles and will only be able to perform operations their assigned IM Roles have been designed to perform, i.e. create, modify, move or delete information.
FORMS
Most IM users will get access to a collection of forms via their association to an IM Role but it is also possible to associate specific forms directly to a user object.
With IM, various type of operations can be performed on different type of objects and different collections of Forms will be available depending on selected Role and individual settings.
Each form is composed of three main components:
1. Presentation
The presentation layer is built via “drag and drop” of controls into the framework of the form.
There are many different controls included with IM such as text field, combo boxes, frames and many other.
2. Logic
Often, a form must include specific logic to manipulate the data presented to users and to control that the data has the correct format and syntax.
This Logic can be applied via Filters or Custom Controls.
Some controls, custom controls and filters are included with the public release of Identity Manager.
For example a filter must be used to translate a Microsoft timestamp into a human readable format.
Read JAVA Doc related to it.
A custom control often includes complex logic, for example the date selector which is showing a graphical calendar to Users.
Read PSD and Developer guide.
3. Data source
After an object has been created or modified within the IM GUI, the information can be written to the data repositories.
Data repositories must be LDAP compliant or SQL databases.
Using Filters and Custom Controls, it is possible to collect and manipulate data from several sources into one form.
The result can be saved into more than one data repositories at the same time.
The Configurator Client is saving IM Forms in xml-format, either into files or as objects in an LDAP directory.
Installation and UPGRADe
See following document for installation of IM Web, LINK
See following document for installation of IM Configurator, LINK
See following document for upgrading of IM Web, LINK
COMMON Configuration of IM WEB
Configuring PhenixID Identity Manager Audit to database
With Identity Manager it is possible to enable an advanced audit to a database. The audit writes down Who, When, What object affected, Value before and Value after to the database.
Read more here: PSD1062 – Configuring PhenixID Identity Manager Audit to database
Configure memory used by IM WEB
Read more here: PSD1048
Configure Windows Integrated Authentication for Identity Manager
PhenixID Identity Manager runs on the Tomcat application server. Microsoft IIS Web Server can be connected to the Tomcat using a connector.
Users can get SSO (Single Sign-On) to Identity Manager based on login information from the IIS.
Read more here: PSD1079 – Configure Windows Integrated Authentication for Identity Manager
How to configure SSL for Tomcat
How to enable the tomcat application for SSL communication. This article requires a certificate and is not provided by PhenixID. Certificate type must be “PKCS12”.
Read more here: PSD1060 – How to configure SSL for Tomcat
How to create a self signed certificate
To be able to handle https traffic you need a certificate. If you can’t buy one or have a PKI infrastructure you could create one yourself.
Read more here: PSD1052 – Creating Self-Signed Certificates Using OpenSSL
How to change proxy account password and encrypt it
Read more here: PSD1038 – How to change proxy account password and encrypt it
More configuration tips here:
PhenixID Solution Documents (PSD)
Using the Configurator ClieNt
Configurator
- Login
- Role Selector
- Navigation
- Policy Management
- Tab/Form Designer
The Configurator Client is a Java application that may be used as a platform independent management tool for LDAP compliant directories.
For example, administration tasks like creating, modifying, moving, searching and deleting LDAP objects may be performed.
It is also the configuration tool for IM Web Edition.
IM Administrators must use it to create and manage Tabs (web forms), IM Policies as well as most functionalities available to Users via the Web Edition.
To start the PhenixID Identity Manager Configurator Client For Windows, click on the Start button and select “Programs-> PhenixID -> PhenixID Identity Manager”.
Configurator Client Login Configuration
The Login Window is enabling Users to connect and bind to any LDAP directory service.
Options can be set to provide related information such as SSL, TLS, anonymous bind, naming context, etc.
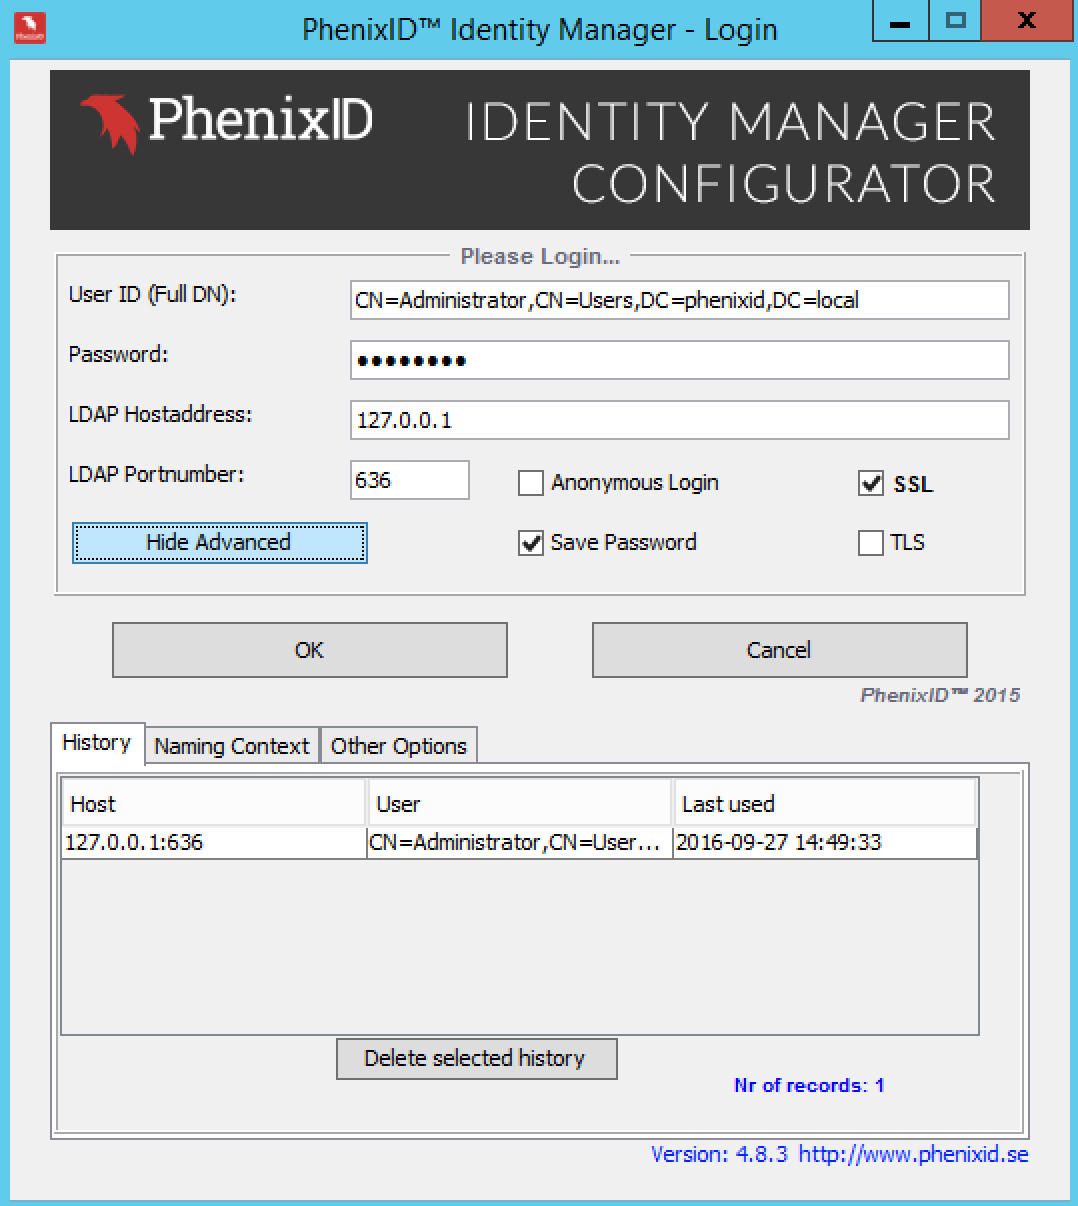
|
Option |
Description |
|
User ID |
Enter the fully distinguished name of the user. |
|
Password |
The password for this user. |
|
LDAP Host address |
LDAP-server (IP-address or DNS Name). |
|
LDAP Port number |
Port Number to the LDAP server. |
|
Anonymous Login |
Check this box for anonymous bind. |
|
Save Password |
Check this box to save password for future logins. |
|
SSL |
Check this box if SSL is to be used. |
|
TLS |
Check this box if TLS is to be used. |
Login Options – Advanced
Click on “Show Advanced” button, the login Window will expand to show more options.
History
Information from all previously successful login is recorded and can be re-used.
Select Host & Login credentials and Click OK to login.
History records can be removed by selecting an item from the list and click on the “Delete selected history” button.
Naming Context
Option to select a specific context in the directory service repository.
|
Option |
Description |
|
Get Naming Contexts from Server |
Click this button to query selected LDAP Host about Directory structure |
|
Drop Down List |
Naming context can be selected from list |
Other Options
Choose the Look and Feel (skin) for the login window and if an optional Policy Configuration file should be used.
|
Option |
Description |
|
Look and Feel |
Click on the drop down list to choose the Look and Feel skin |
|
Config File |
Enter optional file name – Default file is: “DSEditor.properties” |
The PhenixID Identity Manager Configurator GUI
After login into the directory the main IM window is shown.
From here PhenixID Identity Manager is managed and controlled.
The look and feel of this window as well as other features be configured to fit the users or the administrators’ requirements through different Policies.
See the chapter about Policies for more information.
The different parts from this window is explained below:
- Panes. The First Pane (left) and the Second Pane (right).
- Menu bar
- Toolbar
- Status bar
- Title bar
In general, navigation into the directory is done in the First pane and objects administration is performed in the Right pane when right clicking on objects perform operations.
Available operations will depend on object type and configured Policies.
Toolbar
Icons represents different functions and the dropdown list will shows the Predefined searches list.
A predefined search will use object selected in the Left pane as BaseDN.
Mouse operation
This application briefly shows context sensitive help when the mouse cursor remains over a defined spot, for example Menu Action, property value etc.
Left Button
- Navigate the directory in the tree-like structure to expand or collapse the hierarchy.
- Show and select actions in the Menu bar.
- Select windows, Close windows, Minimize windows, enlarge or decrease the size of a window using the Title bar in usual “Windows” style.
Right Button
- Show and select available operations for highlighted objects.
- Show and select actions from the Menu bar.
Keyboard sequences
Alt+I Import LDIF file to the directory.
Alt +E Export Directory to LDIF file.
Ctrl+X Exit PhenixID Directory Manager.
Alt+S Start Search Manager.
Alt+M Start Schema Manager.
Alt+D Start Tab Designer.
The First and Second Pane
Can be customized via the menu bar or different Polices read from file or Directory when the PhenixID client is starting.
Policies CAN_CHANGE_LEFT_PANE and CAN_CHANGE_RIGHT_PANE must be set to allow the Panes customization from the Menu bar.
The look and feel from the Panes is controlled by the policies FIRST_PANE and SECOND_PANE.
The First Pane
The first pane can be configured to show information in two different ways:
- Tree
- Predefined Search (see Using Predefined Searches as a First pane layout below)
This configuration is done by selecting one of the three options in the menu bar.
Click View ->Left Pane.
Note that the policy CAN_CHANGE_RIGHT_PANE must be set to TRUE to show this menu.
The default value is Tree view.
First Pane Tree
Click View > Left Pane > Tree to choose this view.
It will show the information from the directory in a tree-like structure.
Navigation into the Directory Information Tree (DIT) is performed the same as browsing into a file system.
First Pane Predefined Search
Click View > Left Pane > Predefined Search to choose this view.
It will show all saved predefined searches.
A standard LDAP search can be saved to become predefined for future use.
See more information under section “Creating Predefined Search”
The Second Pane
The second pane can be configured to show information in three different ways:
- Second Pane Container Contents
- Second Pane Raw Editor
- Second Pane Null
This configuration is done by selecting one of the three options from the menu View ->Right Pane.
Note that the policy CAN_CHANGE_RIGHT_PANE must be set to TRUE to show this option.
The default value is Second Pane Container Contents.
Second Pane Container Contents
Click View > Second Pane > Second Pane Container Contents
This option will display the content of a container object selected in the first pane as leaf objects in the second pane.
Second Pane Raw Editor
Press View > Right Pane > Second Pane Raw Editor
This option will display the attributes of an object in the second pane.
Second Pane Null
Press View > Right Pane > Second Pane Null
When this option is selected, only the first pane will be displayed.
Display object content in the First Pane
Left click on container object in the first pane and its content will be displayed in the second pane.
In following example the view of the second pane is displayed as Second Pane Container Contents.
Display available operations for selected container object
Right Click on container object in the First Pane to show menu then select an operation.
|
Option |
Description |
|
New |
If the user has a Create Tabs loaded, this menu will be displayed with those objects. |
|
Refresh |
Refreshes the directory information from the directory services. |
|
Object Properties |
Opens the selected object with its tabs. The object properties will also be displayed when double clicking on the object. |
|
Raw Edit |
This opens the object in Raw Edit mode (can be disabled with the policy Enable_Raw_Edit_Menu). |
|
Rename |
Rename this object. A new window will appear (can be disabled with the policy DISABLE_RENAME_OPTION). |
|
Delete this object |
Delete this object (can be disabled with the policy DISABLE_DELETE_OPTION). |
|
Search |
Opens the Search Manager with the BaseDN of the selected object. |
|
Virtual View |
Shows the Predefined Searches that the logged in user can use. |
Search Settings for the Second Pane Container Contents
Click View > Search Settings or press the corresponding Icon from the toolbar.
|
Option |
Description |
|
Enable Thread Search |
Enables background searches through a separated thread. |
|
Nr of objects to fetch |
Number of objects to fetch before drawing it to screen. |
|
Enable Optimized Browsing |
Enables the LDAP Cache. Caches additional attributes and optimize the rendering of themes when browsing. |
|
Enable LDAP Cache |
Enables LDAP caching of object classes and optional Additional Display Attributes. |
|
Cache Additional Display Attributes |
If Additional Display Attributes should be cached |
|
Max Cache Entries |
The maximum number of objects the cache can contain. Use the number of Zero (0) for unlimited number of objects. |
|
Clear Cache |
Clear the current cache |
|
Cache Status |
You can see the size of the cache and how it is being used. |
|
Enable PD Search in Toolbar |
Enable Predefined Searches in the Toolbar menu. |
|
Enable PD Search in popup Menu |
Enable Predefined Searches in the Popup menus showing up using the Right Mouse Button. |
|
Use selected Base DN |
Use the selected object Base DN (in the Left Pane) in all Predefined Searches used from |
|
VLV Settings |
Select Virtual List View Status (Auto, On or Off). Auto: If Identity Manager should try to determinate if VLV is supported by the directory services. Note! Some directory services do not respond correctly when asked if VLV is supported. In such cases, use the Off mode On: Always do virtual list view Off: Never use virtual list view |
|
Search Filter |
Choose a search filter. |
|
Sort Key(s) |
The VLV sort key. Multiple keys sorted by commas. |
|
Max Results |
The number of objects to fetch in a VLV search. |
|
Use VLV in Simple Search |
If VLV will be used for Simple Search |
Using the Web Edition
Web Edition
- login
- role selector / default Roles
- navigation
- policy management
- admin tab
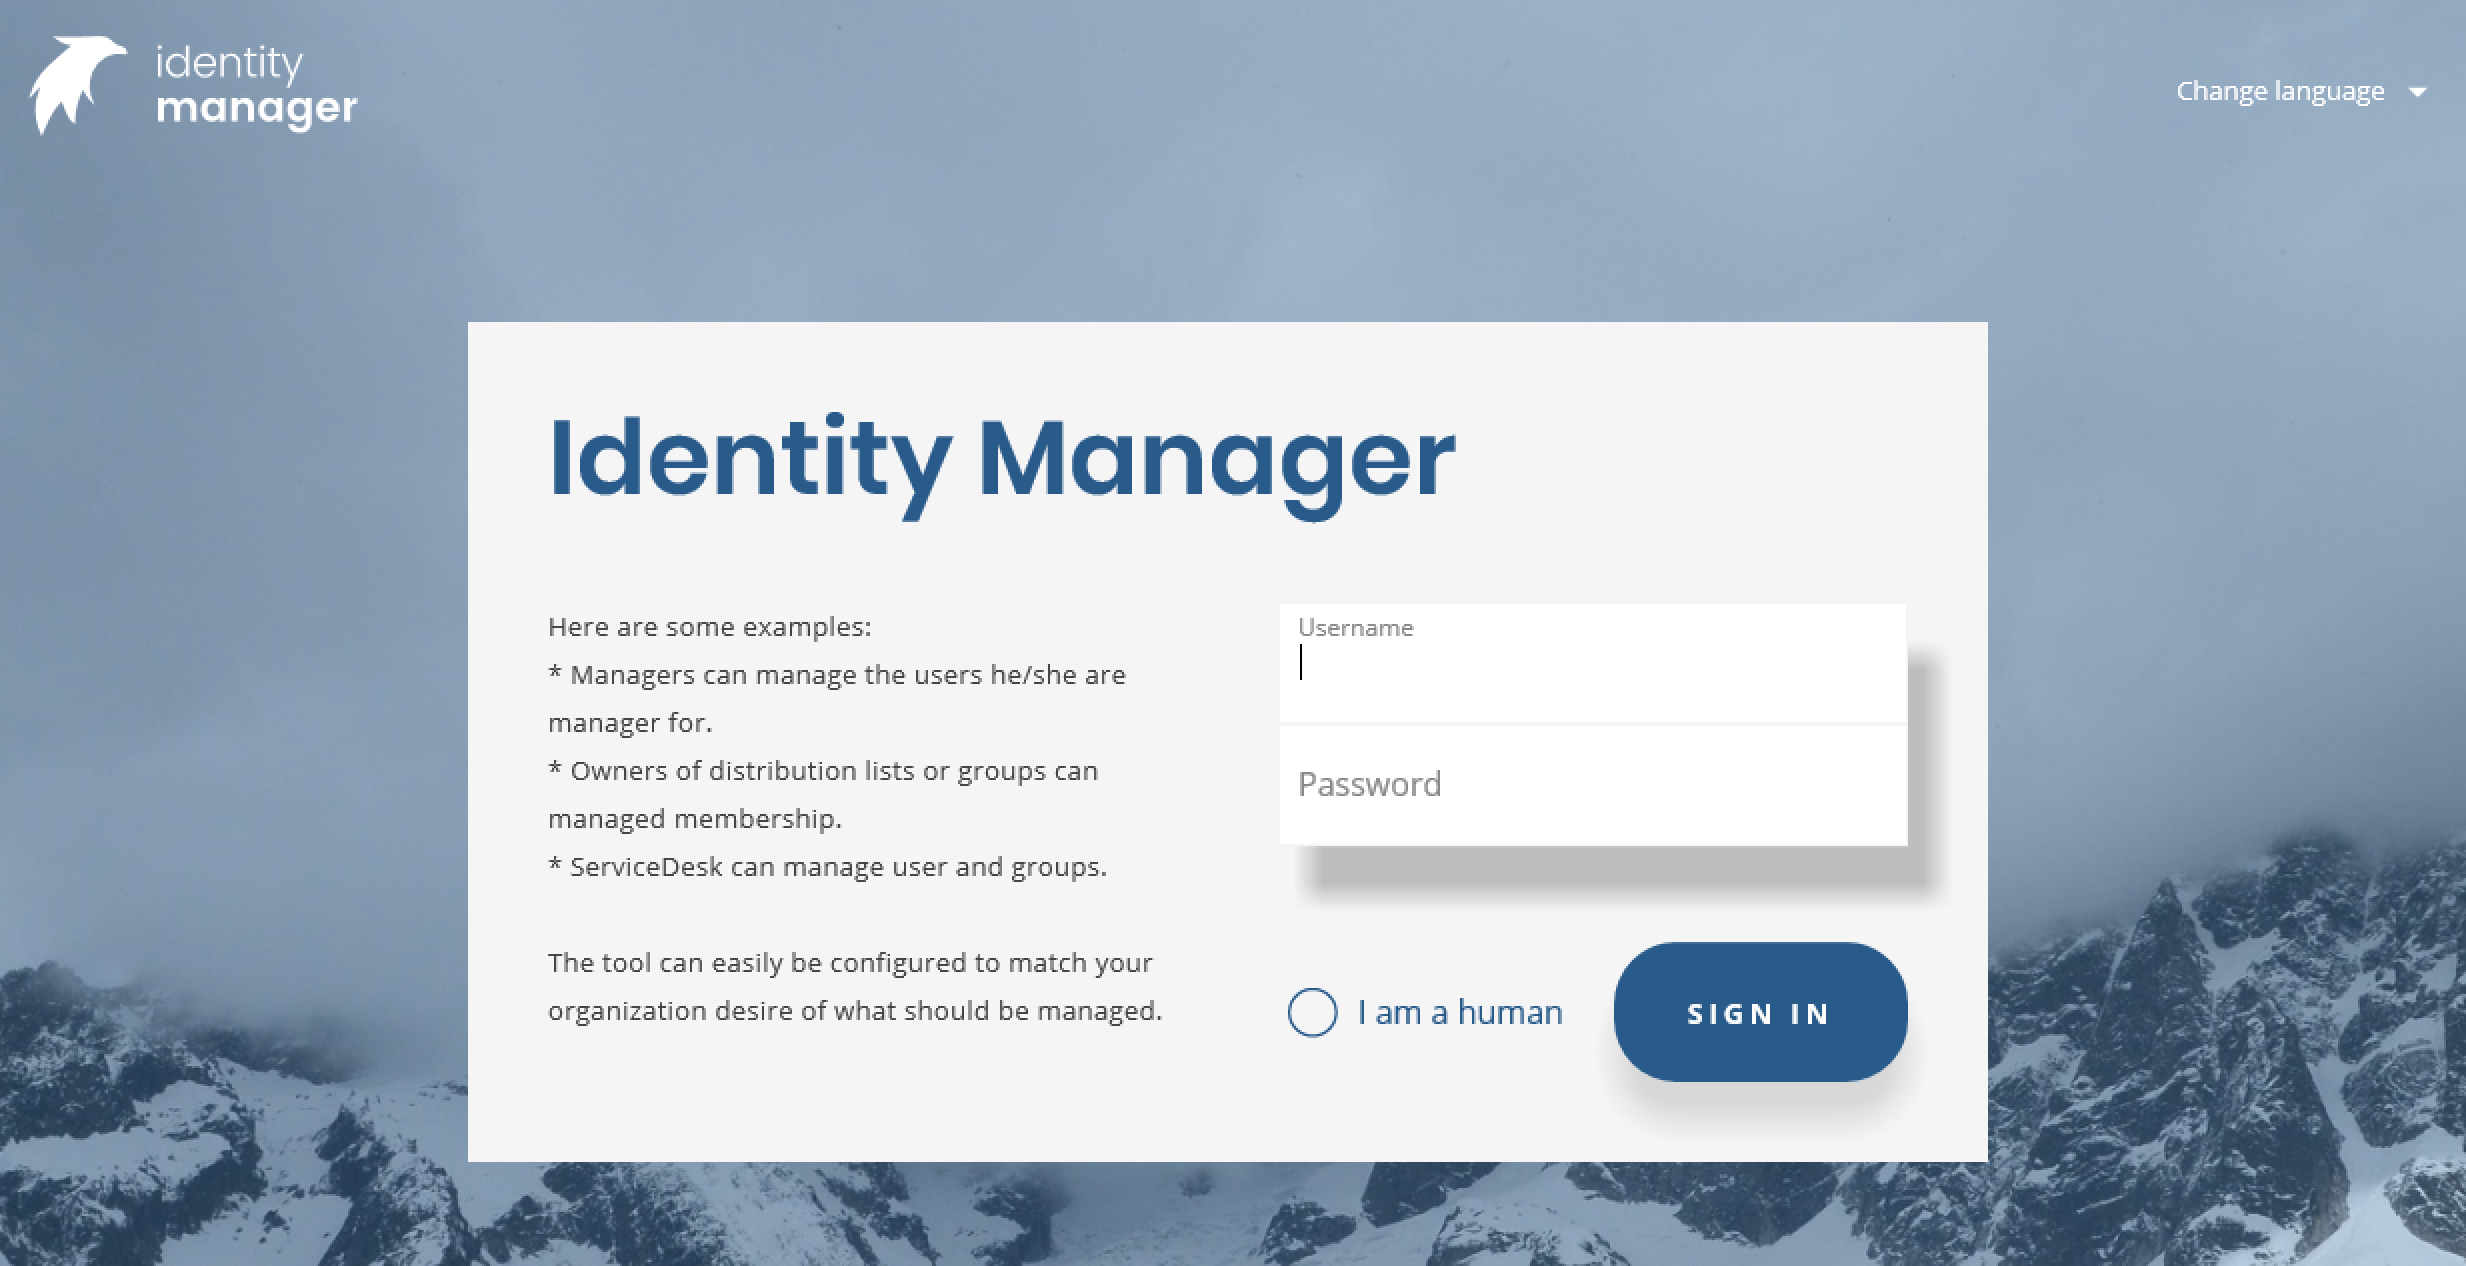
The Identity Manager Web Edition is the Web Portal where Administrators and Users are connecting to with a web browser to manage the Directory Information they have been granted access to.
Internet Explorer, Mozilla Firefox and Apple Safari web browsers are supported with IM.
Site IM Administrator must provide IM Web Edition URL to site Users.
Launch a web browser
Enter IM Web Edition URL similar to:
http://your_server_nameor_IP/phenixid
Enter username and password in the Login form.
Choose the language.
Click Login.
When WebSSO is used with Internet Explorer and Active Directory then Users will be automatically logged on the portal.
Follows a brief description of the various elements available from the IM Web portal GUI.
IM Administrators may choose to hide some of these elements from one or more Roles.
Role Selector
Some Users may have been assigned to more than one Role and must select the Role corresponding to the tasks to perform via the Role Selector.
NOTE: When users were assigned to one role only, the role selector is not presented.
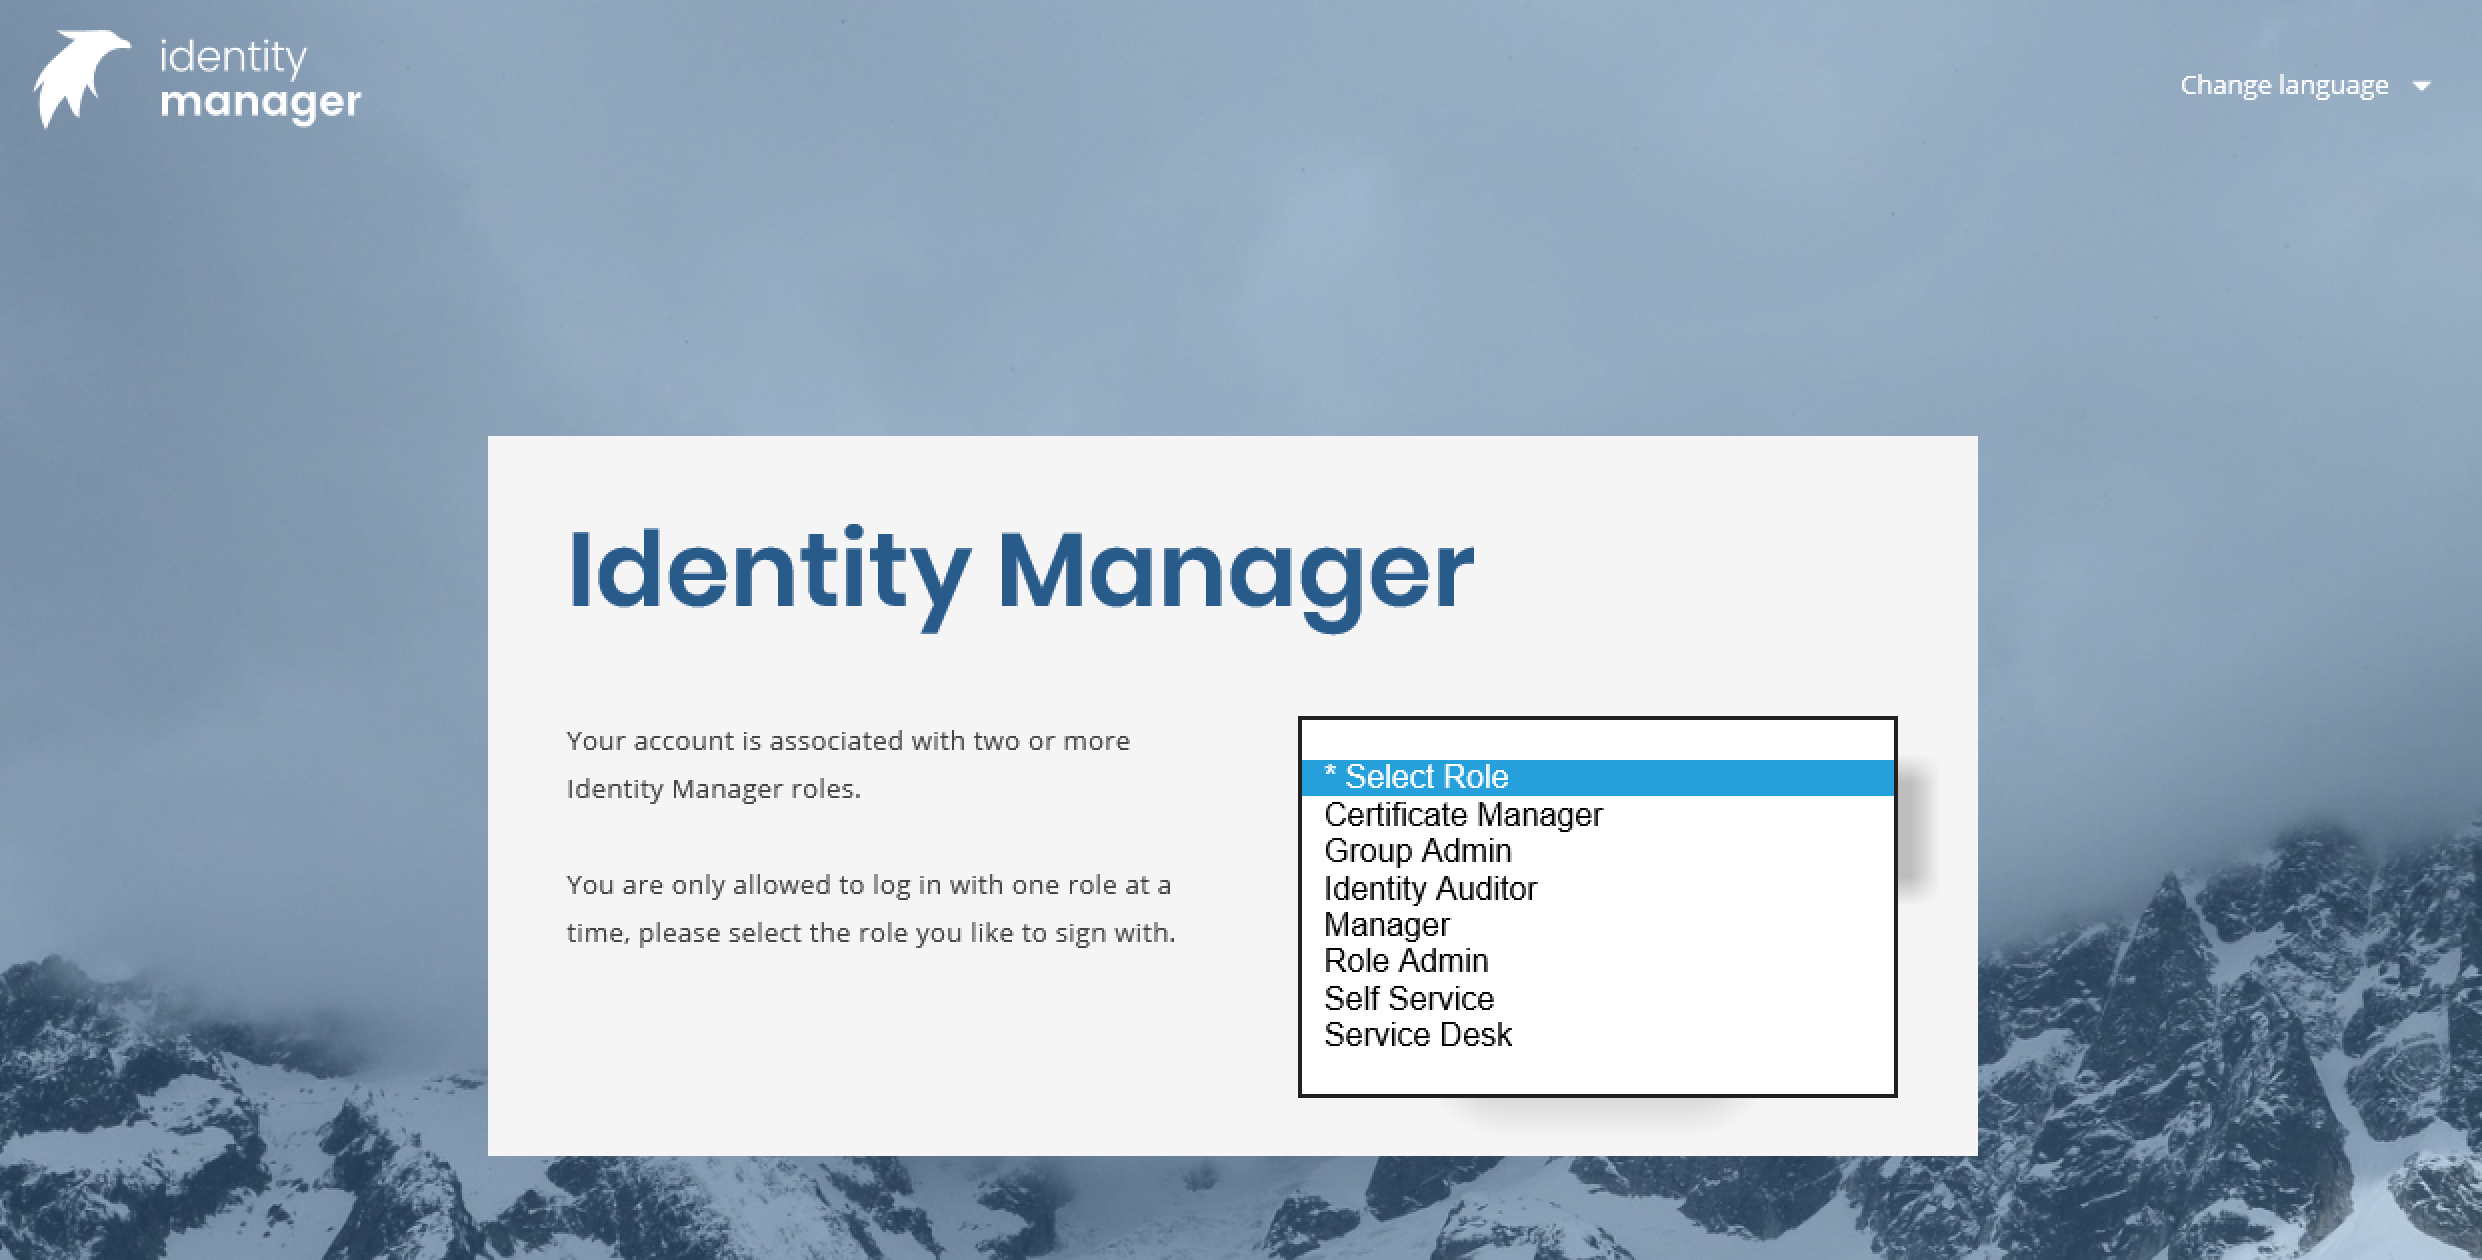
Operation:
- Click on the drop down box from the Role Selector and choose the Role.
- It is possible to switch Role later without login and logout from the Portal.
Work panes from Identity Manager Web Edition:
- Browse view
- Search view
- Predefined search view
- Displays information about the current logged in User Account. Right-click to switch Role, Language or choose Self-management when available to current Role.
- Logout button
- Left pane. Often used to search for objects, differs slightly depending on the view chosen.
- Right pane. Here you select objects to work with, e.g. delete, move, edit etc.
- Column headers. Left click to sort and right click to filter.
- Shows how many objects there are in right area.
Views from IM Web Edition GUI
By default there are four views (Tabs) to choose from the IM Web Edition GUI.
Some or all views will be displayed depending on the Roles configuration.
Often, only one view is presented to Users.
Browse view
Composed of a left pane and a right pane.
Left pane is meant to browse the directory structure or perform operations.
The Right pane is meant edit, move or delete objects. It can also be used to produce reports that can be saved various formats.
Examples of operations that can be performed from the Browse view.
- To create a new object, right-click on a container object in left pane and select New.
- To edit an existing object, right-click (double click) on an item from the right pane and select Edit.
- To move an object, right-click on an item from the right pane and select Move.
- To remove an object, right-click on an item in right pane and select Delete
Search
Composed of a left pane and a right pane.
Left pane is meant to define search elements and Right pane to presents the results from the search.
Predefined Search
A predefined search is a more specific and packaged search operation.
Predefined searches may be launched on their own or may require User input.
Prompted search: A prompted search will open a dialog box for users to contribute information to the search, for example a name or a year.
Static search: Launching such a search will provide results shown in the right pane without user interaction.
There are no limitations to the number of predefined searches available to a role.
Self admin
The self administration view is providing Users with the opportunity to edit information about their user account.
This view may be reached directly after the Login sequence or may be selected when logged in as a Role, then right click on own user account and choose Edit (see picture below)
Self Administration window may consist of one or more forms. IM Administrators must design and configure the Self Administration feature according to the sites implementation.
Other
It is possible to sort and filter results from the Search.
IM Customization
GUI Customization
For GUI customization, please read PSD1047
Roles
PhenixID Identity Manager (IM) is an application designed to manage different data sources where objects such as users, groups and computers exists.
The main concern was to make it possible in a flexible manner so that different different types of users can have different administrative roles providing them with the management tools corresponding to their tasks assignment.
An IM Role is most often a group object created in the Directory IM is connected to.
This means that a user can belong to one or more roles when it can because it belongs to the corresponding block in a directory service.
Policies
Policy Manager or Configuration Editor?
The Policy Manager is an IM Control designed to configure IM policies.
It is used and started differently depending on policy loading mode which can be local or directory.
The directory mode depends on whether the Directory Schema has been extended and the storahe location for the policies.
In Directory mode, the schema was extended and IM reads policies from the directory.
In Local mode, the schema was not extended and policies are not stored in the directory but into the file system.
Note: After the schema was extended and policies stored in the Directory, the configuration items under the Tools menu are changed.
Item Configuration is replaced with Active Policies (shows loaded and activated policies) and Reload Policies (Reads and reloads all policies).
Local Mode
Policies are created and managed through the Tools > Configuration menu.
It will start the Policy Manager Editor.
See more information about the Policy Manager Editor under the section Directory Mode below.
Directory Mode
Active Policies can be seen via the Tools > Active Policies
To modify existing policies or set new Policies in Directory Mode, navigate the Directory within the Left IM Configurator pane (Tree View) and select object where to add or modify policies.
Then right click on object and select object properties.
Choose the Policy Manager Tab to start the Policy Manager Editor:
|
Option |
Description |
|
1 Policies |
Shows the available policy nodes categorized under different sections. The policy nodes is constructed from IM Configurator core program and extended by xml files located in the directory “..\..\PhenixID\IM\Configurator\lib”. See Policy descriptor construction for more info. |
|
2 Policy Name |
Shows the name of the Policy. |
|
3 Loaded from |
Shows from where the policy is loaded. |
|
4 Value |
The value field is different depending on different policies. True/False list. Sets the value for the policy Select Value. Select a value from the directory through the browse button or add/delete a manual value. A reset to Default Button is also included. |
|
5 Add Manual Value |
Click to manual add a policy |
|
6 Import/Export |
Import policies from LDAP, Import policies from File, Export policies to File. |
|
7 List View |
Shows loaded and activated policies in a list for the selected object. |
|
8 Show All |
Show all policies in a list sorted by name |
|
9 Show Effective |
Show the effective policy for an object, explicit assigned and inherited. |
Different colors are used when displaying policies:
Blue, indicates that the policy is inherited from another object.
Red, indicates that the policy is set on the selected object.
Green, indicates that the policy was modified but not saved.
Policy Setting Examples
Examples on roles and policies can be find here – link to PSD1097 and PSD1036
Forms
Four different type of Forms (Tabs) can be created with the PhenixID Identity Manager Designer: Create, View/Edit, Predefined Search and Template forms:
- Create forms are used for new object creation.
- View forms are used to edit and/or view objects properties, modify the content of AD attributes.
- Predefined Search forms are used to create and save LDAP queries, for example, a query to find users who did not logged in for the last 90 days.
- Template Forms are used to create Forms including common controls with the same look and feel, for example, background colors, pictures, etc.
- A template form can be selected when creating a new form, all controls and configuration used will come from the Template.
Note: Forms can be built from only one template, so, when more than one template is necessary they will have to be built to provide the same look and feel.
All changes done to a Template will affect all the Forms created using it.
Identity Manager Design tool
This chapter outlines the general functions of the tool used to create Forms.
Two “step by step” descriptions of a Form creation process can be found in this chapter to explain the concept of Form creation with IM:
- Making a Create Object Form
- Making a View Form
To start the Design tool select Tools > Tab Designer or press Icon from the toolbar.
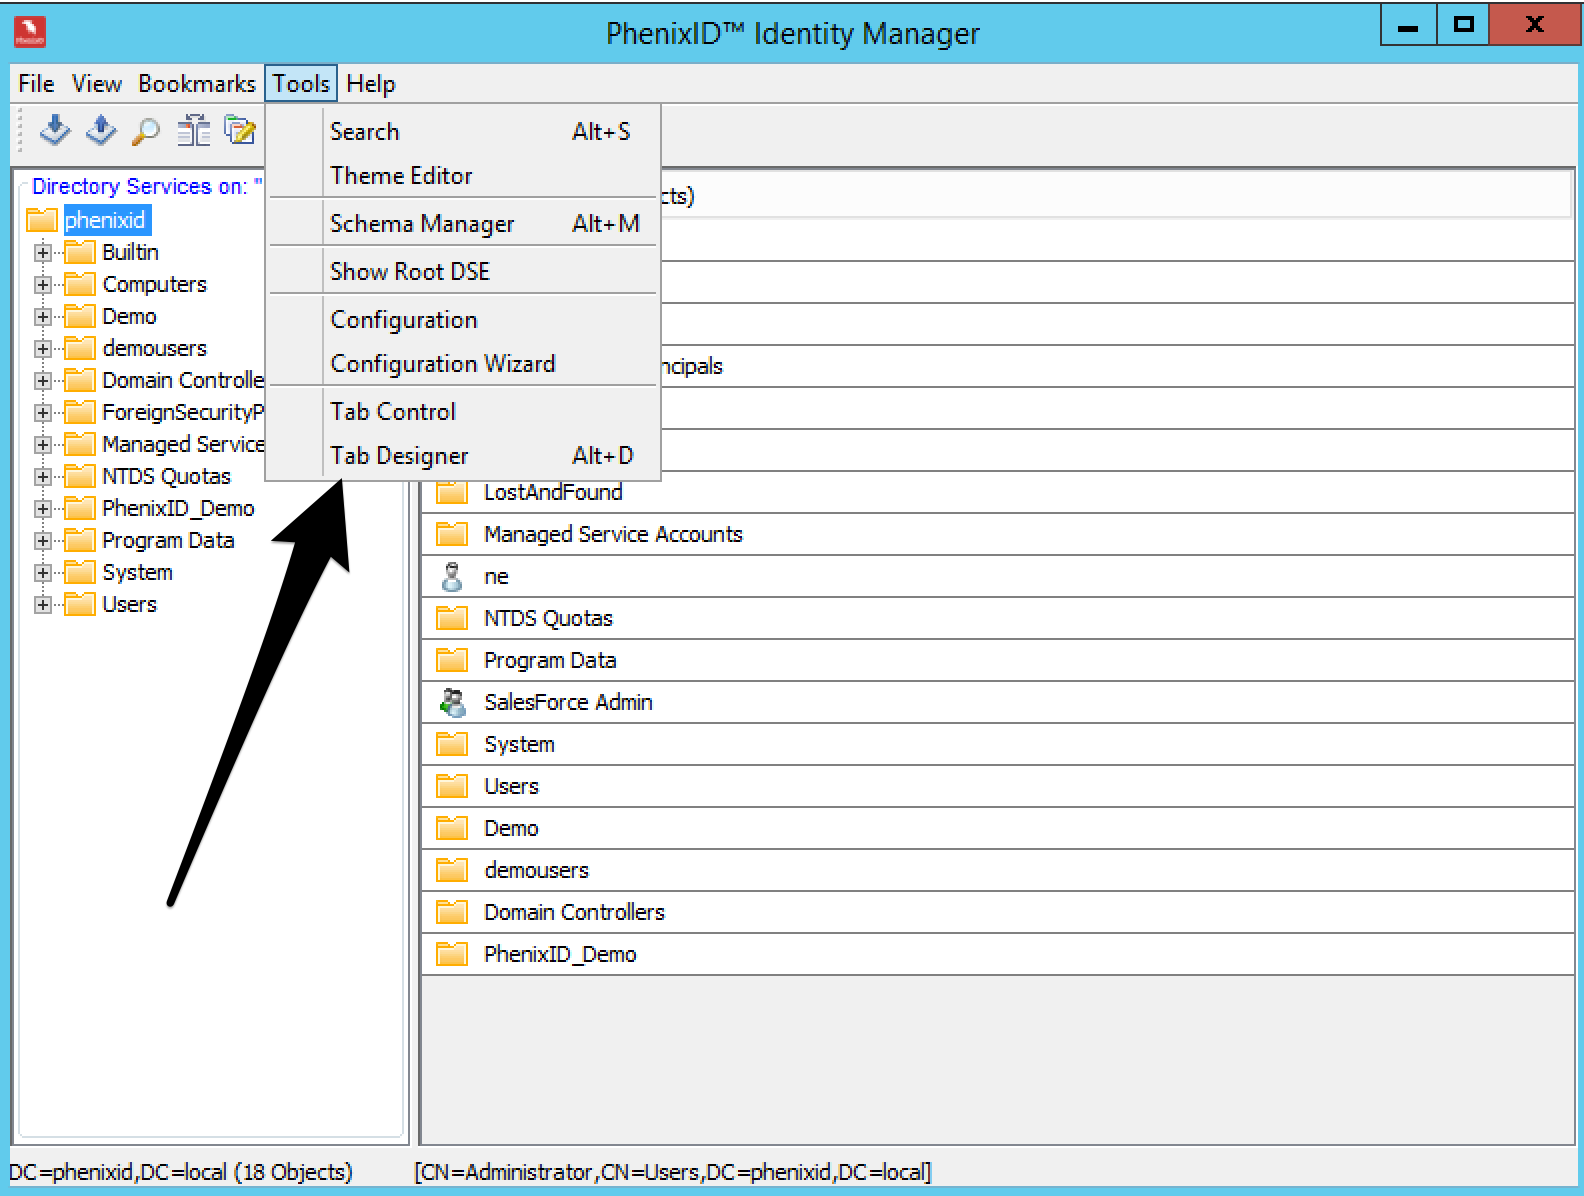
New Tab Window:
The menu bar consists of four options; File, Design, Tools and Help all explained in following sections.
The Design Tool is also showing Icons representing ready to use attributes controls.
These controls can be selected and dragged into the framework of a form.
File menu
From the file menu a specific form can be created.

Select File > New View Tab. The following window will appear.

Add 4.6 options to following
|
Option |
Description |
|
Display Name |
The name that will be displayed for this form. Doesn’t have to be unique |
|
Unique Name |
The title of this Form. Must be unique name among all Forms. |
|
Object Class |
The object class for which this form will be used. |
|
Restriction Filter |
A search filter (standard LDAP search, Java class filter or DN) that will be checked on the object. If this search is successful, the form will be displayed. The option MyDN” or! MyDN can be used in a filter. MyDN – Display the form when users open their own object. !MyDN – Display the form when users open any object but their own. Leave empty if no search filter will be used. |
|
Help text |
The help text for this Form. It will be displayed whenever the user points his cursor over any non-attribute area. |
|
Background Color |
The background color of this Form. |
|
Display Order |
The Display order for this Form (1-1000). Use a low number to place the form in the beginning of a row (to the left) |
|
Tab Template |
Select a form to be used as a template. All controls defined in the template form will be used by this form. A good strategy is to define common things like background colors; pictures etc. to get a common look and feel for all forms that are created. Controls that use the same attribute name are not used from the template form. |
|
|
Supported client types |
|
Configurator |
Check this box if this form should be available for Configurator (Swing) clients. |
|
Web Browser |
Check this box if this form should be available for Web Browser (HTML) clients. |
|
Web Services |
Check this box if this form should be available for Web Services clients. |
|
Display when Multiple Edit |
If this form should be displayed when multiple objects has been selected for editing. |
|
Display Only in Multiple Edit. |
If this form only should be displayed when editing multiple objects. |
|
|
Show Advanced |
|
Creator |
Name of the creator of the Form. |
|
Version |
The version number of this Form. A form could automatically be updated over the web. See Update URL. The version number is controlled and if a newer exists an update could be performed. |
|
Update URL |
A form can be updated over the web. Define the reference URL where to find an updated version of this Form. This lets administrators in a controlled way distribute and update Forms. |
|
Online Help URL |
URL to online documentation. |
|
Signing or Verification |
This for requires signing or verification. A form can be signed or verified with a certificate. |
New Create Form – General properties
Select File > New Create Tab.
The following window will appear.
|
Options |
Description |
|
Display Name |
The name that will be displayed for this form. Doesn’t need to be unique |
|
Unique Name |
The title of this Form. This has to be a unique name among all Forms. |
|
Background Color |
The background color of this Form. |
|
Display Order |
The Display order for this Form (1-1000). Use a low number to place the form in the beginning of a row (to the left) |
|
Object Classes |
The Object Classes for this object, separated by commas. |
|
Containment Classes |
The object classes under which this object can be created. For example Organization, Organizational Unit |
|
Restriction Filter |
A search filter (standard LDAP search, Java class filter or DN) that will be checked on the container object. If this search is successful, the form will be displayed |
|
Tab Template |
Select a form to be used as a template. All controls defined in the template form will be used by this form. A good strategy is to define common things like background colors; pictures etc. to get a common look and feel for all forms that are created. Controls that use the same attribute name are not used from the template form. |
|
Configurator |
Check this box if this form should be available for Configurator (Swing) clients. |
|
Web Browser |
Check this box if this form should be available for Web Browser (HTML) clients. |
|
Web Services |
Check this box if this form should be available for Web Services clients. |
|
Enable for Virtual View |
Enables the Form to be displayed in Virtual View. Most common used when an administrator is only allowed to use the “Predefined Search View” in Identity Manager. |
|
Auto fill |
Auto populates the form with one or more attributes from the object class specified. |
|
|
Show Advanced |
|
Creator |
Name of the creator of the Form. |
|
Version |
The version number of this Form. A form could automatically be updated over the web. See Update URL. The version number is controlled and if a newer exists an update could be performed. |
|
Update URL |
A form can be updated over the web. Define the reference URL where to find an updated version of this Form. This lets administrators in a controlled way distribute and update Forms. |
|
Online Help URL |
URL to online documentation. |
|
Signing or Verification |
This for requires signing or verification. A form can be signed or verified with a certificate. |
To load and modifying an existing Form
There are several options to load an existing form:
- Load tab from file, browse to and open a form from the file system
- Load tab from LDAP, browse to a form saved in the LDAP directory.
It is also possible to load a form directly into the design tool from the LDAP directory by right clicking the LDAP object and select Edit Tab.
- Load tab from URL
Select Form from Tools > Tab control, select a form already loaded in the current Identity Manager session.
Tab Control will show a list of all Forms currently loaded and provide detailed information about them. From there they can be highlighted and then, unloaded, re-loaded, modified and saved.
Select File > Select from Tab Control to select an already loaded form to modify it.
The following window appears.
It shows the Title, Version, Object class and type of form.
Signing forms with electronic signatures
To enhance overall security a form can be signed by the creator of the form. Signing a form enables the creator (IM Administrator) to ensure the integrity of the form. If a signed form has been tampered with, it will simply stop functioning.
There are two policies to enable this higher level of protection.
First, the policy CAN_LOAD_UNSIGNED_TAB set to false will disable Users’ ability to load a form that is not electronically signed.
Second, the policy CERTIFICATE_TRUSTED_STORE_CONTAINER will check and compare certificates used to sign forms with those stored in the Directory Service.
Only trusted forms, i.e. signed with trusted certificates, will be able to load.
The flow chart below illustrates the process.
Design Menu
Designing a form includes placing different attribute controls in a form.
To place a control in a form is easy, this is done by dragging-and-dropping a control into the form’s framework.
To simplify the placement of several controls next to each other, the PhenixID Identity Manager comes with an auto adjustment functionality which will automatically adjust the position (vertically and/or horizontally) of a control close to the position of previously configured controls.
The Form designer can choose to auto adjust to the nearest 5 or 10 pixels from previous controls.
It is possible to turn off auto adjustment.
Tools Menu
Select:
- Tab Properties, to change Form properties.
- Tab Description, to edit a Form description.
- Refresh, to refresh a Form with modifications.
- Control External filter overview, to display all external filters applied to a Form.
- Tab External filters, to configure global external filters for a Form.
- Edit Control
- Delete Control
Control Icons.
|
Icon |
Control |
Description |
|
Text Field |
A text field is used to enter information by a user or to display information entered by a user. |
|
|
Text Area |
Inserts a text area that can be filled with information. A scroll bar will be displayed if the amount of information exceeds the size of the area. |
|
|
* |
Photo Attribute |
Inserts a frame to which the user can load a photo or image file. |
|
* |
Frame |
Inserts a frame to graphically divide one or many controls from other controls. |
|
* |
Combo Box |
A drop-down list box with two or more values. Only one value can be selected. |
|
* |
Password Field |
Inserts a Text Field with specific options only to be used as password input field. |
|
* |
Check Box |
Give the user a choice between two values such as Yes/No, True/False, or On/Off. |
|
* |
Radio Buttons |
With Radio Buttons a single item in a group can be selected. When one value is selected the others are disabled. |
|
* |
Multi List |
Displays a list of values and lets the user select one or more. |
|
* |
Static String |
Insert a string with static information, i.e. the information will be displayed but not editable in the form. |
|
* |
X.509 v3 Certificate Handler |
Create X.509 v3 Certificate Handler |
|
* |
Certificate Revocation List Handler |
Create Certificate Revocation List Handler |
|
* |
URL Object |
Create URL object |
|
* |
Auxiliary Class Handler |
Create Auxiliary Class Handler |
|
* |
Static Image |
Insert an image file or graphic. |
|
* |
Binary Object |
Create Binary Object |
|
* |
Policy Control |
Inserts a control that is needed in order to be able to create a list of policies inside a tab. |
|
* |
Distinguished Name |
Create Distinguished Name |
|
* |
Custom Control |
Create Custom Control |
Attribute Properties Window
Regardless of the type of attribute control, the Attribute Properties window will appear when a control is selected and dragged to the design area.
It will as follows:
|
Option |
Description |
|
|
Attribute Properties – General |
|
Attribute name |
The LDAP attribute name to associate this control with or the word “NONE” (without quotes) to associate the control to a non LDAP attribute (to be used as a variable) |
|
Title |
The leading title for the control. For no title, leave blank. |
|
Help text |
The help text that will popup when the user is moving the mouse cursor above the control |
|
Control |
The type of control. |
|
Syntax |
The syntax (String, String list or binary) Not used for all controls. |
|
|
Attribute Properties – Placement |
|
X-position |
The horizontal coordinate for this control |
|
Y-position |
The vertical coordinate for this control |
|
Width |
The width for this control. The value: -1 means auto width |
|
Height |
The height for this control. The value: -1 means auto height |
|
|
Attribute Properties – Colors |
|
Text Color or Background color |
There are four ways to select the Text Color or Background Color. 1. By entering RGB (Red, Blue and Green) values separated by commas, directly into the blank field in the Attribute Properties window; see screen shot below. 2. With a color palette, click the button to the right of the Text Color or Background Color field. 3. Click on the HSB tab in the color palette and enter the HSB values. Click on the RGB tab in the color palette and enter the RGB (Red, Blue and Green) values |
|
|
Attribute Properties – Parameters |
|
Editable |
If this attribute should be editable. |
|
Variable |
If this attribute is a variable and that the value should not be read from the directory. |
|
Mandatory |
If this attribute should be mandatory. |
|
Locked |
If this control could be resized or moved with the mouse cursor. Only applicable in the design tool. |
|
Hidden |
If this attribute should be hidden or visible. |
|
Display Only |
Do not save the value of this attribute even if the value has been edited and changed. Good for variables that you want to protect from being changed by mistake. |
|
Focus Order |
Set the focus order for this control. |
|
|
Attribute Properties – Options |
|
External filters |
All controls can be configured with External Filters. A number of controls also have some additional Options for Attributes. For such controls an extra button (with letters in red) is displayed in the Attribute Properties Window. |
|
Default Value |
Default value for this attribute |
Designing a Create form – Introduction
This section is an introduction to the concept of designing forms.
The following examples are meant to demonstrate how to design Template Forms and Create Forms.
built from them to get a consistent look and feel through the IM Web Portal.
For an advanced Create object Form with associated Filters there is a PhenixID Solution document available at:
PSD1082 – Compose and generate directory user ID’s with Identity Manager
Simple Create Template Form
The following default PhenixID Template will be used to design an object creation Template, as a result all Create Forms made from this Template will have a common PhenixID look and feel, same background color and a PhenixID logotype.
Template form – Step by step
From the IM Configurator, click Tools > Tab Designer or its corresponding Icon from the toolbar.
Then select File > New Template Tab.
Enter Tab Properties as follows, in this example the default white background color is set.
The next step is to add attribute controls corresponding to the type of Forms this Template will be used as the source. Icons in the tool bar represents attribute controls that can be placed in a Form via simple Drag-and-Drop technique.
Two attribute controls will be added to this Form, a Static String and a Static Image.
To add these controls, click on their Icons from the tool bar and drag them down into the Form’s framework.
Regardless of the type of control, an Attribute Property window will come up.
Static String attribute control
Title – Enter “<html><b>This is a Template provided by PhenixID</b></html>”.
Basic HTML is used to define the layout of the text displayed when using this control as seen in the Title field.
The property window should be configured as shown in following picture:
Click Apply when finished.
To add a Static Image control, click on the Static Image Icon from the tool bar and drag it down into to the Form’s framework.
Select Options for Static Image to select an image.
Configure placement values according to corporate standards.
Check the box Display Only to not save the value of this attribute regardless if it has been edited.
Image folder for the Web Edition is ..\customer\extension\web
When design and configuration have been completed save the Template form into the corresponding Active Directory Container.
Note: Standard naming convention for Template Forms is to include Template in their names.
Design a Create Form – Step by step
In the following example Directory Administrators would like a Form to create a new type of user accounts in the directory service.
These Users are external Consultants and their user objects will contain basic information about them, the Template Form will be named Consultants.
All Consultant user objects will be created under a container named Other Users already existing in the directory service.
The Form should be loaded and ready to use when Directory Administrators are highlighting the container and then right click on it.
A menu should then unfold where, among other forms, the Consultant form would be found as follows:
The Form example below will be used by Directory Administrator to create new consultants in the OU “Other accounts”.
The process of creating this form, saving it and have it accessible from a certain container is described in the following sections.
Creating the form
When Identity Manager is installed several Forms are included.
In this example existing Form from C:\Program Files\PhenixID\IM\Configurator\1-xml\Active Directory will be used as a Template for this new Form.
In the design tool choose File-Load tab from file and browse to the file named “CreateUser.xml”.
When the form is loaded choose Tools. Tab Properties
The Containment Classes is set to “organization” and “Organizational Unit”.
This is to enable the administrator to create new employee objects from such object classes. A restriction filter is set to “[DN]OU=Other Accounts,DC=PhenixID,DC=local”. The form will now only be visible from that container object.
We have selected the template “NordicEdge template” to provide the look and feel and common controls. Enabled the right to create the employee objects in the container ou=Users,o=PhenixID under the section “Enabled DN:s.
Adding controls
In this example a number of controls are placed in the form.
To this form we will add two more controls that will allow the administrator to select a person as manager for this consultant and a description. We will remove the statement about LDAPS communication. In real life this form should include more attributes as; mobile, mail etc.
Field – Manager
This is a Custom Control provided by PhenixID to search for a user object and set the person in the selected attribute.
To add a custom control to the form choose the right most icon and drag it on to the canvas.
In the control properties window add Manager to the “Attribute name”. Click Options for Custom Control and set at least the following parameters:
Search BaseDN, set the search base for searching persons.
Optional Search Filter, only search for user objects
Display Attribute(s), the filter “cn+” “+displayname” will result in showing the userid and displayname of the selected user e.g. jcarlsson Jim Carlsson.
Field – Description
Select a Text field control and drag it out on the canvas. In the control properties window add description to the “Attribute name”.
Remove – Static string
Right click on the text string “Creation of user account……..” and select delete to remove the static string. Save the form (File-Save as).
End result in Identity Manager Web
Login in Identity Manager and select a role that has a policy that allows the created form to be used. Browse to your selected container, right click on the container and select “New-Consultant”.
Notice that this form will only be visible on the container “Other accounts”. This is the result of the restriction filter set on the create form!
How to design an Identity Manager form with two or more connected Comboboxe’s
The scenario is that we design an IM form with two or more Comboboxe’s to select some data from. A common requirement is that when this selection is done in one list (the source) that will affect the contents of another Combo box (the target). One typical use case is that the source dropdown list is prepopulated with the continents of the world and when one continent is selected the target dropdown list is populated with the countries of that continent.
Search Manager & Predefined Search
Overview
The Search Manager is providing LDAP Search features to help search objects in a directory service.
The Search Manager is following the LDAP Search standard from RFC 2254.
Since not everybody is familiar with LDAP search syntaxes, the PhenixID Identity Manager is providing a useful and unique feature with the Predefined Search functionality.
LDAP Search commands may be saved (predefined) for future use and assigned as a permanent option to Users.
Search Manager
From the Configurator client the Directory Tree is browsed to select a container as a search base from where LDAP Search queries will be executed.
To start the Search Manager.
- Right click the container object in the First pane and select the menu Search.
- Use the keyboard and enter <Alt>+S
- Select Tools->Search from the menu bar or click Search Icon from the toolbar
Standard Search Tab
This Tab provides an LDAP search interface following RFC-2254.
|
Option |
Description |
|
Search Base |
The base from where the search will start. |
|
Scope |
The scope of the search SUB: Search from the Search Base and everything below ONE: Search only the Search Base branch BASE: Search only the Search Base object itself |
|
Max Result |
The maximum number of items a search result can return |
|
Filter |
Standard LDAP search filters according to RFC-2254. Write an LDAP search command line, insert an Attribute, an Object class or re-use a Search filter performed earlier: Click the button The interface will provide some help when creating complex LDAP queries by highlighting missing parenthesis: |
|
Display Attributes |
Type what attributes that should be displayed from the objects that matched the LDAP search. To insert Attribute or an earlier saved Display attributes history click the button. Each desired attribute should be separated by a comma. To translate an LDAP attribute to a more user-friendly description it is possible to use the | character. In the example below the attribute givenName will be translated to First name and sn to Last name. givenName|Firstname,sn|Lastname |
|
Search |
Start the search with the defined filter. |
|
Save as Predefined Search |
Saves this search as a predefined search. Read more in section Predefined Search |
|
Search Result |
Shows the result of the search with selected attributes displayed. |
|
Export |
The search result can be exported to Microsoft Excel or Adobe Acrobat PDF format. |
Search Wizard Tab
The wizard Tab is meant to help construct an LDAP query from predefined object types and attributes.
Other LDAP Tab
When the Configurator client has been used previously to login into other LDAP directories then it is possible to perform LDAP queries without logging in again.
Junctions Tab
When Junction policies have been implemented then it is possible to perform LDAP queries into remote LDAP Directories without login into them.
Predefined Tab
This Tab is showing predefined searches available to current User session, predefined searches can be read from files or policies.
Predefined Search
To create a Predefined Search, a Standard Search filter (RFC 2254) must be defined in the Filter field.
Example 1 – A Predefined Search without User Prompt
Search query is created to search for all objects with attribute “sn”.
The filter is: sn=*
Clicking on the “Save as Predefined Search” will start the Search Designer where Predefined Search Properties can be configured.
|
Option |
Description |
|
Display Name |
Enter a name that describes this predefined search. For example “Search User by Last Name”. |
|
Unique Name |
This has to be a unique name among all Forms |
|
Help text |
This text will be shown when mouse cursor is placed on the predefined search |
|
Background Color |
The background color of this Form. |
|
Optional Search filter |
The search filter copied from the Search Manager. Modify search filter if needed. |
|
Search Base |
The search base copied from the Search Manager, change if needed. Use the browse button to select another Search Base. |
|
Scope |
The scope of the search SUB: Search from the Search Base and everything below ONE: Search only the Search Base branch BASE: Search only the Search Base object itself |
|
Max Result |
The maximum number a search result can return. Set to 0 for no limit. |
|
Display Attributes |
The Display Attributes copied from the Search Manager To translate an LDAP attribute to a more user-friendly description it is possible to use the | character. In the example above the attribute sn will be translated to Last name and givenName to First name and mail to Mail. givenName|Firstname,sn|Lastname,mail|Mail |
|
Form Size |
Size on the search pane displayed when using prompted searches |
|
Category |
Optional. Places this predefined search in a category together with other similar predefined searches. In this example “Users”. These categories will later on show up as a directory when using Predefined Searches as a First pane layout.
|
|
Form Template |
Select a Form to be used as template. |
|
Supported Client Types |
Set checkbox for each client that this Predefined search should be visible |
|
Advanced options |
Click “Show Advanced” button. |
|
Creator |
Information gathered from license file default. |
|
Version |
Version number. |
|
Update URL |
A reference url to find an updated version of the form. |
|
Online Help URL |
URL to the online documentation |
|
Custom CSS URL |
Enter the custom CSS resource. This will override the “css/PhenixIDIM-Tab.css file. |
|
Theme String Match |
The string to match a Theme entry for a specific icon. |
|
Category |
Select the category where this form should be visible or create new category. |
|
Run On Launch |
If checked this Predefined Search will be executed when using the web client. |
Save Predefined Search
Select File > Save as
Choose to save to a File or into an LDAP Object.
When saving to an LDAP object, browse the directory to choose an OU.
Predefined Search default name will be the title used when creating it.
Assigning Predefined Search to Users
Set policy PREDEFINED_SEARCH.AUTO_LOAD_LDAP_DN directly to predefined search or its parent container.
See section below “Using Predefined Searches”.
Example 2 – A Predefined Search with User Prompt
Search query is created to search for user objects via their CN (Common Name) attribute.
This predefined search will request additional information.
IM Web Edition operators will therefore be prompted for this information before performing the Search.
The search starts from base OU=InternalUsers,DC=PhenixID,DC=se, where objects have Active Directory objectcategory=person (objectclass=inetorgperson for other LDAP directories like eDirectory, Open LDAP) and there is a value in the “cn” attribute.
Click Save as Predefined Search and it will launch the Search Designer.
Review predefined search form properties and click apply.
In this example three different controls are used to search for a specific user:
Search by First name (LDAP attribute givenName)
Search by Last name (LDAP attribute sn)
Search by UserID (LDAP attribute sAMAccountName, for other LDAP directories use CN).
This will open the attribute Control Properties window.
Write attribute name and Title.
Select Searchtype and then click Apply.
|
Option |
Description |
|
Search Type |
Define the search type that will be performed. Equals: Attribute must match the value. Starts with: Attributes starts with the value Ends with: Attributes ends with the value Contains: Attributes contains the value. |
Repeat procedure for each attribute that operators could use when prompted for additional information.
The resulting Form should look like above.
Save the predefined search.
Using Predefined Searches
Predefined searches can be used with both the IM WEB and Configurator versions.
They usually are available from the First pane layout.
In this scenario, a virtual view of the directory services can be displayed.
Instead of using the standard x.500 structure, a user-friendly structure can be offered.
Using Predefined Searches as a First Pane layout.
For most IM Roles the Predefined search Tab is available from the First pane as shown below:
Under the root directory (Virtual View) all searches are listed. Some of them are placed in the categories.
The category was created earlier by entering the name in the Category text field when saving a Predefined Search.
See the section “Saving a Predefined Search” above.
A Predefined search with a symbol, indicates that this particular search will prompt the user for additional information.
Using Predefined Searches from the Search Manager
Select Tools > Search or click Icon from the toolbar.
The following window will appear.
Select Predefined Tab, a drop-down list is available from which all predefined searches can be selected.
Filters
Examples of control filter, trim
To write a control filter see Developer Guide
The external filters are a powerful function to format the values for controls. External filters can for example be used for the following tasks:
- Verification of user input values
- Formatting of user input values
- Gathering of data from different sources like ODBC, JDBC, other LDAP directory service etc,
- Update data to other databases like ODBC, JDBC, other LDAP directory service etc,
- Notification by email (SMTP)
Click on the button External filter. The picture below shows an example where we have selected a Key trigger type.

|
Option |
Description |
|
Trigger Types |
A control where you can choose trigger types and filters to assign to the triggers. See Trigger Types below. Copy from Copy a filter configuration from another trigger type. Delete Remove the selected filter. |
|
Java Class |
The Java class that contains the code. Click on the button To browse for filter classes that are bundled from PhenixID. IN the example picture above the “filter.Nordicedge” represents a folder in the file system. By selecting a class the method list will be updated. |
|
Methods |
The methods that belongs to a selected class. |
|
JavaScript |
A JavaScript to be run for the web based version. Enter one of the built-in JavaScript’s or an URL to an external JavaScript resource. |
|
Function |
Enter the function name in the JavaScript file if you use an external JavaScript. |
|
Description |
Description of the class. |
|
Parameters |
Shows the parameters that are used by the Java Class and Method. The Add and Actions controls are used to customize the parameters. |
|
Add |
Add Variable, Attribute, and Static String or add a parameter manual. |
|
Actions |
Edit, Delete and move up or down the parameters in the list. |
|
Parameters |
If the Java Class and Method requires any parameters |
Trigger Types
The external filter can trigger on different events for each control. The events (also called trigger types) are as follows.
|
Value |
Description |
|
Init |
This event occurs when the form is being opened. |
|
Pre |
The event occurs just before the user is moving into a specific control (by clicking on it with the mouse or using the Tab Key). This event runs at the client, so for web based clients the filter must be in javascript. |
|
Key |
This event occurs whenever the user is typing or editing something in the control. This event runs at the client, so for web based clients the filter must be in javascript. |
|
Post |
This event occurs when the user leaves the control. This event runs at the client, so for web based clients the filter must be in javascript. |
|
PreSave |
This event occurs just before the user saves the values in the form. |
|
PostSave |
This event occurs if saving the values in the form was successful. |
Note: The trigger type Init, PostSave and PreSave is general and will use the same filter in all clients, while the Pre, Key and Post filter will be specific for each client type.
The Configurator client will use standard JAVA classes, while web based client will use JAVA script.
Also note that the JAVA script field will not be available when the trigger is set to Init, PostSave and PreSave.
Trigger Types – Examples
Each control can have different external filters for each event (trigger type).
- When the user open a form a Text Field control with the trigger type Init an SQL request can be made based on information of the selected object and populate the value of the Text Field control.
- When the user enters the Text Field control a check can be performed with the trigger type Pre to verify that the information is correct before the user starts to edit the value or to populate the Text Field with data gathered from other controls
- When the user starts to edit the value of the Text Field control every character the user enters can be checked or verified by the trigger type Key
- When the user is done editing and leaves the Text Field control the trigger type Post can verify that the information has been entered correctly.
- When the user saves the changes – before the actual values will be saved to the LDAP directory service – an update to an SQL based database can be performed with the trigger type PreSave
- If saving was successful, the trigger type PostSave can notify someone through email (SMTP) that a change or a creation has occurred.
- Available standard external filters
- Included in the product is a defined set of standard external filters. To read which filters that are included go to this URL
Tab external filters
Identity Manager Developer Guide
Custom Controls
Overview
When adding different controls to a form, sometimes what you would like do is not covered with the controls that come in Tab Designer.
Some controls need to be able to handle more complex logic; these controls are called a custom control. For example, if you like to be able to update a user password the control must be able to apply the company’s password policy.
Technically speaking you could simply add a Textfield control to your form and connected it to the password attribute in the directory (in Active Directory that would be unicodePwd attribute).
The custom controls can sometimes also include graphical components.
This chapter will not teach how to develop a custom control. This chapter handles the administration around custom controls, adding, change properties etc.
In this chapter the Dateselector custom control will be used as an example.
Add a Custom Control with the Tab Designer.
To add a custom control to a form you will need to open the Tab designer in the Identity Manager Configurator client.
1. Open the Tab Designer. Open an existing or create a new form where you will add the custom control. In my example a have a view form with three text field controls and one frame control.
2. Add a Custom Control to the form. Drag it and release it where you like in the frame.

When releasing the mouse-button screen similar to following should be seen:

3. In the Attribute name: field, add the attribute that the custom control should update. (in my example we are using the DateSelector control and the directory is Active Directory so my attribute will be the accountExpires)
Then click the Options for Custom Control button.

4. Below is describe the different parts in the Custom Control Options dialog box

a. The name and path of the Custom Control. In this example DateSelector.
b. IM ships with some out-of-the-box controls. Click View Bundled.
c. If a developer have created a custom control for you and you have saved the control correctly in the file system, add the Class Name file and then click Query Custom Control class.
d. Every Custom Control could have a number of parameters for you to edit. In the Date selector case you have seven different parameters to work with.
When done, click OK to close the Custom Control Options dialog box.
Click OK to close the Control Properties: dialog box.
This is how the DateSelector control looks like. If you added another control it might look different.

To write specific custom controls see dev doc
How to use MultiDB view in Identity Manager
Multi DB functionality in Identity Manager can be used to view data on an object from multiple data sources. If a user exists in multiple directories, selected user data can be presented.
The information is retrieved in real-time from each data source and presented in a form. This is very often used with customers that have multiple LDAP directories and metadirectories.
Read more here: PSD1085 – How to use MultiDB view in Identity Manager
Compose and generate unique user ID’s
This tabExternalfilter generates user names in purpose to create unique user accounts. The filter gives you the opportunity to build user names from a given number of characters from the given name, the last name and middle name, add a given prefix, add a given suffix or a digit etc.
After the filter has finished and the account is created you may want to send an email to the end user (or elsewhere) with information about the new account.
Read more here: PSD1082 – Compose and generate unique user ID’s with Identity Manager
How to setup and configure a junction
Identity Manager has the ability to create a link in one Directory Service to include information from Multiple Directories. This function is called Junction.
With junctions a user can login to Active Directory, as the primary directory in Identity Manager, but be able to see and handle object information from other directories i.e. Microsoft ADAM, Novell eDirectory.
The Junction object contains information on how to connect to other directories and witch parameters to apply and how the information will be displayed. The junction information is saved in the directory in XML format.
Read more here: LINKTOCOME – How to setup and configure a junction
IM Maintenance
START / STOP
IMPORT / EXPORT
In many projects we are working in a test environment when we are building components for a successful PhenixID Identity Manager implementation.
This section focus on how to export a full or part of the configuration from the test environment, and to do an import to the production environment.
The elements that can be exported/imported are:
- Forms (Tabs)
- Policies
- Predefined Searches
- Themes
How to export:
Start Identity Manager Configurator version and login to the directory. In the “Tools” menu select “Tab Control”.
When the “Tab Selector” is opened select “Load Tab” and select from “File”.
Browse to the folder “Generic”
Select “NEIMMigrate.xml and open the file. The form is now loaded into the session. Close the “Tab Selector”.
In Identity Manager select from which organizational unit the export should be performed. In this scenario the top container “phenixid” is selected.
Double click the selected container and select the form “IM Migrate/Export/Import”.
Select where to save the export file and the export options. When the export starts a full search will be executed from the selected container and all selected options will then be saved to the file. If policies have been applied to groups the group names and organizational unit structure will be preserved. For groups the description is exported as well.
A success message will be displayed after the export is completed.
This function is excellent to save snapshots under implementation project.
How to import:
Make sure that the “NEIMMigrate.xml” form is loaded (see instructions above).
Select and open the properties on the container from where the import should be performed. Select the “Import” action and select the file that contains the data.
Click the “Load File” button to read the data into the session.
If the naming context differs between the directories it is possible to adjust the settings before starting the import.
In the example above the domain components “DC=phenixid,DC=local” is replaced with the production environment string “DC=phenixid,DC=com”.
If the import contains groups the organizational unit structure and groups will be created during the import process. After the creation the policies will be applied to the groups.
A final confirmation box is shown before the data is imported. If an object already exist the administrator have to decide if the object should be overwritten with the new data.
A summary is displayed at the end of the import.
IM Backup & Restore
IM saves information in two places, on the server where Apache Tomcat is installed and in the directory in which
IM stores configuration data and forms. (There are also scenarios where the IM saves everything locally on the server where Apache Tomcat is installed).
Backup of data where Apache Tomcat is installed is a file based backup. Make sure to backup drive:\Program Files\phenixid.
Backup of the data stored in the directory accompanying the backup taken by the customer for its directory.
Monitoring of IM
Apache Tomcat is the application that ensures that the web application \phenixid function. This service can be monitored. The name of the service is in most cases Apache Tomcat
ldapServerStatus.jsp
With IM comes a JSP page you can access to ensure that the servers that “host” the directory (e.g. Domain Controllers in AD) that IM is working against respond.
Open a browser and type http://IM_Server_Name/im/jsp/ldapServerStatus.jsp
If the directory servers respond it may look like the line below:
————————————————————————————————————–
Status on 127.0.0.1:636 Connection success! Identity Manager Web application and LDAP server responding correctly!
————————————————————————————————————–
NSD1093 Monitor Identity Manager Web application
Log files
IM comes with various log files that can be read to get an understanding of how IM is working. These log files are located in the folder:
Logs for Identity Manager application:
drive:\Program Files\PhenixID\IM\customer\log
Logs for Apache Tomcat application:
drive:\Program Files\PhenixID\IM\server\logs
IM Updates
Since Identity Manager was released there been some enhancements and new features added.
Please read the following document for more information:
IM Application examples
For examples of what you can do with Identity Manager, check out Active Directory Edition.
More IM Related Information
IM related articles and troubleshooting documents can be found on our support site.
Please visit http://www.phenixid.se/support