Summary
This Step by Step Guide covers how to configure PhenixID Identity Manager (IM) to act as an SAML Service Provider (SP).
This setup is used in scenarios where the IM users should be authenticated using an external SAML Identity Provider (IdP).
System Requirements
- PhenixID Identity Manager 5.4.0 or later
- SAML Identity Provider (IdP) metadata
Configure IM as a SAML SP
Fetch and save SAML IdP metadata
First you need to get IdP metadata from the SAML IdP.
Either receive it in a file from the SAML IdP or download it from the IdP.
Contact your IdP administrator for guidance.
The IdP metadata file contains information for the SP (in this case IM) how to access the IdP.
The IdP metadata xml-file needs to be located so IM can access it.
In this example the drive:\..\PhenixID\IM\customer\config folder will be used.
IMPORTANT. The IDP must sign the whole response and not just the assertion.
Example: To use Google as IDP, you MUST check the Signed Response box when configuring your SAML SP App in Google Admin.
Download and save the autopost.template
The autopost.template file is used by IM to redirect the user to the IdP.
The autopost.template needs to be located so IM can access it. In this example the drive:\..\PhenixID\IM\customer\config folder will be used.
The file will be referenced in next step.
The autopost.template can be downloaded here.
Configure the SAML SP
Open DSEditor.properties (drive:\..\PhenixID\IM\customer\config) and configure with the following parameters. Add the configuration at the bottom of the file for example. (this scenario assume that IM is installed on Windows and in c:\Program Files\PhenixID\IM\customer\config. If on Linux or other file path then change accordingly)
#------ SAML CONFIGURATION START ------ #
#
## This policy will activate the SAML authentication method
SERVLET_AUTHENTICATION_FILTER=se.nordicedge.auth.SAMLAuth
#
## This policy will point to the IdP metadata
IDP_META_FILE_LOCATION=C:\\Program Files\\PhenixID\\IM/customer/config/idpMeta.xml
#
## This policy will point to the template used when redirecting the end user to the IdP
SAML_AUTOPOST_TEMPLATE_LOCATION=C:\\Program Files\\PhenixID\\IM/customer/config/autopost.template
#
## The SAML SP entityID
SP_ENTITY=IMSP
#
## The SAML SP Assertion consumer URL
## Change https://im.company.org to the URL of your IM server
## Make sure /NEIDMgmt is added at the end!
ACS_URL=https://im.company.org/im/NEIDMgmt
#
# If a time skew should be supported and if so how many minutes skew to accept. Add minutes as value, for example 5 for 5 minutes. Default value is 0.
#SAML_SP_CLOCK_SKEW=
#
## The SAML logoff URL. Change this to map your environment
LOGOFFURI=https://idp.company.org/saml/authenticate/logout/?nextTarget=https://im.company.org/im
#
#------ SAML CONFIGURATION END ------ #
Restart PhenixID Identity Manager service to activate the configuration.
Create a SAML SP metadata-file for the IdP
Next step is to create a metadata file for your IM SP to give to the IdP administrator.
Create a SP metadata file, see below, including your SP metadata and modify it according your needs.
This file will be used by the Identity Provider to locate the you as a Service Provider.
Change the entityID to match your environment. (in the DSEditor.properties example above the entityID value is IMSP (found in parameter SP_ENTITY).
Change https://identitymanager.company.org/im/NEIDMgmt to the URL of your IM installation.
See example below.
<EntityDescriptor entityID="IMSP" xmlns="urn:oasis:names:tc:SAML:2.0:metadata">
    <SPSSODescriptor protocolSupportEnumeration="urn:oasis:names:tc:SAML:2.0:protocol">
        <NameIDFormat>urn:oasis:names:tc:SAML:1.1:nameid-format:unspecified</NameIDFormat>
        <AssertionConsumerService index="1" Binding="urn:oasis:names:tc:SAML:2.0:bindings:HTTP-POST"
            Location="https://identitymanager.company.org/im/NEIDMgmt" />
    </SPSSODescriptor>
</EntityDescriptor>
Save the file as spMeta.xml and give to the SAML IdP administrator.
Configure the SAML IdP
Configure the SAML IdP with the previously created metadata. Use the file spMeta.xml.
Note. The Subject NameID must contain the login attribute value configured in Identity Manager.
Test IM as a SP
- Browse to https://<im_server_domain>:<im_port>/im/NEIDMgmt
- Browser should redirect to your defined IdP for authentication
- Authentication takes place on the IdP
- The SAML assertion will be sent to the SAML SP
- User is logged in
- Logout – the user should be logged out of IM and from the IdP
Extra. Using ADFS as SAML IdP
Create SAML SP metadata-file for the ADFS IdP
The same SAML SP metadata-file created in the example above is used to give to the ADFS administrator to import.
Import the IM SAML SP metadata in your ADFS server
Open the ADFS management tool
1. Click the “Relying Party Trusts”
2. Click “Add Relying party Trust…” and choose
– Claims aware
– Import data about the relaying party from a file (choose the IM_SP file)
– Add a Display name, e.g. IM SP
– Select a policy
– Verify that the identifier is correct in the Identifiers tab
– Close guide
3. Click your newly created relying party, IM SP
4. Click “Edit Claim Issuance Policy…”
– Click “Add rule..”
– Choose “Send LDAP Attributes as Claims..”
– Configure as picture below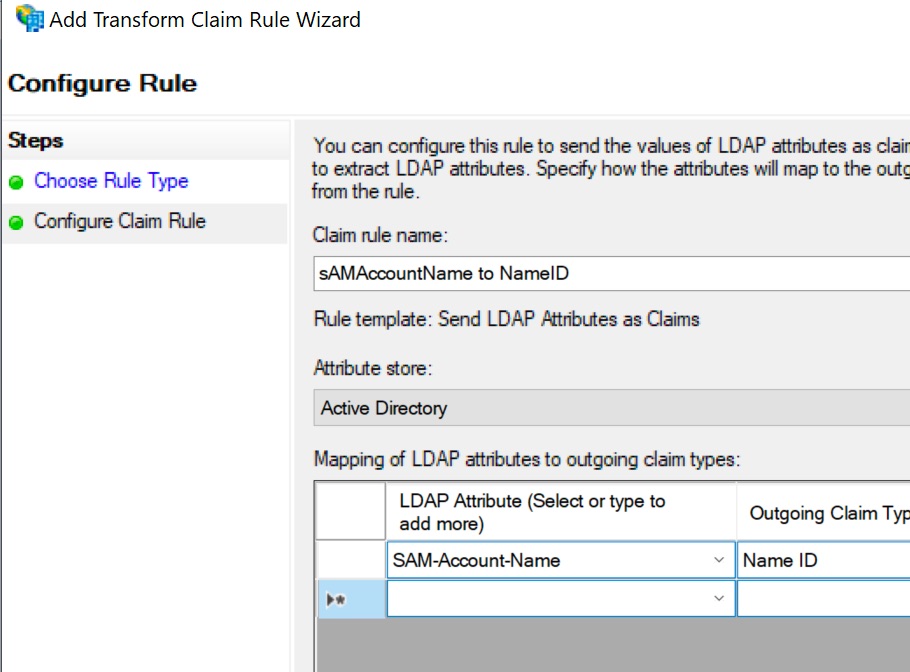
5. Open a CMD prompt and run the following powershell script as an admin
Modify IMSP below to map your configurationSet-AdfsRelyingPartyTrust -TargetIdentifier "IMSP" -SamlResponseSignature "MessageOnly"
6. Now you are done with configuring the ADFS server
Download the ADFS SAML IdP metadata and store on your IM server
To fetch ADFS IdP metadata, browse to and download the XML-file:
https://adfs_idp.company.com/FederationMetadata/2007-06/FederationMetadata.xml
Store the file in ..//PhenixID/IM/customer/config/
In the DSEditor.properties above the update the policy to look like this:
IDP_META_FILE_LOCATION=C:\\Program Files\\PhenixID\\IM/customer/config/FederationMetadata.xml
Restart Identify Manager and test to login using ADFS.
Troubleshoot using ADFS
Click the link to see a valid ADFS SAML Ticket Example. Use for example SAML tracer and compare your data with the link. In the link example we log in as user bobbyo
DISCLAIMER
Information provided in this document is for your information only. PhenixID makes no explicit or implied claims to the validity of this information. Any trademarks referenced in this document are the property of their respective owners.The origin of this information may be internal or external to PhenixID. PhenixID makes all reasonable efforts to verify this information.
PhenixID - support.phenixid.se